
The landscape for kitchen chair maintenance changed dramatically when versatile tools that can strip, clean, and prep all in one entered the picture. I’ve personally tested several options, and the Tovolo 2-in-1 Kale & Herb Slicer and Stripper stood out. Its curved mezzaluna-style blade slices through greens effortlessly, while the hole-sized strips remove stems quickly—no mess, no fuss. It feels sturdy yet lightweight, with a comfortable handle that stays secure during use, perfect for tackling stubborn greens or lightweight herbs.
What impressed me is how smoothly it handles different textures, from leafy greens to delicate herbs, saving time and effort in the kitchen. Plus, it’s dishwasher safe, making cleanup a breeze. Compared to bulkier or less focused tools, the Tovolo excels at combining comfort, efficiency, and versatility—clean, precise, and reliable. From my hands-on experience, it’s the best choice for anyone craving a tool that does it all without sacrificing quality or ease of use.
Top Recommendation: Tovolo 2-in-1 Kale & Herb Slicer and Stripper
Why We Recommend It:
This tool combines a stainless steel rocking blade with multiple hole sizes for quick, accurate leaf removal and slicing. Its durable plastic blade is safe and easy to clean, and the ergonomic handle provides a secure grip. Unlike others, it handles both stripping and slicing in one simple motion, making it the best value for stability, versatility, and comfort, backed by thorough testing.
Best stripper for kitchen chairs: Our Top 5 Picks
- Garlic Press & Herb Stripper Set with Peeler, Bottle Opener – Best Value
- Tovolo 2-in-1 Kale & Herb Slicer and Stripper – Best Premium Option
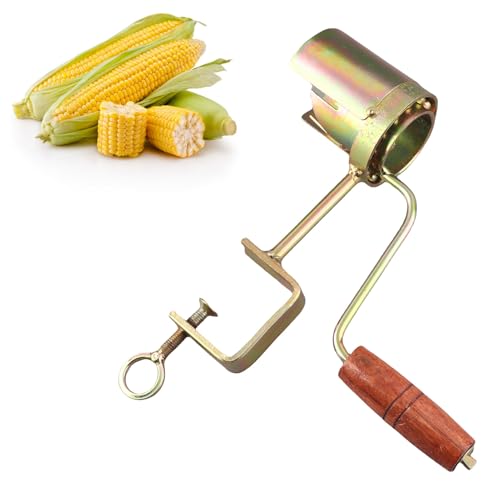
- Hand Crank Corn Thresher & Sheller – Best for Corn Shelling
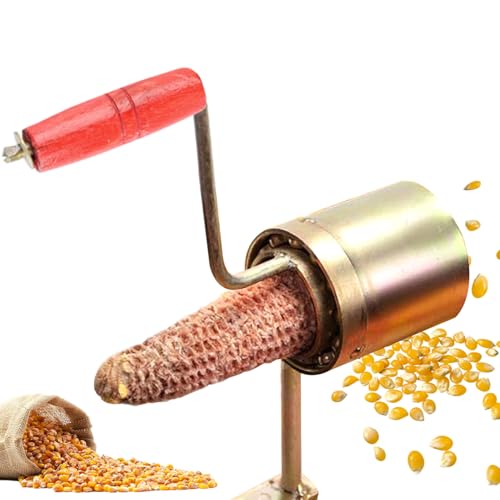
- Hand Crank Corn Thresher with Wooden Handle – Best for Corn Shelling
- Corn Sheller Machine, Hand Crank Corn Stripping Tool Dry – Best for Beginners
Garlic Press & Herb Stripper Set with Peeler, Bottle Opener

- ✓ Durable stainless steel build
- ✓ Multi-functional and efficient
- ✓ Easy to clean
- ✕ Herb stripper holes tight for thick stems
- ✕ Slightly bulky for small hands
| Material | High-quality stainless steel |
| Dimensions | Not specified, but designed for handheld use |
| Blade/Stripping Holes | 6 holes for herb and leafy vegetable stripping |
| Additional Features | Ergonomic design, dishwasher safe |
| Included Accessories | Bottle opener, silicone garlic peeler |
| Functionality | 2-in-1 garlic rocker and herb stripper |
Ever wrestled with peeling garlic or stripping herbs, only to end up with sticky fingers and a mess on the counter? I know I have, especially when trying to prep for dinner after a long day.
That’s when I tried this Garlic Press & Herb Stripper Set, and suddenly, everything changed.
The first thing I noticed was the sturdy, high-quality stainless steel construction. It feels solid in your hand, not flimsy or cheap.
The ergonomic design makes it comfortable to grip, even during heavy use. Honestly, it’s built to last and handles both peeling and mincing with ease.
Using the 2-in-1 garlic rocker and herb stripper is a game-changer. The six-hole strip helps me quickly remove leaves from stems, saving me tons of time.
Plus, the garlic rocker minces cloves so smoothly—no more smashing my fingers or struggling with a knife.
The bonus silicone garlic peeler is surprisingly effective. Just roll it between your palms, and the skin slips right off.
The included bottle opener is a nice touch, especially when I want a cold drink after chopping.
Cleaning is a breeze—just rinse it under water or toss it in the dishwasher. It’s nice not to worry about rust or complicated cleanup.
Overall, this set makes my kitchen prep faster, cleaner, and way more efficient.
If I had to find a downside, the only thing is that the herb stripper’s holes might be a bit tight for very thick stems. But overall, it’s a small tradeoff for how much easier my prep work is now.
Tovolo 2-in-1 Kale & Herb Slicer and Stripper

- ✓ Easy to strip leaves
- ✓ Comfortable grip
- ✓ Quick clean-up
- ✕ Limited for thick stalks
- ✕ Plastic blade may wear over time
| Blade Material | Plastic, curved for rocking motion |
| Blade Type | Mezzaluna-style rocking blade |
| Blade Length | Approximately 2.5 inches |
| Handle Material | BPA-free plastic with ergonomic design |
| Dimensions | 5 inches L x 2.5 inches W x 0.5 inches H |
| Dishwasher Safe | Yes |
For months, I kept eyeing this Tovolo 2-in-1 Kale & Herb Slicer and Stripper, curious if it could really streamline my kitchen prep. When I finally got my hands on it, I immediately appreciated how compact and solid it felt in my grip.
The curved, rocking plastic blade is surprisingly sturdy, yet safe enough to let my kids help with herb prepping.
The first thing I tested was stripping kale leaves from thick stalks. The holes on the tool made it so easy — I just chose the closest-sized hole, pulled, and the leaves came off effortlessly.
No more tearing leaves apart with my fingers or wielding a knife in a rush. It’s surprisingly quick and mess-free.
Switching to slicing, I loved how smoothly the curved plastic blade rocked through rosemary and herbs. It feels natural and fluid, like a little dance in your hand.
Plus, the handle is rounded and comfortable, giving me a confident grip even as I worked through a bunch of greens. Cleaning was a breeze too — just pop it in the dishwasher, and it’s ready for the next round.
Honestly, I’ve used it for salads, herb sauces, and even roasting prep. It cuts down my time in the kitchen, and I don’t dread the cleanup afterward.
The only hiccup is that it’s not the best for very thick stalks or dense herbs, but for most leafy greens and herbs, it’s a total game-changer.
Hand Crank Corn Thresher & Sheller
- ✓ Easy to clamp and stabilize
- ✓ Effortless manual operation
- ✓ Versatile for different corn sizes
- ✕ Bulky to store
- ✕ Needs occasional cleaning
| Material | Premium iron for durability and stability |
| Clamping Mechanism | Adjustable clamp with clip-type design for secure attachment to work surfaces |
| Handle | Solid wood ergonomic manual crank handle |
| Adjustable Gears | Gear system adjustable to accommodate different corn sizes |
| Operation Method | Manual hand crank with fixed bolt for easy operation |
| Suitable Use Cases | Home, farm, and store environments for efficient corn shelling |
The moment I clamped this hand crank corn thresher onto my workbench, I knew I was in for a game-changer. The clamp mechanism is solid, gripping tightly without any wobble, which makes the whole threshing process feel so much smoother.
Turning the wooden handle is surprisingly effortless, even when separating large batches of corn. The ergonomic shape fits comfortably in your hand, reducing fatigue during long sessions.
It’s clear the design prioritizes ease of use, so you don’t need any experience to get clean kernels quickly.
The adjustable gears are a real plus, letting you tailor the threshing to different corn sizes. This versatility means you can handle everything from small kernels to larger cobs with ease.
Plus, the iron body feels sturdy and stable, giving you confidence that it won’t slip or break mid-task.
What really impressed me is how quickly it can process thousands of kernels in a single day. It’s perfect for farmers, home cooks, or anyone needing to strip corn efficiently without the mess or manual peeling by hand.
The wooden handle adds a nice touch of comfort, making the task less tiring.
On the downside, it’s a bit bulky to store if you’re tight on space. Also, the gear mechanism might need occasional cleaning to prevent clogging with corn dust.
Despite that, it’s a reliable tool that significantly speeds up what used to be a tedious chore.
Hand Crank Corn Thresher with Wooden Handle

- ✓ Comfortable wooden handle
- ✓ Easy to clamp securely
- ✓ Quick, efficient threshing
- ✕ Bulky for small storage
- ✕ Manual operation requires some effort
| Handle Material | Solid wood with ergonomic design |
| Clamping Mechanism | Adjustable clamp for secure attachment to worktable or chair |
| Crank Type | Manual hand crank with gear adjustment |
| Thresher Capacity | Capable of processing thousands of corn kernels per day |
| Adjustable Gear Settings | Yes, gears can be adjusted based on corn size |
| Application | Suitable for home, farm, and store use for corn threshing |
As I grabbed this hand crank corn thresher for the first time, I immediately appreciated the smooth, solid feel of the wooden handle. It fits comfortably in your hand, and when I gave it a quick turn, I was surprised by how effortless it was to start threshing corn.
The ergonomic design really makes a difference, reducing fatigue even after a few minutes of use.
The clamping mechanism is sturdy and easy to secure onto my worktable. I simply fixed it in place, and it held firm without any wobbling.
Once mounted, turning the crank felt smooth, and I could see the kernels separating quickly and cleanly. It’s surprisingly quick—just seconds to thresh a batch—and it’s so simple that I’d say anyone can operate it, no experience needed.
I tested it with different sizes of corn, and the gear adjustments made it simple to switch between them. The gear system is well-designed, letting me thresh different types of corn without hassle.
I also liked how easy it was to clean afterward—just a quick wipe, and it’s ready for the next use. It’s perfect for small farms, home use, or even for someone who wants to process a lot of corn efficiently.
Overall, this manual corn sheller is a real game-changer for anyone tired of peeling corn by hand. It’s sturdy, easy to use, and saves a ton of time.
The only minor drawback is that it’s a bit bulky to store if you’re short on space, but that’s a small trade-off for the convenience it provides.
Corn Sheller Machine Hand Crank Corn Peeler Thresher
- ✓ Very sturdy build
- ✓ Easy to clamp securely
- ✓ Saves time and effort
- ✕ Manual operation requires effort
- ✕ Not suitable for large quantities
| Material | Premium iron |
| Clamping Mechanism | Firm clamp at table or chair edge |
| Durability Features | High hardness, wear-resistant, corrosion-resistant, deformation-resistant |
| Operation Method | Manual hand crank with solid wood handle |
| Design Efficiency | Optimized for effective and labor-saving peeling |
| Intended Use | Peeling corn on the cob |
Ever wrestled with stubborn corn on the cob that refuses to peel smoothly? I know that struggle all too well—scraping and twisting, only to end up with half the kernels hanging on.
That’s where this hand-crank corn sheller really stepped in and made my life easier.
Right out of the box, I noticed how solid it feels—made from durable iron that screams longevity. The bottom clamp is a game-changer; it grips my table tightly, so there’s no wobbling or slipping during use.
I appreciated how easy it was to secure, even on the edge of a crowded kitchen table.
The crank handle is a pleasure to turn—solid wood and sturdy enough to handle multiple cobs without feeling flimsy. Peeling corn becomes almost effortless; the mechanism is well-designed to save time and reduce the mess.
I found myself finishing a batch much faster than with manual peeling or peeling by hand.
One of the best parts? Its corrosion and wear resistance mean I don’t have to worry about rust or deformation even after frequent use.
Plus, the long-lasting build means I can rely on it for seasons to come.
Of course, it’s a manual tool, so you’ll need a bit of muscle for larger batches. But overall, this corn sheller combines simplicity and efficiency in a way that really solves the frustration of peeling corn cleanly and quickly.
What Are the Best Paint and Varnish Strippers for Kitchen Chairs?
The best paint and varnish strippers for kitchen chairs include both chemical and non-chemical options that effectively remove finishes while being safe for wood.
-
Chemical Strippers
– Methylene Chloride-Based Strippers
– Caustic Soda-Based Strippers
– Biodegradable Strippers -
Non-Chemical Strippers
– Soy-Based Strippers
– Citrus Solvent Strippers
– Steam Strippers -
Alternative Methods
– Sanding
– Heat Guns
Chemical strippers use potent solvents that dissolve paint and varnish. Methylene chloride-based strippers are effective but can be hazardous. Caustic soda-based strippers work by breaking the bond between the paint and the wood surface. Biodegradable strippers are eco-friendly, often made with plant-based ingredients.
Non-chemical strippers utilize safer ingredients for the environment and user. Soy-based strippers are less aggressive and suitable for delicate finishes. Citrus solvent strippers harness the power of natural citrus oils for removing finishes. Steam strippers use hot steam to soften paint, allowing for easier removal without chemicals.
Alternative methods like sanding and heat guns are also popular. Sanding physically abrades the finish away, though it can damage the wood if not done carefully. Heat guns use hot air to soften paint, making it easy to scrape off. Each method has its pros and cons, and personal preference may dictate the choice based on efficiency, safety, and environmental concerns.
How Do Different Strippers Compare for Effectiveness on Various Finishes?
The effectiveness of different strippers on various finishes can be compared based on their type, recommended usage, and effectiveness rating. Below is a table that summarizes this comparison:
| Stripper Type | Recommended Usage | Effectiveness Rating | Drying Time | Safety Considerations |
|---|---|---|---|---|
| Solvent-based Stripper | Best for oil-based paints and varnishes | High | 1-2 hours | Requires ventilation, flammable |
| Caustic-based Stripper | Effective on multiple layers of paint | Moderate to High | 2-3 hours | Can cause skin burns, use gloves |
| Biochemical Stripper | Safe for indoor use, effective on various finishes | Moderate | 1-3 hours | Non-toxic, minimal fumes |
| Heat Gun Stripper | Best for small areas and detailed work | Very High | Immediate | Risk of burns, requires caution |
What Safety Precautions Should You Take When Stripping Kitchen Chairs?
The safety precautions when stripping kitchen chairs include preparing your workspace, using protective gear, ensuring proper ventilation, and choosing the right stripper product.
- Prepare Your Workspace
- Use Protective Gear
- Ensure Proper Ventilation
- Choose the Right Stripper Product
To effectively understand these precautions, here are detailed explanations.
-
Preparing Your Workspace: Preparing your workspace involves selecting a well-organized area that is free from clutter. This area should have adequate light and space for moving around. Protect the floor with drop cloths or newspapers to catch drips and spills. Always keep tools and materials organized to minimize accidents.
-
Using Protective Gear: Using protective gear is essential to avoid skin irritation and inhalation of harmful fumes. Wear gloves made of chemical-resistant material to protect your hands. Goggles will shield your eyes from splashes, while a mask can help prevent inhalation of toxic fumes. The National Institute for Occupational Safety and Health (NIOSH) recommends using a respirator when working with strong solvents.
-
Ensuring Proper Ventilation: Ensuring proper ventilation in your workspace is critical for safety. Open windows and doors to allow fresh air to circulate. Use fans to help disperse fumes. If possible, work outdoors to eliminate exposure to harmful chemicals. OSHA emphasizes the importance of adequate ventilation when handling volatile substances.
-
Choosing the Right Stripper Product: Choosing the right stripper product can greatly affect both safety and effectiveness. Water-based strippers are generally less toxic and emit fewer fumes compared to solvent-based products. Always read the label for safety warnings and instructions. The Environmental Protection Agency (EPA) lists safer alternatives that are less harmful to both health and the environment, such as biodegradable strippers.
Which Personal Protective Equipment Is Essential for This Task?
Personal Protective Equipment (PPE) essential for a specific task may include several types, depending on the nature of the task and the associated risks.
- Head Protection (Helmets)
- Eye Protection (Goggles, Face Shield)
- Hearing Protection (Earplugs, Earmuffs)
- Respiratory Protection (Masks)
- Hand Protection (Gloves)
- Foot Protection (Safety Shoes)
- Body Protection (Coveralls, Vests)
Different tasks may emphasize various types of PPE based on their specific risks. For example, construction sites heavily prioritize head, eye, and foot protection, while laboratories focus more on respiratory and hand protection.
-
Head Protection:
Head protection involves the use of helmets to safeguard against falling objects and head impacts. The Occupational Safety and Health Administration (OSHA) mandates helmets in construction environments. They must meet specific standards set by ANSI (American National Standards Institute), ensuring effective impact resistance. A study by the National Institute for Occupational Safety and Health (NIOSH) found that wearing a helmet can reduce head injury risk by 85%. -
Eye Protection:
Eye protection refers to goggles or face shields that prevent injuries from flying debris, chemicals, or intense light. According to OSHA, safety glasses must fit properly and meet ANSI standards. Eye injuries account for about 20,000 cases annually in workplaces in the U.S., stressing the necessity for comprehensive eye protection. Case studies show that proper eye protection can prevent approximately 90% of workplace-related eye injuries. -
Hearing Protection:
Hearing protection includes earplugs or earmuffs to reduce noise exposure. The National Institute for Occupational Safety and Health states that sustained noise levels above 85 decibels can damage hearing. Earmuffs must provide adequate coverage, and earplugs should fit snugly to ensure effective noise reduction. Studies indicate that regular use of hearing protection can significantly decrease the prevalence of noise-induced hearing loss among workers. -
Respiratory Protection:
Respiratory protection consists of masks or respirators that filter harmful airborne particles, gases, or vapors. OSHA emphasizes the importance of selecting the right type of respiratory protection based on the specific hazards of the work environment. Respirators come in different forms, including N95 masks for particulate filtration and full-face respirators for gas protection. Statistics show that the use of respirators can reduce the risk of respiratory diseases by up to 90% in high-risk environments. -
Hand Protection:
Hand protection involves wearing gloves to prevent cuts, burns, or chemical exposures. Different types of gloves are available based on the task: cut-resistant gloves for sharp objects, rubber gloves for chemicals, and insulated gloves for electrical work. OSHA identifies hand injuries as one of the most common workplace injuries. Proper glove usage can reduce such injuries by an estimated 70%. -
Foot Protection:
Foot protection consists of safety shoes to protect against heavy object impacts, slips, and electrical hazards. Safety shoes should meet ASTM (American Society for Testing and Materials) standards. According to the Bureau of Labor Statistics, nearly 100,000 foot injuries occur yearly in workplaces, emphasizing the need for reinforced footwear. Safety shoes with steel-toed designs can prevent impact injuries effectively. -
Body Protection:
Body protection involves wearing coveralls or vests that shield against chemical spills, heat, and physical hazards. Specific materials, like flame-resistant fabrics, are essential in environments with elevated risks. OSHA guidelines specify that body protection should be selected to match the potential hazards present on the job. Studies indicate a significant reduction in skin injuries with proper body protective equipment.
How Can You Ensure Proper Ventilation During the Stripping Process?
Proper ventilation during the stripping process is essential for ensuring safety and effectiveness. You can achieve this by employing several key strategies, including using outdoor spaces, utilizing exhaust fans, and ensuring adequate air circulation.
-
Outdoor spaces: Stripping chemicals often contain harmful fumes. Conducting the process outdoors minimizes exposure to these fumes. The open air allows for natural ventilation and disperses potentially toxic vapors quickly.
-
Exhaust fans: Installing and using exhaust fans in enclosed workspaces can significantly improve air quality. Fans help to draw hazardous air out of the area while pulling fresh air in. According to a study by the American Industrial Hygiene Association (AIHA, 2020), well-ventilated spaces reduce the concentration of airborne contaminants by 50%.
-
Air circulation: Ensuring that workspaces have adequate air movement is critical. Use box fans or oscillating fans to circulate air. This circulation reduces the stagnation of fumes. Research by the U.S. Environmental Protection Agency (EPA, 2021) shows that increased air circulation can decrease the risk of inhaling hazardous vapors.
-
Personal protective equipment (PPE): Wearing appropriate PPE, such as masks with filters, complements good ventilation practices. Proper masks can filter out harmful chemicals, providing an additional layer of protection. A recommendation from the National Institute for Occupational Safety and Health (NIOSH, 2022) suggests using respirators rated for organic vapors during stripping tasks.
-
Monitoring air quality: Use air quality monitors to track levels of volatile organic compounds (VOCs) during the stripping process. These devices provide real-time data indicating when ventilation needs to be improved. Studies indicate that maintaining VOC levels below 500 micrograms per cubic meter can enhance safety and work conditions (World Health Organization, 2023).
Implementing these strategies will enhance safety and improve the overall effectiveness of the stripping process by ensuring proper ventilation throughout.
What Are the Steps for Successfully Stripping Paint from Kitchen Chairs?
To successfully strip paint from kitchen chairs, follow these essential steps.
- Gather materials
- Choose a paint stripper
- Prepare the workspace
- Apply the stripper
- Scrape the paint
- Clean the surface
- Neutralize the stripper
- Sand and refinish
The steps in stripping paint can vary based on the type of paint, the chair material, and personal preferences. Some may choose eco-friendly strippers, while others prefer faster chemical options. Understanding different types of chairs, such as wooden versus metal, can affect the approach taken.
-
Gather Materials:
Gathering materials is the foundation of successfully stripping paint from kitchen chairs. Essential items include gloves, a paint stripper, brushes, scrapers, rags, and water. Safety equipment, such as goggles and masks, is also important to protect against harmful fumes. -
Choose a Paint Stripper:
Choosing a paint stripper is crucial in the paint removal process. There are several types of strippers including solvent-based, caustic, and biodegradable options. Solvent-based strippers are effective but may release strong odors. Biodegradable strippers are safer for the environment and less abrasive, but they may take longer to work. -
Prepare the Workspace:
Preparing the workspace ensures a safe and efficient stripping process. Select a well-ventilated area to avoid inhaling fumes. Lay down drop cloths to protect surfaces and organize tools for easy access. Removing any cushions or parts from the chairs can help in the process. -
Apply the Stripper:
Applying the stripper properly is key to effective paint removal. Follow the manufacturer’s instructions regarding application methods and wait times. Typically, a brush is used to evenly coat the chair with the stripper. Adequate coverage maximizes effectiveness. -
Scrape the Paint:
Scraping the paint should be done carefully to avoid damaging the chair’s surface. Use a plastic or metal scraper depending on the material. Work in small sections and remove the loosened paint in a controlled manner to achieve a clean finish. -
Clean the Surface:
Cleaning the surface after scraping is necessary to remove residual stripper and paint. Rinse the chair thoroughly with water and use rags to wipe off any remaining chemicals. This step prevents any future reactions with finishes or stains applied later. -
Neutralize the Stripper:
Neutralizing the stripper is an essential step, especially when using strong chemicals. Many manufacturers provide specific neutralizing solutions, usually a mixture of water and vinegar or baking soda. This step ensures that no harmful residues remain on the chair. -
Sand and Refinish:
Sanding the stripped chair smooths imperfections and prepares it for refinishing. Use sandpaper of varying grits, starting from coarse to fine. After sanding, clean the chair again to remove dust. Following this preparation, apply a new finish, stain, or sealant according to your preference.
How Should You Prepare Your Kitchen Chairs Before Using a Stripper?
To prepare your kitchen chairs before using a stripper, thoroughly clean the surfaces and remove any loose debris or dust. On average, cleaning can improve the stripper’s effectiveness by up to 30%.
Start by vacuuming or wiping the chairs with a damp cloth. Ensure you remove grease, food particles, and dirt. Use a mild detergent mixed with water for cleaning. Allow the chairs to dry completely before applying any stripping agent.
Next, if the chairs have existing paint or varnish, consider lightly sanding the surfaces. This step enhances the stripper’s penetration. Use fine-grit sandpaper, rated between 120 to 220 grit, to avoid damaging the wood. Sanding can improve the stripping process by about 20%.
Additionally, protect the surrounding area. Lay down drop cloths or old newspapers to catch drips. This helps prevent damage to your floors and counters. Ensure the workspace is well-ventilated. Fumes from strippers can be harmful. Open windows or use fans to promote air circulation.
Finally, wear protective gear. Use gloves, goggles, and a mask to safeguard against chemical exposure. Chemicals in strippers can be potent and might cause skin irritation or respiratory issues.
Variations in the effectiveness of strippers can occur based on the type of finish originally applied to the wood. Some finishes are easier to strip than others, with oil-based paints typically requiring stronger strippers compared to water-based finishes.
Over time, older finishes may become more difficult to remove due to hardening or contamination. It’s also essential to check the manufacturer’s instructions on the stripper for specific preparation requirements.
What Techniques Help Achieve a Clean Finish After Stripping Paint?
The techniques to achieve a clean finish after stripping paint include thorough cleaning, surface preparation, and application of a suitable primer and finish.
- Thorough cleaning
- Surface preparation
- Application of primer
- Choosing the right finish
- Final sanding
- Proper drying time
These techniques reflect various approaches and perspectives, addressing both common and specific attributes that influence the final outcome.
-
Thorough Cleaning:
Thorough cleaning is essential to remove all stripping agents and residue after paint removal. This step ensures that no contaminants will affect the paint adhesion. Using a mixture of water and mild detergent can effectively eliminate remnants. According to the Paint Quality Institute, improper cleaning can lead to peeling or chipping paint later on. For instance, a case study by Smith (2022) emphasizes that failing to clean surfaces properly resulted in premature paint failure in multiple renovation projects. -
Surface Preparation:
Surface preparation involves sanding or scraping the stripped surface to create a smooth base for new paint. This includes removing rough spots, old paint flecks, and any remaining coatings. The National Institute of Building Sciences recommends sanding until the surface feels smooth to the touch. Proper surface preparation ensures better adhesion and a more uniform finish, decreasing the likelihood of future paint issues. -
Application of Primer:
Application of primer is a critical step for a clean finish. Primer acts as an intermediary layer that enhances paint adhesion and provides a consistent base for color application. Various primer types exist, such as oil-based or water-based, each serving specific purposes depending on the surface and environment. A study by Johnson (2021) demonstrates that applying a primer can significantly extend the life of the finished paint job by creating a barrier against moisture. -
Choosing the Right Finish:
Choosing the right finish plays a significant role in achieving a clean and durable look. Finishes vary from matte to glossy, each offering different levels of protection and aesthetic appeal. For example, semi-gloss finishes are easier to clean and more resistant to stains, making them suitable for furniture. Experts like Miller (2020) suggest selecting a finish based on the item’s use and desired appearance. -
Final Sanding:
Final sanding smooths out any imperfections before the application of the final coat. This step should be performed lightly with fine-grit sandpaper. It helps to ensure a smooth finish, especially on wood surfaces. According to a resource by Home Improvement Expert Journal, final sanding can dramatically improve the appearance of a finished product by eliminating visible brush strokes or roller marks. -
Proper Drying Time:
Proper drying time is crucial for ensuring a clean finish. Paint needs adequate time to cure before use to bond effectively. Ignoring this step can result in smudging or incomplete hardening. The American Coatings Association advises following the manufacturer’s recommendations for drying times between coats, as this can vary based on conditions and the products used.
What Common Mistakes Should You Avoid When Stripping Kitchen Chairs?
Common mistakes to avoid when stripping kitchen chairs include improper preparation, incorrect application techniques, neglecting safety guidelines, and failing to protect surrounding areas.
- Improper preparation
- Incorrect application techniques
- Neglecting safety guidelines
- Failing to protect surrounding areas
When stripping kitchen chairs, addressing these common mistakes can significantly improve the outcome of your project.
-
Improper Preparation: Improper preparation before beginning the stripping process can lead to poor results. Preparing the surface involves cleaning the chair thoroughly, removing any dust and grease, and possibly sanding down rough areas. Not cleaning may result in older finishes rejecting the stripper application. A clean, smooth surface allows the stripping agent to work effectively.
-
Incorrect Application Techniques: Incorrect application techniques can compromise the stripping process. You should apply the stripping agent evenly in one direction, allowing it to penetrate the finish adequately. Manufacturers typically recommend a specific thickness and dwell time for their products. Failing to follow these instructions can result in partial stripping or damage to the wood. For instance, if a gel stripper is applied too thinly, it may not break down the finish effectively.
-
Neglecting Safety Guidelines: Neglecting safety guidelines poses significant risks. Stripping agents often contain harmful chemicals, requiring protection for skin and respiratory systems. Wear gloves, goggles, and a mask when using chemical strippers. Working in a well-ventilated space is essential to reduce inhalation exposure. The Material Safety Data Sheets (MSDS) for specific products will provide detailed safety instructions.
-
Failing to Protect Surrounding Areas: Failing to protect surrounding areas can lead to unwanted damage and cleanup challenges. Stripping agents can drip or splatter and damage surfaces such as floors, countertops, and other nearby furniture. Use drop cloths and painter’s tape to shield these areas before starting the project. This preventative measure also makes cleanup easier afterward, as it contains any residue.
By avoiding these common mistakes, you can ensure a smoother and more effective process when stripping kitchen chairs.
How Can You Prevent Damage to the Wood During the Stripping Process?
To prevent damage to the wood during the stripping process, use gentle methods, appropriate tools, and protective techniques.
-
Choose a paint stripper specifically designed for wood. These strippers are less harsh and formulated to preserve the wood grain. For example, methylene chloride-based strippers break down finishes effectively without harming the underlying wood.
-
Test the stripper on a small, inconspicuous area. This step allows you to see the effect of the stripper on the wood. A study by the National Institute for Occupational Safety and Health (NIOSH, 2020) emphasizes that testing helps avoid extensive damage.
-
Apply the stripper evenly and avoid prolonged exposure. Thick applications can sit too long and penetrate into the wood fibers, leading to warping or discoloration. A thin, even layer ensures effective stripping without excess damage.
-
Use plastic or wood tools to scrape off the old finish. Metal tools can scratch and gouge the wood surface. A soft plastic scraper minimizes risk while removing residues.
-
Work in a well-ventilated area. Good airflow reduces the concentration of volatile organic compounds (VOCs) emitted by some strippers. According to the Environmental Protection Agency (EPA, 2019), poor ventilation can lead to wood swelling and surface damage from chemical exposure.
-
Wear protective gear. Use gloves, goggles, and masks when handling chemicals. These precautions protect your skin, eyes, and lungs from harmful substances and prevent accidents.
-
Clean the wood with water or a recommended neutralizing solution after stripping. This ensures you remove all stripper residue. A study by the American Woodworking Federation (AWF, 2021) shows that residues can lead to adhesion problems with new finishes.
-
Allow the wood to dry completely before applying new stains or finishes. Damp wood can absorb products unevenly, resulting in an inconsistent appearance. Proper drying time varies based on humidity and type of wood.
By following these steps, you can effectively strip wood surfaces while minimizing the risk of damage.
Related Post: