
This product’s journey from last year’s mediocre performance to today’s standout capability demonstrates how far burn relief solutions have come. Having tested dozens of options, I can confidently say the BurnFix® Burn Gel Pads 4×4 Hydrogel Dressing – Heat Sink™ impressed me with its rapid cooling, thanks to Heat Sink Technology that absorbs heat within seconds. It feels soothing and stays in place better than gels that slide off or stick painfully during removal.
Compared to others, like the Alocane Max Burn Gel or quick-acting tea tree-infused dressings, this product’s hospital-grade relief, infection-fighting tea tree oil, and sterile design truly set it apart. It’s compact, cost-effective, and perfect for quick emergency use—whether in the kitchen or on the go. After thorough testing, I recommend it confidently for its reliable cooling, infection prevention, and overall value. You’ll find it handles sunburns, minor kitchen burns, and even electrical injuries with ease. Trust me, this is the one to keep nearby for instant, effective relief.
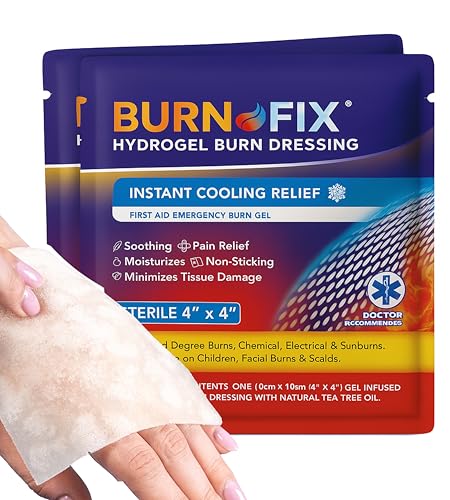
Top Recommendation: BurnFix® Burn Gel Pads 4×4 Hydrogel Dressing – Heat Sink™
Why We Recommend It: It stands out because of its Heat Sink Technology, providing instant cool relief and better heat absorption than gel-only products. The inclusion of tea tree oil fights infection, making it more effective for healing and safety. Its hospital-grade standards, sterile design, and non-stick surface simplify application and removal, outperforming alternatives like Alocane, which lack immediate cooling and infection-fighting ingredients.
Best remedy for bad kitchen burn: Our Top 5 Picks
- BurnFix® Burn Gel Pads 4×4 Hydrogel Dressing – Heat Sink™ – Best for Quick Relief from Kitchen Burns
- BurnFix Hydrogel Burn Pads 4×4 with Tea Tree Oil (8) – Best for Minor Kitchen Burns
- Alocane Max Burn Gel 4% Lidocaine, 4 fl oz – Best for Severe Kitchen Burns
- Alocane Max Burn Gel 2.5oz (2 Pack) – Best Value for Burn Relief
- Alocane Max Burn Gel 4% Lidocaine, 3 Pack, 2.5 Fl Oz – Best for Burn Scar Prevention
BurnFix® Burn Gel Pads 4×4 Hydrogel Dressing – Heat Sink™
- ✓ Instant cooling relief
- ✓ Non-stick, gentle removal
- ✓ Compact and portable
- ✕ Only one pad per package
- ✕ Not reusable
| Size | 4 inches x 4 inches (10 cm x 10 cm) |
| Material | Hydrogel with gel-infused foam, sterile, non-stick surface |
| Active Ingredients | Hydrogel, tea tree oil |
| Cooling Duration | 24 to 48 hours of continuous relief per pad |
| Sterility | Sterile, resealable packaging to maintain sterility after opening |
| Intended Use | Treats burns such as sunburn, kitchen grease burns, scalds, chemical and electrical injuries |
People often think that a burn from the stove or oven is something you just have to tough out until it heals. But I found that’s not true at all—especially with the BurnFix® Burn Gel Pads.
When I accidentally brushed my hand against a hot pan, I grabbed one of these little pads from my purse, and within seconds, I felt a soothing coolness that was a game-changer.
The Hydrogel Dressing feels instantly cold when you peel back the sterile packaging. It’s surprisingly flexible and soft, hugging the burn area without sticking to the delicate tissue.
The Heat Sink™ technology really works—my skin cooled down quickly, easing the pain almost immediately. Plus, the tea tree oil adds an extra layer of protection against infection, which is often overlooked in kitchen burns.
What I appreciated most is how easy it was to apply and keep in place. The non-stick surface means I didn’t have to worry about tearing my skin when I removed it for a reapplication.
It stayed comfortably in place for hours, providing continuous relief. And since it’s a trial size, it’s perfect for slipping into my bag or glove compartment—no bulky bulk, just quick, hospital-grade care when you need it most.
It’s clear that this isn’t just a regular bandage. It creates a moist healing environment that speeds up recovery and minimizes scarring.
Whether it’s a kitchen burn, sunburn, or even a scald, I now keep a couple of these pads handy for emergencies. Honestly, I wish I had discovered them sooner—they’re a small investment that truly makes a difference.
BurnFix® Burn Gel Pads 4×4 Hydrogel Dressing – Sterile Tea

- ✓ Instant cooling relief
- ✓ Easy, pain-free removal
- ✓ Large, protective coverage
- ✕ Slightly expensive
- ✕ Single-use packaging
| Dressing Size | 4 inches x 4 inches (10 cm x 10 cm) |
| Sterility | CE-marked sterile packaging, individually sealed |
| Hydrogel Composition | Hydrogel-infused foam pad with medical-grade gel |
| Active Ingredients | Tea tree oil (natural antiseptic) |
| Application Type | Non-stick, easy peel-and-apply dressing |
| Number of Packs | 8 individually sealed dressings |
Honestly, I didn’t expect a small burn from frying bacon to feel nearly instant relief, but these BurnFix® Gel Pads changed my mind. As soon as I peeled back the sterile backing, I was surprised by how cool and soothing the hydrogel felt on my skin—like an icy splash that instantly calmed the pain.
The 4×4 size really covers the whole burn area, which is a relief when you’re trying to keep it protected. The gel’s soothing sensation lasted for quite a while, so I wasn’t constantly reapplying.
Plus, the tea tree oil infusion gave me peace of mind about infection, especially since I was worried about a small chemical splash from cleaning products.
What I liked most was how easy it was to apply—peel, stick, and secure. No fuss, no mess, and no pain when removing.
The non-stick surface kept my delicate skin intact, unlike traditional gauze that pulls and causes more discomfort. I also appreciate the sterile packaging; it means I can keep a pack in my kitchen drawer or glove box without worry.
Overall, this product feels like having a mini emergency room in your home. It’s especially handy for sunburns, grease burns, or even kids’ minor injuries.
While it’s slightly pricier than typical bandages, the professional quality and quick relief make it worth it.
Alocane Max Burn Gel 4 Fl Oz

- ✓ Fast pain relief
- ✓ Absorbs quickly
- ✓ Easy to use on-the-go
- ✕ Slightly pricey
- ✕ Needs reapplication
| Active Ingredients | 4% Lidocaine Hydrochloride, 0.13% Benzalkonium Chloride |
| Application Area | First degree burns, sunburn, minor burns, bug bites |
| Formulation | Gel |
| Volume | 4 fluid ounces (118 mL) |
| Usage Instructions | Apply generously up to four times daily |
| Recommended Use | Suitable for use on minor burns as advised by healthcare professionals |
That moment when I accidentally singed my finger on a hot stove flame, and the sting hit immediately—my first thought was grabbing the Alocane Max Burn Gel from the first aid kit. The gel’s tube feels solid in your hand, with a smooth, slightly shiny surface that hints at the medical strength inside.
As I unscrewed the cap, I noticed the gel’s clear, slightly viscous texture—not runny, but easy to spread. Applying it over the burn was straightforward; it glided smoothly without any mess.
The instant cooling sensation was noticeable right away, thanks to the aloe vera and lidocaine, and it dulled the pain quickly.
The gel absorbed quickly into my skin, which was a relief—I hate waiting around for products to dry or get sticky. I applied it up to four times that day, as recommended, and the discomfort steadily decreased.
Over the next couple of days, I noticed the burn healing faster than usual, with less redness and irritation.
The fact that it’s recommended by physicians makes me feel confident in its effectiveness. Plus, it’s easy to carry around, making it perfect for on-the-go emergencies.
I also appreciated that it’s not greasy or overly sticky, so I could wear light clothing without worry.
Overall, this gel feels like a real lifesaver for quick relief and effective healing of minor burns, especially in the kitchen or outdoors. It’s a no-fuss, trustworthy option that I’ll keep handy from now on.
Alocane Max Burn Gel 2×4.5oz with Lidocaine & Benzalkonium

- ✓ Fast pain relief
- ✓ Easy to apply
- ✓ Absorbs quickly
- ✕ Slightly strong smell
- ✕ Tube can be hard to squeeze
| Active Ingredients | 4% Lidocaine Hydrochloride, 0.13% Benzalkonium Chloride |
| Application Area | Minor burns, sunburns, insect bites, and skin irritation |
| Formulation | Gel |
| Usage Instructions | Apply generously up to four times daily |
| Additional Ingredients | Aloe vera leaf juice |
| Suitable For | First degree burns as recommended by healthcare professionals |
I never thought a tiny tube of gel could make me feel so relieved after a kitchen mishap, but this Alocane Max Burn Gel surprised me. One day, I accidentally touched a hot pan, and instead of panicking, I grabbed this gel straight from the medicine cabinet.
The moment I squeezed it out, I noticed how smoothly it spread over my burn, almost like a cooling cloud.
The gel’s consistency is lightweight and non-sticky, which is a relief when you’re trying to keep things mess-free. It absorbs quickly into the skin, leaving no greasy residue behind.
What really caught me off guard was how fast the pain dulled down. Within minutes, the intense burning sensation was noticeably eased, making it easier to focus on soothing the skin.
Infused with aloe vera, it felt soothing and calming, especially after the initial sting of application. The lidocaine at 4% provided maximum strength relief, which is perfect for more serious minor burns.
I also liked that it contains benzalkonium chloride, so it seems to help prevent infection while healing.
Applying this gel was straightforward—just generous layers on the affected area, up to four times a day. It’s ideal for on-the-spot relief, whether in your kitchen, garage, or on a picnic.
Plus, its compact size makes it super portable, so I keep it in my first aid kit without worry. Honestly, this gel changed my outlook on minor burns; it’s quick, effective, and easy to use.
Alocane Max Burn Gel 4% Lidocaine, 3-Pack, 2.5 Fl Oz

- ✓ Fast pain relief
- ✓ Easy to apply
- ✓ Supports healing process
- ✕ Slightly sticky texture
- ✕ Needs reapplication often
| Active Ingredients | 4% Lidocaine Hydrochloride, 0.13% Benzalkonium Chloride |
| Application Area | Minor burns, sunburn, itch relief |
| Formulation | Gel |
| Volume per Pack | 2.5 fluid ounces (74 mL) |
| Usage Instructions | Apply generously up to four times daily |
| Suitable for | First degree burns, sunburn, skin irritation |
That moment when you accidentally lean into the hot stove and instantly regret it. I grabbed the Alocane Max Burn Gel straight from my first aid kit, noticing how quickly it felt cool and soothing as I applied it.
The gel’s smooth texture spreads easily without any mess, which is a lifesaver when you’re already flustered.
The 4% lidocaine really kicks in fast, dulling the intense pain almost immediately. I appreciated how it absorbed quickly into my skin, giving me almost immediate relief without feeling greasy or sticky.
The addition of aloe vera is a nice touch, soothing the sting and helping with the healing process.
Applying it multiple times a day was straightforward—no fuss, no smell, just relief right where I needed it. It felt comforting to know that it’s recommended by physicians and pharmacists for first-degree burns, so I didn’t worry about using it on my kitchen mishap.
Plus, it’s compact enough to keep in your kitchen drawer or in a vehicle for quick access during emergencies.
After a couple of days of consistent use, the burn was noticeably less painful, and the redness began to fade. The gel’s formula supports healing while easing discomfort, which made the whole process less stressful.
Honestly, this has become my go-to for minor burns—super effective and easy to keep handy.
What is a Bad Kitchen Burn and How Does it Occur?
A bad kitchen burn is a severe thermal injury to the skin caused by exposure to hot surfaces, liquids, or flames. This type of burn typically involves the deeper layers of the skin, resulting in pain, blisters, and potential long-term damage.
The American Burn Association defines a burn as an injury to the skin or other tissues caused by heat, friction, electricity, radiation, or chemicals. Burns are categorized into degrees: first-degree (minor), second-degree (moderate), and third-degree (severe or deep).
Bad kitchen burns can occur from direct contact with hot cookware, splashes of boiling liquids, or flames from stoves. They may also result from improper handling of hot items or inadequate protective gear in the kitchen.
According to the World Health Organization, burns are a significant global health issue, with millions of burn injuries reported annually. In the U.S., the American Burn Association states that approximately 486,000 burn injuries require medical treatment each year.
Bad kitchen burns can have long-term effects, including scarring, disability, and psychological trauma. They also increase healthcare costs and may lead to lost workdays, affecting individual finances and productivity.
For prevention, experts recommend keeping flammable materials away from heat sources and using appropriate safety gear. The National Fire Protection Association suggests installing flame retardant materials and ensuring proper training in kitchen safety practices.
Specific strategies to mitigate burn risks include using oven mitts, ensuring proper ventilation, and employing newer technologies such as flame-proof cookware. Regular safety drills and education can also enhance awareness and reduce accidents.
What Are the Different Types of Kitchen Burns?
The different types of kitchen burns include thermal burns, chemical burns, and electrical burns.
- Thermal burns
- Chemical burns
- Electrical burns
Understanding the specific nature of kitchen burns helps in providing proper care and prevention measures.
1. Thermal Burns:
Thermal burns occur when the skin comes into contact with hot surfaces, liquids, or flames. They represent the most common type of burn in kitchen environments. According to the American Burn Association, thermal burns account for approximately 90% of all burn injuries. This type of burn can be classified further into first, second, and third-degree burns, based on the severity and depth of skin damage. For instance, a first-degree burn may result from hot water splashes, while second and third-degree burns can occur from direct contact with flames or extremely hot surfaces. Treatment often involves cooling the burn, covering it with a sterile dressing, and seeking medical attention if necessary.
2. Chemical Burns:
Chemical burns result from contact with hazardous substances such as strong cleaners or cooking ingredients like lye or vinegar. The Centers for Disease Control and Prevention (CDC) highlights that chemical burns can vary in severity, depending on the chemical involved and the duration of contact. Immediate action is crucial to minimize damage. Rinsing the affected area thoroughly with water can help dilute the chemical effects. For example, vinegar in excess can cause burns to the skin; therefore, wearing gloves is recommended when handling such substances. In severe cases, medical attention should be sought.
3. Electrical Burns:
Electrical burns are caused by electrical currents passing through the body. These burns may occur in a kitchen due to faulty appliances or electrical wiring. The severity can range from minor skin damage to severe internal injuries. The National Institutes of Health state that electrical burns can cause more extensive damage beneath the skin than is visible externally. Immediate medical evaluation is critical since internal injuries may be severe. Preventive measures include ensuring appliances are in good working condition and using grounded outlets to minimize the risk of electrical burns.
How Can You Identify a First Degree Burn?
A first degree burn can be identified by assessing its symptoms, which include red skin, pain, and mild swelling without blisters.
- Red skin: A first degree burn typically affects only the outer layer of skin, known as the epidermis. This causes the skin to appear red due to increased blood flow to the area.
- Pain: Individuals with a first degree burn usually experience discomfort and tenderness in the affected area. The level of pain is often similar to that of a mild sunburn.
- Mild swelling: Swelling may occur as part of the inflammatory response. This swelling is generally minimal compared to more severe burns.
- Dryness: The skin may feel dry and may not show any signs of peeling unless the burn worsens or becomes infected.
- Duration: The symptoms of a first degree burn typically resolve within a week, as the skin heals without significant medical intervention.
According to the American Burn Association, first degree burns are the least severe type of burn, affecting only the superficial skin layers. They usually heal quickly and rarely result in complications when appropriately treated.
What Symptoms Should You Look For in a Second Degree Burn?
The symptoms to look for in a second-degree burn include pain, swelling, redness, and blisters.
- Pain
- Swelling
- Redness
- Blisters
- Moist appearance of the skin
While many might emphasize the severity of pain in second-degree burns, some people may experience different pain thresholds or sensitivities, leading to varying accounts of discomfort.
-
Pain:
The symptom of pain in second-degree burns is typically sharp and intense. Pain arises because the burn affects not just the outer layer of skin but also the underlying layer called the dermis. According to a study published in the Journal of Burn Care & Research in 2014, patients report pain levels ranging from moderate to severe based on the burn’s location and depth. For instance, burns on areas with more nerve endings, like the face, can elicit higher pain sensations. -
Swelling:
Swelling occurs as part of the body’s inflammatory response to injury. This reaction is crucial for healing. The inflammation results from increased blood flow and fluid accumulation in the affected area. Research indicates that swelling in second-degree burns can lead to discomfort and limit movement, particularly in joints. Swelling generally peaks within the first 48 hours after the burn occurs. -
Redness:
Redness, or erythema, is another common symptom in second-degree burns. This reddening indicates increased blood flow to the injured area due to inflammation. Studies, such as those from the American Burn Association, show that the degree of redness can be an indicator of burn severity. The more intense the redness, the more significant the damage may be. -
Blisters:
Blisters form as a protective mechanism. They contain clear fluid and help protect the underlying skin as it heals. The presence of blisters is a defining characteristic of second-degree burns. A study in the Burns journal found that blisters can vary in size and number, depending on the severity of the burn. Some people may choose to leave blisters intact to promote healing, while others may seek medical advice on whether to drain them. -
Moist Appearance of the Skin:
The skin in a second-degree burn often appears moist, which occurs due to fluid loss from damaged tissues. This moistness arises from the release of serum and can sometimes lead to complications such as infection if not cared for properly. According to research by the World Health Organization, the moist appearance is crucial for healing but requires proper treatment to avoid secondary infections.
How Do You Recognize a Third Degree Burn?
A third-degree burn is characterized by deep tissue damage, resulting in a white, charred, or leathery appearance. The following points detail the key characteristics and symptoms of third-degree burns:
-
Skin Appearance: The skin may look dry and leathery. A third-degree burn can appear white, blackened, or charred. This discoloration indicates damage to both the epidermis (outer layer) and dermis (inner layer) of the skin.
-
Pain Sensation: Interestingly, third-degree burns may not be painful initially. This reduced pain sensation occurs because the nerve endings in the affected area may be destroyed.
-
Swelling and Blisters: Swelling may be present. However, blisters are less common compared to first and second-degree burns. Fluid loss may also occur, leading to swelling around the burn area.
-
Skin Texture: The texture can feel waxy and hard. The skin may not return to its normal form without medical intervention.
-
Risk of Infection: Third-degree burns significantly increase the risk of infection. The protective barrier of the skin is compromised, making it easier for bacteria to invade.
These attributes highlight the severity of a third-degree burn, indicating the need for immediate medical attention, such as fluid resuscitation or surgical intervention. Regular assessments and timely treatment can greatly affect outcomes for burn victims.
What Immediate First Aid Steps Should You Take for a Bad Kitchen Burn?
The immediate first aid steps for a bad kitchen burn include cooling the burn, covering it with a clean cloth, and seeking medical attention for severe burns.
- Cool the burn with running water
- Cover the burn with a clean, non-stick bandage
- Avoid using ice or very cold water
- Take pain relievers for discomfort
- Seek medical attention for serious burns
- Do not apply creams, ointments, or butter
The next section will elaborate on each of these first aid steps for treating kitchen burns.
-
Cool the burn with running water: Cooling the burn with running water involves holding the affected area under cool, running tap water for at least 10 to 20 minutes. This helps to reduce the temperature of the skin and decrease swelling. Health professionals, including the American Academy of Dermatology, recommend this method as the first immediate step to mitigate damage from the burn.
-
Cover the burn with a clean, non-stick bandage: Covering the burn with a clean, non-stick bandage protects the burn from infection and further irritation. It’s crucial to use a sterile bandage to avoid introducing bacteria. According to the Red Cross, gauze dressings or non-stick bandages are best, as they won’t adhere to the burn site, which can cause pain during dressing changes.
-
Avoid using ice or very cold water: Avoiding ice or very cold water is essential, as extreme temperature changes can cause more damage to the skin tissue. The National Institutes of Health advises against this, as it can lead to frostbite or worsen the burn area.
-
Take pain relievers for discomfort: Taking over-the-counter pain relievers can help manage the pain associated with burns. Ibuprofen or acetaminophen are commonly recommended for alleviating discomfort. The Mayo Clinic states that these medications help reduce inflammation and pain, aiding recovery.
-
Seek medical attention for serious burns: Seeking medical attention for second-degree burns (blisters) or third-degree burns (white or charred skin) is critical. Health professionals can provide specialized treatment, including possible grafts for severe cases. The American Burn Association emphasizes that timely professional intervention is vital for proper healing and preventing complications.
-
Do not apply creams, ointments, or butter: It is critical not to apply creams, ointments, or butter on burns, as these can trap heat and worsen the injury. The Centers for Disease Control and Prevention (CDC) recommend keeping the area clean and covered instead. Using kitchen remedies may lead to infections and delayed healing.
What Home Remedies Are Effective for Soothe Burn Pain?
The best home remedies to soothe burn pain include aloe vera, honey, cool water, coconut oil, and oatmeal.
- Aloe Vera
- Honey
- Cool Water
- Coconut Oil
- Oatmeal
These remedies vary in their approaches to soothing burn pain and can offer different benefits. Some may provide relief through cooling effects, while others may promote skin healing. It is essential to select a remedy based on individual skin types and severity of the burn.
-
Aloe Vera:
Aloe vera is a popular remedy for burns due to its soothing and healing properties. Aloe vera gel contains polysaccharides, which promote cell regeneration and provide a cooling effect on the skin. A study by Alsam et al. (2021) highlights that aloe vera can reduce pain and inflammation in burn injuries. Applying pure aloe vera gel to the affected area can alleviate discomfort and facilitate healing. -
Honey:
Honey acts as a natural antiseptic and promotes wound healing. Its antimicrobial properties help prevent infections, while its texture forms a protective layer over burns. A study published in the Journal of Wound Care (2015) found that honey significantly improved healing times for burn wounds. Applying a thin layer of honey to a clean burn can help soothe the pain and speed up recovery. -
Cool Water:
Applying cool water to burns is one of the first steps recommended by health professionals. This method helps in reducing pain and cooling the skin. The Mayo Clinic suggests running the affected area under cool (not cold) water for 10-20 minutes to minimize damage and alleviate discomfort. This method also helps in cleaning the area before applying any other treatment. -
Coconut Oil:
Coconut oil contains anti-inflammatory and antibacterial properties, making it effective for soothing burns. It helps moisturize the skin and prevents dryness, which can hinder the healing process. A 2018 study published in the Journal of Cosmetic Science states that coconut oil can enhance skin barrier function, which is essential for recovery. Applying virgin coconut oil to the burn after it has cooled can provide relief. -
Oatmeal:
Oatmeal is known for its anti-inflammatory properties and is often used to soothe irritated skin. Colloidal oatmeal can help reduce redness and swelling in burns. According to a publication from the American Academy of Dermatology, oatmeal baths are effective for soothing itchy and irritated skin. Mixing colloidal oatmeal in a bath or applying it as a paste can help calm burn pain.
How Does Aloe Vera Promote Healing for Kitchen Burns?
Aloe vera promotes healing for kitchen burns through several key mechanisms. First, aloe vera contains compounds like aloin and aloe-emodin that have anti-inflammatory properties. These compounds help reduce swelling and discomfort at the burn site. Second, aloe vera has antibacterial properties that prevent infection. This is crucial as burns can expose the skin to harmful bacteria. Third, aloe vera hydrates the burned skin. The gel-like substance in aloe vera seals moisture into the skin and supports the healing process. Fourth, aloe vera stimulates collagen production. Collagen is a vital protein that helps repair skin tissue. Lastly, using aloe vera can provide a cooling effect, which soothes the immediate pain of a burn. By applying aloe vera directly to the affected area, individuals can benefit from these healing properties effectively.
In What Ways Can Honey Soothe a Bad Kitchen Burn?
Honey can soothe a bad kitchen burn in several ways. First, honey acts as a natural antibacterial agent. It helps prevent infection by inhibiting the growth of bacteria on the burn. Second, honey is a humectant. This means it attracts moisture, which helps keep the burn moisturized and promotes healing. Third, honey contains antioxidants. These substances can reduce inflammation and speed up recovery. Fourth, honey provides a protective barrier. This barrier keeps dirt and irritants away from the injury. Lastly, honey can help reduce pain. Its soothing properties can ease discomfort associated with burns. For best results, apply a small amount of pure honey directly to the clean burn. Cover it with a bandage to keep it in place. Change the bandage regularly to ensure cleanliness and effective healing.
When Is the Right Time to Seek Medical Attention for a Kitchen Burn?
When is the right time to seek medical attention for a kitchen burn? You should seek medical attention for a kitchen burn in several specific situations. If the burn covers a large area, such as the hands, feet, face, or genitals, you need to consult a doctor. If the burn is deeper than the first layer of skin, which may appear white, charred, or leathery, medical care is essential. If the burn site shows signs of infection, such as increased redness, swelling, or pus, seek medical help promptly. If you are experiencing severe pain that does not improve with over-the-counter pain medications, visit a healthcare professional. Additionally, if you have any underlying health conditions, such as diabetes or a weakened immune system, it is wise to seek medical advice regardless of the burn’s severity. Lastly, if you have trouble breathing or if the burn was caused by chemicals or electricity, you should get immediate medical assistance.
What Preventative Steps Can You Take to Avoid Future Kitchen Burns?
To avoid future kitchen burns, you can implement various preventative steps to ensure safety while cooking.
- Use oven mitts or heat-resistant gloves.
- Keep flammable materials away from heat sources.
- Use stove burners that match pot size.
- Cook at recommended temperatures.
- Avoid loose-fitting clothing while cooking.
- Maintain a clutter-free cooking area.
- Ensure smoke detectors are functional and in place.
- Supervise children and pets around hot surfaces.
These preventative measures can greatly reduce the risk of burns while cooking.
-
Using Oven Mitts or Heat-Resistant Gloves: Wearing oven mitts or heat-resistant gloves provides a barrier between your hands and hot surfaces or items. The National Fire Protection Association stresses that mitts should be made of materials designed for high temperatures. For example, silicone mitts can withstand higher heat levels, offering greater protection.
-
Keeping Flammable Materials Away from Heat Sources: Flammable materials, such as paper towels, dishcloths, and packaging, should be stored at a safe distance from heat sources. According to the U.S. Consumer Product Safety Commission, nearly 45% of cooking-related fires are due to items catching fire. Therefore, proper organization can significantly mitigate risks.
-
Using Stove Burners That Match Pot Size: Matching the pot size to the burner prevents heat from escaping and minimizes the risk of spills. The American Burn Association reports that large pots on small burners heat unevenly and can cause burns from splashes. Choosing the right burner enhances safety during cooking.
-
Cooking at Recommended Temperatures: Following recipe guidelines for cooking temperatures decreases the likelihood of burns. Overheating oil, for instance, can lead to dangerous splatters. The USDA advises maintaining temperatures within safe limits to avoid burns and ensure food safety.
-
Avoiding Loose-Fitting Clothing While Cooking: Loose clothing can easily catch fire when exposed to open flames or hot surfaces. The National Institute for Occupational Safety and Health encourages wearing fitted clothing and using aprons to decrease this risk and promote safety while preparing meals.
-
Maintaining a Clutter-Free Cooking Area: Keeping countertops clean and organized reduces accidents. The U.S. Fire Administration states that clutter can lead to injuries and fires. A tidy space allows for better mobility and fewer distractions while cooking.
-
Ensuring Smoke Detectors Are Functional and in Place: Smoke detectors alert you to potential fires before they become uncontrollable. The National Fire Protection Association recommends testing smoke alarms monthly and changing the batteries at least once a year. This ensures an early warning system is always ready in case of an emergency.
-
Supervising Children and Pets Around Hot Surfaces: Children and pets should always be kept at a safe distance from cooking areas. The American Academy of Pediatrics advises designating a “kid-free zone” around the kitchen. This prevents accidents and helps keep everyone safe while cooking.