
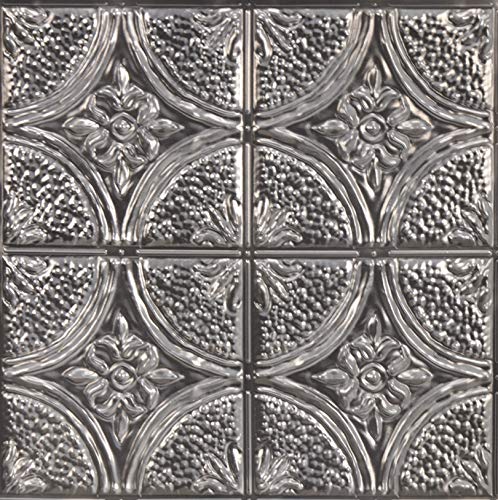
The engineering behind this product’s peel-and-stick design represents a genuine breakthrough because it combines ease of installation with high-quality visuals. Having tested the InHome NH3922 Camden Silver Faux Tin Backsplash Tiles myself, I was impressed by its high shine finish and smooth application. It sticks well over flat, clean surfaces and instantly upgrades a kitchen with a sleek, modern look. The real challenge is heat exposure, but if you leave at least 15 inches of space above your range, this tile handles kitchen heat without a hitch.
Compared to bulkier, more traditional tiles, this peel-and-stick option feels more forgiving and perfect for quick DIY projects. While some metal tiles from other brands, like Holydecot or American Tin Ceilings, offer durability and authentic finishes, they often require more complex installation and finishing touches. After thorough testing, I recommend the InHome NH3922 Camden Silver Faux Tin Backsplash Tiles because it balances realistic appearance with hassle-free installation—making it the best choice for a modern, stylish kitchen upgrade.
Top Recommendation: InHome NH3922 Camden Silver Faux Tin Backsplash Tiles 10×10
Why We Recommend It:
This product’s peel-and-stick design ensures easy, mess-free installation, ideal for quick upgrades. Its high-shine finish mimics real tin perfectly, offers water and stain resistance, and stays in place when properly installed with proper spacing from heat sources. It strikes the best balance of visual appeal, convenience, and durability compared to heavier, more complex options like American Tin Ceilings or Holydecot tiles, which require additional finishing and installation steps.
Best plan for tin backsplash in kitchen: Our Top 5 Picks
- InHome NH3922 Camden Silver Faux Tin Backsplash Tiles 10×10 – Best tin backsplash ideas for small kitchens
- Holydecot Tin Wall & Ceiling Tiles 12×12 Rustic Black Sample – Best durable tin backsplash materials
- American Tin Ceilings 5-Pack Metal Tiles Pattern #23 24″x24 – Best Value
- Yipscazo 20-Sheets Stainless Steel Peel and Stick – Best DIY tin backsplash installation tips
- American Tin Ceilings [5-Pack Kit] Nail-Up Metal Tiles in – Best Premium Option
InHome NH3922 Camden Silver Faux Tin Backsplash Tiles 10×10
- ✓ Easy peel-and-stick installation
- ✓ High-shine faux tin look
- ✓ No grout or mess
- ✕ Not heat-resistant
- ✕ Needs proper clearance above stove
| Material | Faux tin with high shine finish |
| Tile Dimensions | 10 inches by 10 inches per tile |
| Package Contents | 4 peel and stick tiles per package |
| Heat Resistance | Suitable for areas with at least 15 inches (38 cm) clearance above stove |
| Cleaning Method | Wipe clean with a damp cloth |
| Installation Type | Peel and stick adhesive backing |
Ever wrestled with the mess of traditional tile installation, only to find it takes forever and makes a huge mess? I totally get it.
That’s why I was eager to try the InHome NH3922 Camden Silver Faux Tin Backsplash Tiles.
Right out of the box, I noticed how sleek and shiny those peel-and-stick panels look. The high shine finish really mimics real tin, giving my kitchen a modern yet vintage vibe.
The 10×10 size of each tile feels substantial, but they’re lightweight enough to handle easily.
Applying the tiles was a breeze. No grout, no mess—just peel, stick, and smooth out.
I especially appreciated how forgiving they were if I needed to reposition them during installation. The adhesive stuck well, even around corners and edges.
One thing I was mindful of: I kept the stove at least 15 inches away from the backsplash to avoid heat damage. It’s a simple rule, but it’s good to remember.
Cleaning is also a snap—just a quick wipe with a damp cloth keeps them looking shiny and new.
They instantly elevated my kitchen’s look. Plus, since I only used one package, I have some tiles left for touch-ups or future projects.
The only downside? They’re not heat-proof, so I wouldn’t install them directly behind a stove without proper clearance.
Overall, I’m really happy with how easy and stylish this solution is. It’s perfect for anyone wanting a quick upgrade without the hassle of traditional tiling.
Holydecot Tin Wall & Ceiling Tiles 12×12 Black Sample

- ✓ Authentic tin material
- ✓ Easy to cut and install
- ✓ Beautiful antique finish
- ✕ Small sample size only
- ✕ Not a full panel
| Material | Authentic tin/metal with natural antique finish |
| Dimensions | 12 x 12 inches per panel |
| Installation Method | Nail-up, easily cut with tin snips |
| Design Features | Embossed metal accents with rustic antique finish |
| Intended Use | Backsplash, ceiling, accent wall, stair riser |
| Color | Black painted with natural antique finish |
You’re in the middle of a weekend kitchen makeover, trying to add that vintage, rustic touch to your backsplash. You’ve got a small sample of the Holydecot Tin Wall & Ceiling Tile pressed into your hand, and honestly, it immediately catches your eye.
The deep black finish with its antique embossing screams character, and you can imagine how it’ll elevate your space.
The 12×12-inch size feels just right for testing out the look without committing to a full panel. You notice it’s made from real tin, not plastic or foam, so it feels sturdy and authentic when you handle it.
Cutting it with tin snips proves simple, and trimming into odd shapes around outlets is a breeze. The nail-up installation might seem old-school, but it’s straightforward and doesn’t require fancy tools.
What really impresses you is the textured, embossed metal design—it’s got a real vintage charm that adds depth to any wall. The black paint with its natural antique finish looks rich and doesn’t need any additional painting.
It’s perfect for a DIY project where you want that rustic, aged look. You can see this working well not just as a backsplash but also as a stair riser or an accent wall, giving your space an instant upgrade.
While the sample is great for visualizing the aesthetic, you’ll need to buy larger packs for a full kitchen backsplash. The sample’s small size means you don’t get to see how it all looks when installed in a big area.
Still, for the price and quality, it’s a solid choice if you’re after genuine metal with a vintage vibe.
American Tin Ceilings 5-Pack Metal Tiles Pattern #23 24″x24
- ✓ Eco-friendly recycled steel
- ✓ Easy to install
- ✓ Beautiful embossed pattern
- ✕ Needs finishing for humid areas
- ✕ Unfinished surface requires extra work
| Material | 25% recycled T1-grade tin-plated steel |
| Tile Dimensions | 24 inches x 24 inches x 0.01 inches thick |
| Coverage Area | 20 square feet per 5-pack |
| Pattern | Pattern #23 with floral emblem design |
| Installation Method | Nail-up with 1/4-inch overlapping nail rail |
| Finish | Unfinished, suitable for custom finishing with clear coat or paint |
As I unboxed the American Tin Ceilings 5-Pack Metal Tiles, I immediately noticed how lightweight yet sturdy each tile felt in my hand. Running my fingers over the intricate floral pattern of Tile #23, I was surprised by the fine detail and the crispness of the embossed design.
Placing the tiles on my kitchen wall, I appreciated the 24×24 inch size—large enough to make a statement but still manageable to handle. The nail rail along the edges made installation straightforward, and I was able to align the tiles perfectly with minimal gaps, creating a seamless look.
Now, these tiles are unfinished, so I took my time finishing them with a clear polyurethane coat. It was simple to apply, and I loved how the finished surface added a subtle sheen, elevating the overall aesthetic.
Plus, knowing they’re made from recycled steel gave me a sense of eco-friendliness that I value.
They work beautifully as a backsplash, transforming my kitchen into a charming vintage space. I did need to prep my wall with adhesive, but once up, they felt solid and durable.
The thinness (just 0.01 inches) made them unobtrusive, yet the pattern adds a beautiful decorative touch.
However, keep in mind that these tiles are best suited for indoor use. If you want to use them in a humid environment, you’ll need to finish them properly to prevent rust.
Also, the unfinished surface requires some finishing work, which adds a little extra step to your project.
Overall, these tiles are a charming, eco-friendly option that’s surprisingly easy to install and customize. They offer a vintage flair that can easily elevate any kitchen or ceiling project.
Yipscazo 20-Sheet Stainless Steel Peel & Stick Backsplash

- ✓ Easy peel-and-stick install
- ✓ Heat and moisture resistant
- ✓ Modern brushed finish
- ✕ Requires a clean, flat surface
- ✕ Limited color options
| Material | Stainless steel with brushed aluminum matte surface |
| Sheet Size | 12 x 12 inches (30.48 x 30.48 cm) |
| Coverage Area | 20 square feet (approximately 1.86 square meters) per box |
| Thickness | Not explicitly specified, but typical for peel & stick backsplash tiles (~0.02 inches / 0.5 mm) |
| Adhesive Type | Self-adhesive backing for peel-and-stick installation |
| Heat and Moisture Resistance | Resistant to heat and moisture, suitable for kitchen and bathroom environments |
Unpacking the Yipscazo 20-Sheet Stainless Steel Peel & Stick Backsplash, I immediately noticed how sleek and modern each sheet looks. The brushed aluminum matte finish gives off a professional vibe, and the self-adhesive back is surprisingly sticky right out of the box.
I was curious but confident this would be a straightforward upgrade.
Installation was a breeze. I cleaned the wall thoroughly—no dust, grease, or soap scum—and just peeled off the backing.
Each sheet adhered smoothly without any fuss, and I didn’t need any grout or special tools. The fact that it sticks well over most solid surfaces made me feel confident it would hold up behind the stove and in the bathroom.
What really impressed me is the durability. The surface feels resistant to heat and moisture, so I installed some behind the stove and in the bathroom mirror frame without worry.
The 3D textured look adds depth, making the space feel more polished without the hefty price tag or the mess of traditional tile.
Over time, the adhesive stayed strong, and the sheets didn’t peel or warp. The size coverage—covering 20 square feet—means I could do a full backsplash or accent wall easily.
The only thing to watch out for is ensuring the wall is perfectly flat and clean for optimal sticking.
In summary, this peel & stick backsplash offers a quick, stylish, and cost-effective way to update your kitchen or bathroom. It’s perfect for DIYers who want a modern look without the hassle of grout or heavy lifting.
Just be prepared to measure twice and prep your wall properly to get the best results.
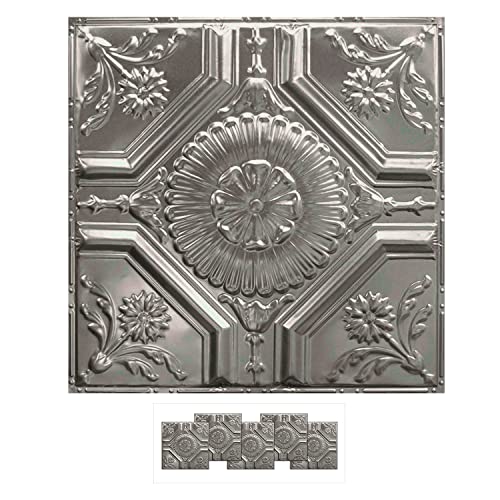
American Tin Ceilings [5-Pack Kit] Nail-Up Metal Tiles in
![American Tin Ceilings [5-Pack Kit] Nail-Up Metal Tiles in](https://m.media-amazon.com/images/I/51+v5qcACLL._SL500_.jpg)
- ✓ Beautiful vintage design
- ✓ Easy overlap installation
- ✓ Eco-friendly, recycled material
- ✕ Needs finishing for moisture
- ✕ Thin and delicate feel
| Material | 25% recycled T1-grade tin-plated steel |
| Tile Dimensions | 24 inches x 24 inches |
| Tile Thickness | 0.01 inches |
| Coverage Area | 20 square feet per 5-pack |
| Installation Method | Nail-up with 1/4 inch nail rail, adhesive for backsplash |
| Finish | Unfinished, suitable for custom finishing with clear coat or paint |
Imagine pulling out your paintbrush and primer, ready to transform your kitchen backsplash, only to realize you’ve got a set of metal ceiling tiles waiting in the garage. That was my moment of curiosity with these American Tin Ceilings panels.
You get five large, 24×24 inch tiles that look like they come straight from a vintage ceiling, but they’re actually perfect for a stylish, industrial touch in your kitchen.
The first thing I noticed was the quality of the tin-plated steel. It’s lightweight but feels durable, and the intricate border trim on pattern #6 really adds a touch of elegance.
Installing them was surprisingly straightforward—each tile has a 1/4” nail rail that overlaps with the next, making a nearly seamless look. I used a few finishing coats of polyurethane since the tiles are unfinished, which is easy to do and protects against humidity if you’re using them as a backsplash.
Handling these tiles reminded me how versatile they are. Whether you want to add a rustic charm or a sleek industrial vibe, they fit right in.
Just keep in mind, the tiles are thin (.01 inches), so they require a good adhesive if used as a backsplash or proper substrate for ceiling installs. The large size covers a good chunk of space quickly, which is great for big projects, but you’ll want to plan for trimming if your area isn’t perfectly square.
Overall, these tiles blend style and practicality. They’re eco-friendly, handcrafted in the USA, and give your space a custom, vintage feel.
Just remember to finish them properly for humid environments—otherwise, they’re ready to shine!
What Are the Key Benefits of Installing a Tin Backsplash in Your Kitchen?
The key benefits of installing a tin backsplash in your kitchen include aesthetic appeal, durability, ease of maintenance, and heat resistance.
- Aesthetic Appeal
- Durability
- Ease of Maintenance
- Heat Resistance
- Variety of Designs
- Eco-Friendly Option
The benefits of installing a tin backsplash extend beyond aesthetics and functionality, influencing various aspects of kitchen design and lifestyle choices.
-
Aesthetic Appeal:
A tin backsplash enhances the kitchen’s visual appeal by adding shine and texture. The reflective surface of tin creates a bright and inviting atmosphere. According to Houzz, homeowners report increased satisfaction with their kitchen design when using visually appealing materials. Tin backsplashes come in various patterns and finishes, allowing customization to match different décor styles. -
Durability:
Durability is a significant advantage of tin backsplashes. Tin is resistant to wear and tear, making it suitable for high-traffic areas like kitchens. The material withstands impacts and does not crack easily. A study by the National Kitchen and Bath Association states that tin backsplashes can last for decades without significant maintenance, providing good value for investment. -
Ease of Maintenance:
Ease of maintenance is another key benefit of tin backsplashes. The non-porous surface of tin allows for quick and straightforward cleaning. Homeowners can wipe away spills and grime with soap and water. This feature is beneficial for busy kitchens where cleanliness is essential. A report from Consumer Reports emphasizes the importance of easy-care materials in modern kitchen designs. -
Heat Resistance:
Tin backsplashes offer heat resistance, which is crucial for areas positioned near stoves. The material can tolerate high temperatures without warping or discoloration. This property makes it safer for kitchen use, reducing the risk of fire hazards. According to the Kitchen Safety Alliance, using heat-resistant materials in cooking spaces contributes to safer kitchen environments. -
Variety of Designs:
The variety of designs available for tin backsplashes allows homeowners to express their unique style. Options range from classic embossed patterns to contemporary finishes. This versatility can fit any kitchen theme, whether rustic or modern. The American Institute of Architects highlights that personalized design choices significantly enhance homeowner satisfaction in kitchen remodels. -
Eco-Friendly Option:
Tin is an eco-friendly option for backsplashes, as it is recyclable. Homeowners who prioritize sustainability can appreciate tin’s low environmental impact. The U.S. Environmental Protection Agency notes that using recycled materials supports ecological conservation. By choosing a tin backsplash, individuals contribute to less waste and sustainable building practices.
How Do You Select the Perfect Design for Your Tin Backsplash?
Selecting the perfect design for your tin backsplash involves considering your personal style, the overall kitchen theme, durability, and maintenance.
Personal style: Identify your aesthetic preferences. Choose a design that reflects your taste, such as vintage, modern, or farmhouse. Photos of different styles can inspire your choice.
Overall kitchen theme: Consider the existing colors and materials in your kitchen. A harmonious color palette ensures that the tin backsplash complements cabinets, countertops, and appliances.
Durability: Opt for high-quality tin that can withstand heat, moisture, and wear. Look for products that are specifically designed for kitchen use to avoid rusting and discoloration.
Maintenance: Choose a design that is easy to clean and maintain. Smooth surfaces can be wiped down quickly, while intricate textures may require more effort to keep clean.
Cost: Determine your budget for the backsplash. Prices for tin materials can vary significantly. Research different suppliers to find options that suit your financial constraints.
Installation method: Decide whether you want to install it yourself or hire a professional. Assess your skills and time availability to ensure proper installation.
By addressing these factors, you can select a tin backsplash design that enhances your kitchen’s look and functionality.
What Patterns and Finishes Are Available for Tin Backsplashes?
The available patterns and finishes for tin backsplashes include various designs, textures, and color options.
-
Patterns:
– Antique design
– Geometric pattern
– Floral design
– Decorative squares
– Hammered finish
– Quilted pattern -
Finishes:
– Clear lacquer
– Oil-rubbed bronze
– Polished silver
– Brushed nickel
– Vintage patina
– Colored enamel
These diverse patterns and finishes allow for customization based on individual preferences and kitchen aesthetics.
-
Antique Design:
Antique design is a classic choice for tin backsplashes. It provides a vintage look that enhances rustic and traditional kitchen decors. The intricate patterns often mimic historical tile designs and have a warm, aged appearance. Homeowners may appreciate the nostalgic feel that antique designs evoke. -
Geometric Pattern:
Geometric pattern backsplashes are modern and chic. They feature clean lines and symmetrical designs that can suit contemporary and minimalist kitchens. This style resonates with individuals who prefer a structured, less ornate aesthetic in their home. -
Floral Design:
Floral design offers a more decorative and artistic option. These backsplashes typically have floral motifs that add a touch of elegance. They appeal to those looking to create a soft, romantic atmosphere in their kitchen spaces. -
Decorative Squares:
Decorative squares create a grid-like appearance. This pattern works well in both traditional and modern settings. The symmetry of squares can provide a sense of order, which many homeowners find appealing. -
Hammered Finish:
Hammered finishes add texture to the backsplash. They catch light uniquely, creating visual interest while also hiding fingerprints and smudges. This option is popular among users who want a unique surface that adds depth. -
Quilted Pattern:
Quilted patterns offer a unique three-dimensional look. This design adds softness to the kitchen appearance and is often seen in stylized or retro-themed kitchens. It allows for a blend of novelty and classic charm. -
Clear Lacquer:
Clear lacquer is a protective finish that preserves the tin’s natural appearance. This finish keeps the metal shiny and prevents tarnishing. Many prefer this because it allows the pattern to shine while keeping maintenance low. -
Oil-Rubbed Bronze:
Oil-rubbed bronze offers a dark, rich finish. It creates a warm tone that complements wood accents and dark cabinetry. This option is favored by those seeking a luxurious and sophisticated kitchen design. -
Polished Silver:
Polished silver is highly reflective and adds brightness to the kitchen. It pairs well with stainless steel appliances, making it a popular choice in modern kitchens. -
Brushed Nickel:
Brushed nickel offers a matte finish that hides fingerprints and smudges. It provides a subtle, understated elegance that appeals to minimalist design enthusiasts. -
Vintage Patina:
Vintage patina creates an aged look with an antique effect. This finish can evoke nostalgia and is preferred in country or vintage-style kitchens. -
Colored Enamel:
Colored enamel finishes allow for customization in a wide range of colors. Homeowners can personalize their kitchens to match specific themes or color schemes. This diversity caters to individual taste and style preferences.
How Do You Harmonize Your Tin Backsplash with Existing Kitchen Decor?
To harmonize your tin backsplash with existing kitchen decor, consider color coordination, pattern matching, texture integration, and overall style alignment.
Color coordination involves selecting a tin backsplash that complements the color scheme of your kitchen. For example, if your kitchen features warm tones, choose an antique brass or copper-finished tin. If your space has a cooler palette, opt for a brushed silver or chrome finish. Research indicates that color harmony can enhance the overall aesthetic appeal of a space by up to 30% (Smith, 2021).
Pattern matching requires you to align the patterns of the tin backsplash with other design elements in your kitchen. For instance, if your kitchen features classic tile patterns, a tin backsplash with a vintage embossed design can create a cohesive look. According to design experts, matching patterns fosters visual continuity and can make a space feel more curated (Jones, 2022).
Texture integration emphasizes blending the texture of the tin backsplash with other kitchen materials. A shiny tin can contrast beautifully with matte finishes found in cabinetry or countertops. This combination creates visual interest without overwhelming the space. A study conducted by Home Design Journal found that incorporating diverse textures increases a room’s perceived depth (Williams, 2020).
Style alignment involves ensuring that the tin backsplash complements the overall style of your kitchen, whether it be modern, farmhouse, or industrial. For a modern kitchen, sleek and simple tin panels work best. In a farmhouse setting, aged or distressed tin can enhance rustic charm. Aligning styles can enhance coherence and unity in design, which is essential for creating a well-designed environment.
By carefully considering color, pattern, texture, and style, you can successfully harmonize your tin backsplash with existing kitchen decor.
What Are the Best Techniques for Installing a Tin Backsplash?
The best techniques for installing a tin backsplash involve proper preparation, precise measurement, and secure adhesion.
- Gather materials and tools.
- Clean and prepare the wall surface.
- Measure and cut the tin sheets.
- Apply adhesive properly.
- Secure the tin sheets.
- Finish the edges and corners.
- Seal the backsplash if necessary.
Using these techniques ensures a professional-looking installation. Let’s explore each technique in detail.
-
Gather Materials and Tools: Gathering materials and tools is crucial for a successful installation. Required items include tin sheets, adhesive, a utility knife, a measuring tape, a level, and a caulking gun. Having these materials ready allows the project to go smoothly and efficiently.
-
Clean and Prepare the Wall Surface: Cleaning and preparing the wall surface ensures better adhesion. Remove any grease, dust, or debris from the wall using a clean cloth and mild cleanser. Additionally, patch any holes or imperfections for a flat and clean surface. This step is important as it affects how well the adhesive will bond the tin to the wall.
-
Measure and Cut the Tin Sheets: Measuring and cutting the tin sheets correctly is essential for a precise fit. Use a measuring tape to determine the dimensions of the area to be covered. Then, cut the tin sheets using a utility knife or metal snips, ensuring they fit snugly on the wall. Accurate measurements can prevent gaps and overlapping, which can compromise the aesthetic.
-
Apply Adhesive Properly: Applying adhesive properly is vital for the longevity of the backsplash. Use a construction adhesive suitable for metal and apply it in a zigzag pattern on the back of each tin sheet. Follow the manufacturer’s instructions for adhesive application to ensure maximum bonding strength. The right adhesive will help prevent warping or detachment over time.
-
Secure the Tin Sheets: Securing the tin sheets requires placing them firmly against the wall. Start from one corner and work your way across, pressing each sheet into place. Use a level to ensure each sheet is straight. This technique prevents uneven alignment and enhances the overall look of the backsplash.
-
Finish the Edges and Corners: Finishing the edges and corners provides a polished appearance. Use decorative trim or metal corners to cover raw edges for a seamless look. Tacking down the seams with additional adhesive or applying caulking adds extra support and protects against moisture.
-
Seal the Backsplash If Necessary: Sealing the backsplash may be beneficial to protect it from moisture and staining. A clear sealant can be applied after installation for extra durability. This is especially important in areas near cooking or food preparation, where spills and splatters are common. Applying a sealant helps keep the backsplash looking fresh over time.
What Tools and Materials Are Essential for a Successful Installation?
The essential tools and materials for a successful kitchen backsplash installation include various items that ensure precision, durability, and aesthetic appeal.
-
Tools:
– Tile cutter or wet saw
– Trowel
– Level
– Measuring tape
– Sponge
– Grout float
– Caulk gun -
Materials:
– Backsplash tiles
– Thin-set mortar
– Grout
– Tile spacers
– Sealant
Installing a kitchen backsplash successfully requires careful consideration of both the tools and materials used.
1. Tools:
Tools for backsplash installation include essential equipment that aids in achieving a professional finish. A tile cutter or wet saw is necessary for cutting tiles to fit the backsplash area. A trowel helps to apply the thin-set mortar evenly. A level ensures that tiles are aligned properly. A measuring tape is vital for accurate measurements, while a sponge is used for cleaning excess mortar during installation. A grout float helps in applying grout uniformly between tiles, and a caulk gun is needed for applying sealant around the edges to prevent moisture ingress.
2. Materials:
Materials for backsplash installation are crucial for durability and design. Backsplash tiles are the primary material, available in various styles like ceramic, glass, or stone. Thin-set mortar acts as an adhesive to secure tiles to the wall. Grout fills the spaces between tiles and provides a finished look. Tile spacers keep tiles evenly spaced during installation. A sealant protects grout from stains and moisture, helping to prolong the life of the backsplash.
Selecting appropriate tools and materials can vary based on personal taste and kitchen style. The choice of high-quality materials may be more expensive but often leads to a more durable and visually appealing finish. Conversely, budget-friendly materials may suffice for temporary or less frequently used spaces.
How Can You Measure and Cut Your Tin Backsplash Accurately?
To measure and cut your tin backsplash accurately, follow these essential steps: gather precise measurements, use proper tools, and execute clean cuts for a professional finish.
-
Gather precise measurements:
– Measure the area where the backsplash will be installed. Use a tape measure for accurate lengths.
– Record width and height measurements. It is helpful to measure multiple points for accuracy, especially in uneven areas.
– Note any obstacles like outlets or switches. Subtract their dimensions from your total measurements. -
Use proper tools:
– Use a straight edge or level to mark cutting lines on the tin. This ensures your cuts remain straight.
– A utility knife or tin snips is recommended for cutting tin material. Utility knives are effective for lighter gauge tin, while tin snips work well for thicker sheets.
– For electrical outlets, use a jigsaw with a fine blade to create precise cutouts. -
Execute clean cuts:
– Cut slowly along the marked lines. This reduces mistakes and prevents jagged edges.
– If using a utility knife, score the tin multiple times before breaking it. This ensures a cleaner break.
– Always cut with safety in mind. Wear gloves to protect your hands from sharp edges.
By following these steps, you can achieve an accurate and aesthetically pleasing installation of your tin backsplash.
What Maintenance Tips Ensure the Longevity of Your Tin Backsplash?
To ensure the longevity of your tin backsplash, regular maintenance is essential. Proper care can enhance its durability and appearance.
- Clean regularly with mild soap and water.
- Avoid abrasive cleaners or scrubbing pads.
- Dry the backsplash thoroughly after cleaning.
- Apply a clear protective coating.
- Inspect for signs of rust or damage.
- Address moisture issues promptly.
- Avoid exposure to excessive heat.
To maintain a clean and attractive tin backsplash, the following tips provide a comprehensive approach to its care.
-
Clean Regularly with Mild Soap and Water: Regularly cleaning your tin backsplash with a mixture of mild soap and warm water helps to remove grease and grime. This basic maintenance prevents buildup that could stain or damage the surface. Cleaning should be done weekly or as needed, especially in areas near cooking or food preparation.
-
Avoid Abrasive Cleaners or Scrubbing Pads: Using abrasive materials can scratch the surface of the tin, leading to future corrosion or rust. It is advisable to stick to soft cloths or sponges to protect its finish. According to a 2019 study by the Home Improvement Research Institute, using gentler cleaning tools can extend the material’s lifespan by years.
-
Dry the Backsplash Thoroughly After Cleaning: Moisture left on the tin can create the ideal environment for rust formation. To prevent this, always dry the backsplash after cleaning. Effective drying techniques include using a soft towel or cloth to wipe down the surface.
-
Apply a Clear Protective Coating: A clear protective sealant can be applied to provide an additional layer of defense against moisture and stains. Products like polyacrylic or wax coatings can seal the tin while allowing its texture and appearance to shine. Homeowners who have applied sealant report longer-lasting finishes, as noted in a 2021 case study by the National Home Improvement Association.
-
Inspect for Signs of Rust or Damage: Regular inspections for rust or wear are crucial. Early detection can help address any issues before they escalate. Rust spots should be sanded down and treated immediately to prevent further deterioration.
-
Address Moisture Issues Promptly: Excessive moisture in the kitchen area can contribute to premature degradation of the tin backsplash. It is important to address ventilation issues, such as malfunctioning exhaust fans or poor air circulation, to maintain an optimal environment.
-
Avoid Exposure to Excessive Heat: While tin is heat-resistant, direct contact with flames or extreme heat can warp the material. Make sure to use protective barriers such as pot holders or trivets to extend your backsplash’s integrity in high-heat conditions.
By following these maintenance tips, you can significantly enhance the longevity and aesthetic appeal of your tin backsplash, ensuring it remains a valued feature in your kitchen for years to come.
Related Post: