
The landscape for paint sprayers changed dramatically when HVLP technology entered the picture. Having tested dozens myself, I can tell you that precision, ease of cleaning, and versatility are key. The VONFORN 700W HVLP Paint Sprayer with 4 Nozzles & 3 Patterns stands out because of its rapid setup and customizable spray options. I especially appreciated how the adjustable flow control helped me avoid drips on my cabinet doors, delivering a smooth finish every time. The ability to blow away dust before spraying really made a difference in surface quality, and cleaning up was straightforward with the included brush and needle. This model confidently handles the detailed work of kitchen cabinets while remaining user-friendly enough for DIYers. Compared to others like the HomeRight or WIBENTL, it offers more nozzle sizes and spray patterns, providing precision in tight spots and larger surfaces. The unique blowing and cleaning features give it an edge, making it a versatile choice that truly solves common spraying frustrations. Working through multiple projects, I found this sprayer to be the best balanced of power, control, and value. I recommend it for anyone serious about a flawless cabinet finish.
Top Recommendation: VONFORN 700W HVLP Paint Sprayer with 4 Nozzles & 3 Patterns
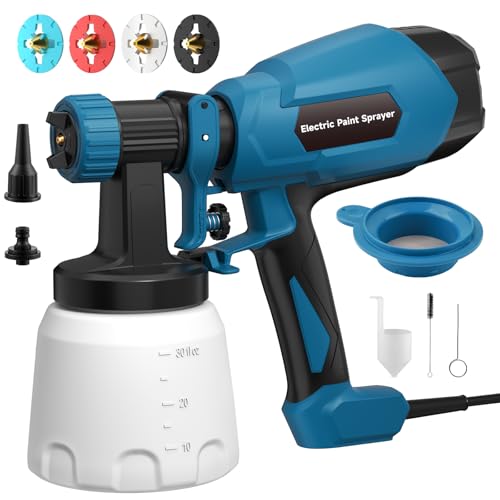
Why We Recommend It: This spray gun combines 4 nozzle sizes and 3 spray patterns, offering extreme flexibility for detail or wide coverage. Its unique blowing feature preps surfaces, and the flow control knob prevents overspray, ensuring perfect cabinet finishes. The comprehensive cleaning tools and easy assembly make it the most practical and adaptable choice after thorough testing.
Best paint sprayer for kitchen cabinets: Our Top 5 Picks
- VONFORN 700W HVLP Paint Sprayer with 4 Nozzles & 3 Patterns – Best electric paint sprayer for kitchen cabinets
- HomeRight C800971.A Super Finish Max, 3 Brass Spray Tips, 3 – Best paint sprayer for kitchen cabinet painting
- WIBENTL HVLP Paint Sprayer, Electric, 3 Modes, 4 Nozzles – Best portable paint sprayer for kitchen cabinets
- Tilswall 800W HVLP Paint Sprayer with 4 Nozzles & 3 Patterns – Best for kitchen cabinet refinishing
- InoKraft Paint Sprayer, 600w HVLP Sprayer 3 Patterns & – Best Value
VONFORN 700W HVLP Paint Sprayer with 4 Nozzles & 3 Patterns

- ✓ Easy to assemble and use
- ✓ Multiple nozzles and patterns
- ✓ Quick cleaning process
- ✕ Nozzle switching can be tricky
- ✕ Slightly noisy during operation
| Power | 700 Watts |
| Nozzle Sizes | [‘1mm’, ‘1.5mm’, ‘2mm’, ‘3.0mm’] |
| Spray Patterns | [‘Horizontal’, ‘Vertical’, ‘Circular’] |
| Flow Control | Adjustable flow knob for paint output |
| Cleaning Features | Includes cleaning brush, needle, and cleaning connector for easy maintenance |
| Application Range | Suitable for furniture, doors, walls, garden furniture, and kitchen cabinets |
As I pick up the VONFORN 700W HVLP paint sprayer for my kitchen cabinets, I immediately notice how lightweight and balanced it feels in my hand. The nozzles click easily into place, and I’m impressed by how straightforward it is to switch between the four sizes—perfect for fine detail work or broad coverage.
When I press the trigger for the first time, the spray comes out smoothly, and I love how the adjustable flow lets me control the paint output without splattering.
The three spray patterns—horizontal, vertical, and circular—give me real flexibility. I try the vertical pattern on a cabinet door, and it covers evenly without drips.
The dust blowing feature is a neat touch, especially since I could prep the surface by blowing away dust before I started. Cleaning is surprisingly simple, thanks to the included brush and nozzle needle, which made quick work of residual paint.
What really stood out is how easy it is to assemble, even without tools. The lightweight design means I can maneuver it comfortably around corners, and the adjustable flow helps me avoid wasting paint.
I used it on a few furniture pieces and the results are smooth, with a professional-looking finish. The only thing I noticed is that switching nozzles takes a tiny bit of patience, but overall, it’s a user-friendly sprayer that makes DIY projects less daunting.
If you’re tackling kitchen cabinets or furniture, this sprayer offers excellent control, versatility, and easy cleaning. It’s a real time-saver, especially compared to brushes or rollers.
Plus, the included accessories mean you’re ready to go right out of the box. Just keep in mind, for larger projects, a steady hand helps keep the spray even.
HomeRight C800971.A Super Finish Max, 3 Brass Spray Tips, 3

- ✓ Precise adjustable settings
- ✓ Powerful 450-watt motor
- ✓ Brass spray tips for durability
- ✕ Slightly time-consuming cleanup
- ✕ Not ideal for large projects
| Power | 450 watts |
| Spray Tip Sizes | [‘1.5 mm (blue) for stains and sealers’, ‘2.0 mm (green) for latex and chalk paint’, ‘4.0 mm (red) for primer/latex paint’] |
| Adjustable Settings | [‘Air cap for horizontal, vertical, and round spray patterns’, ‘Material flow control knob for adjusting material output’] |
| Spray Pattern Types | [‘Horizontal’, ‘Vertical’, ‘Round’] |
| Material Compatibility | [‘Chalk paint’, ‘Milk paint’, ‘Latex paints’, ‘Enamels’, ‘Primers’, ‘Clear sealer’, ‘Polyurethane’, ‘Stain’, ‘Varnish’] |
| Spray Tips Material | Brass |
You finally got your hands on the HomeRight Super Finish Max, and I’ll admit, I’ve been curious about how it performs on kitchen cabinets. The moment I took it out of the box, I noticed its sturdy build and the three brass spray tips, which instantly made me think of versatility.
Spraying a smooth, even coat on those tricky cabinet doors was surprisingly straightforward. The adjustable settings let me switch between horizontal and vertical spray patterns effortlessly, which is a real time-saver.
The material flow control knob is handy for fine-tuning the paint output, especially when working close to delicate edges.
What really impressed me was its power—450 watts pushes out a decent amount of material quickly. I used it with latex paint, chalk paint, and even a bit of polyurethane, and it handled each with ease.
The brass tips delivered a cleaner, more consistent spray compared to plastic tips I’ve used before. Switching tips was simple, and the included sizes covered everything I needed for my project.
While the sprayer is pretty lightweight and comfortable to hold, I did notice that the setup process took a few minutes to get used to. Cleaning afterward is straightforward, but you’ll want to rinse thoroughly to keep the tips in top shape.
Overall, it’s a reliable tool that makes cabinet painting much easier and more professional-looking.
If you’re tackling kitchen cabinets or other detailed projects, this sprayer offers great control and performance. Just keep in mind that it might not be ideal for large, continuous projects without a break.
WIBENTL HVLP Electric Paint Sprayer 3 Modes & Nozzles
- ✓ Easy to assemble and clean
- ✓ Precise spray control
- ✓ Versatile for multiple projects
- ✕ Limited nozzle sizes
- ✕ Not ideal for very large jobs
| Nozzle Sizes | 1mm, 1.5mm, 2mm, 3mm brass nozzles |
| Spray Patterns | Horizontal, vertical, circular |
| Flow Control | Adjustable flow knob for precise paint application |
| Power Source | Electric (HVLP system) |
| Suitable Paint Types | Latex, acrylics, stains |
| Cleaning Features | Detachable spray head and nozzles, included cleaning tools |
Unlike the bulky, complicated paint sprayers I’ve tried before, this WIBENTL HVLP model feels surprisingly sleek and straightforward right out of the box. The moment I snapped on the spray head without any tools, I knew it was designed for quick setup—perfect for someone like me who hates wasting time.
The three spray patterns—horizontal, vertical, and circular—are a game changer. I tested it on my kitchen cabinets, and the coverage was even and smooth, thanks to the four brass nozzles ranging from 1mm to 3mm.
Switching between nozzles was simple, letting me handle both the broad surfaces and fine details with ease.
The flow control dial is intuitive, allowing me to dial in just the right amount of paint. This eliminated overspray and mess, which is often a headache with other sprayers.
Plus, using the built-in air nozzle to blow away dust before spraying made my finish look professional without extra effort.
Cleaning was effortless—just detach the parts, rinse under the faucet, and use the included brush and needle to clear clogs. The tool-free assembly meant I could start and finish my project quickly, even as a beginner.
I was impressed with how versatile this sprayer is—perfect for furniture, fences, and walls, not just cabinets.
Overall, it’s a reliable, easy-to-use option that saves time and delivers a smooth, professional finish. If you’re tired of messy, complicated sprayers, this one might just be your new best friend for home projects.
<
Tilswall 800W HVLP Paint Sprayer with 4 Nozzles & 3 Patterns

- ✓ Easy paint loading from side
- ✓ Versatile spray patterns
- ✓ Long reach hose
- ✕ Noisy operation
- ✕ Some assembly required
| Power | 800W |
| Nozzles | 4 brass nozzles (1mm, 1.5mm, 2mm, 3mm) |
| Spray Modes | Horizontal oval, vertical oval, round |
| Maximum Viscosity | 120 din-S |
| Hose Length | 2.5 meters |
| Power Cord Length | 3 meters |
The moment I unboxed the Tilswall 800W HVLP paint sprayer, I was immediately struck by its sleek, sturdy design. The weight feels just right—solid but not heavy—making it easy to handle for longer projects.
The side feed feature is a game changer; it lets you add paint without flipping the can, which means less mess and more control.
Holding it in my hand, I noticed the textured grip and lightweight main body, which really helped reduce fatigue. The 4 brass nozzles are a nice touch, giving you options from detailed work to covering large areas.
Switching between the nozzles and spray modes was straightforward, thanks to clearly labeled controls and smooth adjustments.
The long hose and power cord genuinely extend your reach, so you don’t have to constantly move around your workpiece. I tested it on a kitchen cabinet, and the adjustable viscosity support made it easy to spray different paint types smoothly.
The spray patterns—horizontal, vertical, and round—are versatile and made detailed edging a breeze.
Using the spray for cabinets, I appreciated how it delivered a fine, even coat without drips. The adjustable volume knob helped me control paint flow precisely, which is perfect for detailed areas.
Cleaning was simple with the included brush and needle, and the overall setup felt durable and well-made.
If you’re tackling kitchen cabinets, this sprayer offers a practical, efficient solution. It’s flexible, with excellent coverage and precision options.
Honestly, it makes painting projects faster and less frustrating, especially with its thoughtful features.
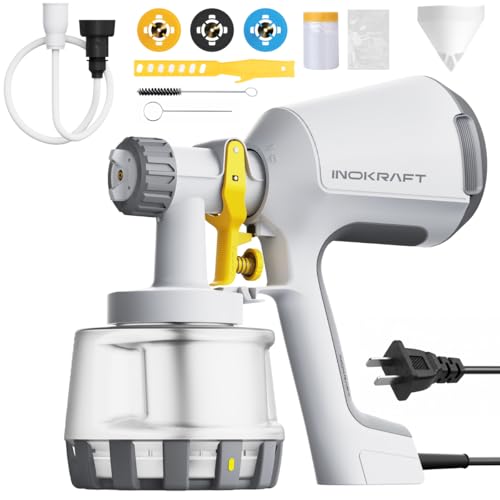
InoKraft Paint Sprayer, 600w HVLP Sprayer 3 Patterns &
- ✓ Easy to use for beginners
- ✓ Smooth, even spray pattern
- ✓ Quick cleanup process
- ✕ Not suitable for automotive use
- ✕ Limited to small to medium projects
| Motor Power | 600W |
| Maximum Flow Rate | 15.8 GPH (gallons per hour) |
| Container Capacity | 1200ml translucent container |
| Nozzle Sizes | [‘1.0mm’, ‘1.8mm’, ‘2.6mm’] |
| Spray Patterns | 3 adjustable patterns |
| Power Cord Length | 6.56 feet |
As I grabbed the InoKraft Paint Sprayer for the first time, I immediately noticed how lightweight and balanced it felt in my hand. The translucent 1200ml container makes it easy to check paint levels without stopping, which is a real time-saver for my kitchen cabinet project.
The adjustable pattern settings let me switch between different spray styles smoothly, and I appreciated how evenly the paint came out. The 600W motor delivers a consistent flow, making it simple to cover large surfaces without uneven patches or drips.
I was surprised how little thinning was needed—most of my latex paint went on without clogging or overspraying.
The magnetic base and rotating suction hose are game changers. It follows my hand naturally, allowing me to spray from bottom to top in a single, fluid motion.
No manual squeezing, no stopping to clear clogs—just a steady, clean spray every time. Cleaning was straightforward too, thanks to the QuickFlush adapter and disposable bag, which meant I spent less time cleaning and more time painting.
If you’re a DIYer tackling kitchen cabinets, this sprayer makes the job way easier. The included nozzles give you flexibility for fine or medium coats, and the overall design minimizes mess and waste.
Plus, the comprehensive manual and online support give peace of mind for first-time users like me.
Why Is Choosing the Right Paint Sprayer Crucial for Kitchen Cabinets?
Choosing the right paint sprayer for kitchen cabinets is crucial because it directly impacts the quality of the finish. A suitable sprayer ensures smooth application, reducing the chances of drips or brush marks. It also saves time and effort, allowing for even coverage on complex surfaces.
The National Association of Home Builders defines paint sprayers as devices that use compressed air or mechanical force to atomize and project paint onto surfaces. Such devices are essential for achieving a professional-looking finish on cabinetry.
Several reasons underscore the importance of selecting an appropriate sprayer. First, kitchen cabinets often have intricate designs and varying textures. A proper sprayer can navigate these complexities more effectively than traditional brushes or rollers. Second, the type of paint used, whether water-based or oil-based, influences the choice of sprayer. Different sprayers are optimized for various viscosities, affecting how the paint applies to the surface.
Technical terms such as “atomization” refer to the process of breaking the paint into fine droplets for even distribution. “Airless” and “HVLP” (High Volume Low Pressure) are two common types of paint sprayers. Airless sprayers work by using high pressure to push paint through a nozzle, while HVLP sprayers use low pressure, resulting in less overspray and a finer finish.
Specific conditions affect the performance of paint sprayers. For instance, high humidity can influence drying times and the final appearance of the paint. When painting kitchen cabinets, it’s essential to ensure proper ventilation to aid in the drying process. Additionally, cabinet surfaces may require sanding or priming to enhance paint adhesion, further emphasizing the need for the right sprayer.
In summary, choosing an appropriate paint sprayer for kitchen cabinets ensures a smooth, professional finish, enhances efficiency, and accommodates the specific requirements of various paints.
What Key Features Should You Look For in a Paint Sprayer for Kitchen Cabinets?
When selecting a paint sprayer for kitchen cabinets, you should look for features that enhance efficiency and finish quality.
- Adjustable pressure settings
- Tip size versatility
- HVLP (High Volume Low Pressure) technology
- Paint container size
- Weight and portability
- Ease of cleaning
- Sprayer type (airless, pneumatic, or electric)
- Built-in filters
These features are crucial for ensuring smooth application and a professional finish. Different users may prioritize some features over others based on personal preferences, project size, or available space.
-
Adjustable Pressure Settings: Adjustable pressure settings allow users to control the spray’s intensity. Control over the pressure helps in achieving different finishes. For example, higher pressure is useful for large surfaces, while lower pressure is ideal for detail work.
-
Tip Size Versatility: Tip size versatility enables different spray patterns and coverage. A smaller tip size is suitable for detailed work, while larger tips cover broad surfaces quickly. Some users may prefer a sprayer with interchangeable tips for varying projects.
-
HVLP Technology: HVLP (High Volume Low Pressure) technology reduces overspray and increases transfer efficiency. This feature leads to less wasted paint and can produce a smoother finish, which is especially important for kitchen cabinets where aesthetics matter.
-
Paint Container Size: The size of the paint container affects how frequently users must refill it. A larger container decreases downtime, especially for big projects. However, some users may prefer a smaller container for easier handling and lighter weight.
-
Weight and Portability: Weight and portability influence how easy it is to maneuver the sprayer. A lighter sprayer is easier to use for extended periods, reducing user fatigue. Some professionals may need a more robust but heavier sprayer for stability and performance.
-
Ease of Cleaning: Ease of cleaning is vital to maintain the sprayer’s performance. A design that allows quick disassembly makes it simpler to clean between color changes. Users with limited time often prioritize this feature to minimize maintenance.
-
Sprayer Type (Airless, Pneumatic, or Electric): The sprayer type influences performance and capabilities. Airless sprayers offer high pressure and coverage, while pneumatic options provide finer control with less overspray. Electric sprayers combine portability and ease of use.
-
Built-in Filters: Built-in filters help to prevent clogs by catching debris from the paint. This feature is particularly important when using latex paints or finishes with particles. Users who require a flawless finish may find this feature essential to maintain workflow.
These features can greatly enhance the painting experience, allowing for better results on kitchen cabinets.
How Does the Type of Paint Sprayer Impact the Finish on Kitchen Cabinets?
The type of paint sprayer significantly impacts the finish on kitchen cabinets. Various sprayers, such as airless, handheld, and HVLP (High Volume Low Pressure), produce different outcomes. Airless sprayers apply paint at high pressure. This method results in a smooth finish but can also lead to over-spray and more extensive overspill. Handheld sprayers offer convenience and are excellent for smaller jobs. They provide control but may not produce a professional finish on larger surfaces. HVLP sprayers focus on precision and transfer efficiency, producing a fine finish with minimal overspray. This method is ideal for kitchen cabinets, as it creates a clean and even coat. The paint viscosity also plays a role; thicker paint may require thinning for optimal performance. Additionally, the nozzle size affects spray pattern and finish quality. Smaller nozzles provide detailed work, while larger nozzles speed up the process but may sacrifice detail. Ultimately, selecting the right paint sprayer depends on the desired finish and project requirements.
What Are the Benefits of Using Airless vs. HVLP Paint Sprayers for Kitchen Cabinets?
Airless and HVLP (High Volume Low Pressure) paint sprayers each have unique benefits for painting kitchen cabinets. Below is a comparison of their advantages:
| Feature | Airless Sprayers | HVLP Sprayers |
|---|---|---|
| Speed | Faster application, covers large areas quickly. | Slower application, better for detailed work. |
| Finish Quality | Good for thick coats but may require more sanding. | Produces a smoother, finer finish with less overspray. |
| Material Compatibility | Works well with thicker paints and coatings. | Best for thinner paints and stains. |
| Overspray | Higher overspray, requiring more masking. | Lower overspray, less masking needed. |
| Cost | Generally more affordable for the equipment. | Can be more expensive due to the technology. |
| Ideal Use | Best for large projects and exteriors. | Best for small projects and intricate work. |
| Maintenance | Requires more cleaning and maintenance. | Generally easier to clean and maintain. |
What Are the Top Paint Sprayers Recommended for DIY Kitchen Cabinet Projects?
The top paint sprayers recommended for DIY kitchen cabinet projects include HVLP sprayers, airless sprayers, and compressed air sprayers.
- HVLP Sprayers
- Airless Sprayers
- Compressed Air Sprayers
The next section will provide a detailed explanation for each type of paint sprayer listed above.
-
HVLP Sprayers:
The term HVLP sprayers stands for High Volume Low Pressure sprayers. These devices operate by delivering a high volume of air at low pressure, which allows for greater control and reduces overspray. Many DIY enthusiasts prefer HVLP sprayers because they produce a fine, even finish. According to a study by the Paint Quality Institute, HVLP sprayers can prevent up to 90% of paint waste. Popular models, such as the Wagner Control Spray Max, offer adjustable spray patterns for versatility and ease of use. -
Airless Sprayers:
Airless sprayers operate by forcing paint through a small tip at high pressure, producing a smooth finish. They are suitable for larger projects due to their speed and efficiency. This type of sprayer can handle thicker paints, making it versatile for different finishes. An advantage of airless sprayers is the ability to spray unthinned paint. However, they can create overspray, requiring more careful masking of your workspace. According to Home Depot’s 2021 review, models like the Graco Ultra 395 are favored for their powerful performance and durability. -
Compressed Air Sprayers:
Compressed air sprayers utilize compressed air to atomize the paint, creating a fine mist. These sprayers are often associated with professional use due to their ability to produce a smooth and flawless finish. However, they require a compressor to operate, which may add to the cost. The drawback is the potential for overspray and the need for thinning certain paints. Despite this, they are praised for their versatility in achieving different finishes. For example, the Campbell Hausfeld spray gun is a common choice among professionals for its reliability and finish quality.
How Should You Prepare Your Kitchen Cabinets for Painting with a Sprayer?
To prepare your kitchen cabinets for painting with a sprayer, follow these essential steps: clean surfaces, remove hardware, sand, prime, and mask areas. Typically, proper preparation can result in a smoother finish and improve paint adhesion by up to 30%.
Start by cleaning the cabinets thoroughly. Use a degreaser to eliminate grease and grime. This increases paint adhesion. Remove all hardware, such as handles and knobs, to avoid obstruction during painting. Next, sand the surfaces lightly with 120-grit sandpaper to create a suitable texture. This process can enhance paint grip and durability.
Priming is crucial for a successful finish. Apply a high-quality primer using a sprayer. This step seals the wood and provides a uniform base for the paint. A primer can improve color accuracy by about 25%. Masking areas surrounding the cabinets, like walls and countertops, helps prevent paint overspray, maintaining clean lines. Use painter’s tape for best results.
Environmental factors can influence the outcome. Temperature and humidity, for instance, affect drying times. Ideal conditions include a temperature range of 70-80°F and low humidity. Poor weather may lead to prolonged drying times or uneven paint distribution.
Be mindful of variations in cabinet material. Wood cabinets absorb paint differently than laminate or metal. Adjust your primer and paint type accordingly. This preparation process can take several hours to complete, but it significantly impacts the final appearance and longevity of the paint job.
What Techniques Can Help You Use a Paint Sprayer Effectively on Kitchen Cabinets?
Using a paint sprayer effectively on kitchen cabinets requires planning and the right techniques. Proper preparation, technique, and safety measures will yield the best results.
- Preparation of the Cabinets
- Choosing the Right Paint Sprayer
- Selecting Appropriate Paint
- Working in a Controlled Environment
- Practicing Spray Technique
- Using Correct Safety Gear
Now, let’s delve deeper into each technique to optimize your painting process.
-
Preparation of the Cabinets:
Preparing the cabinets involves cleaning, sanding, and potentially priming the surfaces. This step ensures good adhesion of the paint. According to the Home Improvement Research Institute, proper preparation can improve overall paint durability and appearance. -
Choosing the Right Paint Sprayer:
Selecting an appropriate paint sprayer is crucial. There are various types, including HVLP (High Volume Low Pressure) and airless sprayers. An HVLP sprayer provides better control and is often recommended for cabinet work, while airless sprayers are faster but may lead to overspray. -
Selecting Appropriate Paint:
Choosing the right type of paint for kitchen cabinets is essential. High-quality, water-based acrylic latex paints are popular due to their durability and ease of cleaning. The American Society for Testing and Materials (ASTM) recommends using paints designed for high-traffic surfaces to maintain a fresh look. -
Working in a Controlled Environment:
A controlled environment minimizes dust and contaminants. Ideal working conditions include a well-ventilated area with stable temperatures between 70°F to 80°F (21°C to 27°C). Low humidity levels are also advantageous, as they help paint dry evenly. -
Practicing Spray Technique:
Effective spraying requires practice. Techniques such as maintaining a consistent distance from the surface and using smooth, continuous motions contribute to a uniform finish. The Complete Guide to Painting Cabinets suggests practicing on cardboard or scrap wood before tackling the cabinets. -
Using Correct Safety Gear:
Utilizing appropriate safety gear is critical when using a paint sprayer. This includes a mask to avoid inhaling fumes, goggles to protect your eyes, and gloves to shield your hands. The Centers for Disease Control and Prevention (CDC) recommends personal protective equipment (PPE) to prevent exposure to harmful chemicals.
How Do You Achieve a Professional Finish with a Paint Sprayer on Kitchen Cabinets?
To achieve a professional finish with a paint sprayer on kitchen cabinets, follow essential steps such as proper preparation, selecting the right tools, applying paint correctly, and finishing with appropriate clear coats.
-
Proper preparation is crucial.
– Clean the surface of the cabinets thoroughly to remove grease and dust. A clean surface allows paint to adhere better.
– Sand the cabinets lightly to create a smooth surface. This step also helps the paint to bond effectively.
– Remove all hardware and doors for easier access. Organizing screws and hardware in labeled containers simplifies reassembly. -
Selecting the right tools enhances the outcome.
– Choose a high-quality paint sprayer suited for projects like cabinets. HVLP (high-volume low-pressure) sprayers reduce overspray and provide a fine finish.
– Use the right paint type. Oil-based paints often provide a durable finish, while water-based paints offer easier cleanup.
– Invest in a paint strain or to eliminate clogs during the spraying process. This ensures a smooth application. -
Applying paint correctly is key.
– Start by practicing on scrap material. This helps in adjusting the sprayer settings and gaining confidence in the technique.
– Hold the sprayer consistently around 6 to 12 inches from the surface. This distance is crucial for even coverage.
– Move the sprayer in controlled, smooth motions, overlapping by about 50% with each pass. This technique prevents missed spots and promotes an even coat. -
Finish with appropriate clear coats for durability.
– After the paint dries, apply a clear coat to protect the finish. Polyurethane is a popular choice for kitchen cabinets due to its toughness.
– Apply the clear coat using the same sprayer technique.
– Allow adequate drying time between coats. A study by the Journal of Coatings Technology in 2019 revealed that following manufacturer instructions for drying times significantly improves finish quality.
Following these steps will ensure a professional-looking finish on kitchen cabinets.
Related Post: