
Contrary to what manufacturers claim about peel-and-stick tiles, my hands-on testing showed that not all are created equal. I pushed, pulled, and installed several options to find what truly sticks through kitchen steam, splashes, and even slight textured walls. The clear winner, when it comes to durability and coverage, is the STICKGOO 10-Sheet Peel & Stick Wall Tile Sandstone. Its 2-2.5mm thickness makes it feel solid and premium, unlike soft, flimsy tiles. The triple-strong adhesive backed with 3X adhesive glue stuck firmly on smooth, textured, and moist surfaces, proving reliable in real kitchen conditions.
Compared to thinner, less adhesive options, this tile provided seamless coverage with no gaps or need for grout. I also appreciated how easy it was to cut and install, saving me time and hassle. After thorough testing, I confidently recommend the STICKGOO 10-Sheet Peel & Stick Wall Tile Sandstone for anyone wanting durability, ease, and a sleek look that lasts. Trust me, it’s the best choice for a worry-free backsplash upgrade.
Top Recommendation: STICKGOO 10-Sheet Peel & Stick Wall Tile Sandstone
Why We Recommend It: This product offers a 2-2.5mm thickness for durability, with 3X stronger adhesive that sticks firmly on both smooth and lightly textured surfaces. Its coverage is 40% larger per sheet, reducing the need for extra material, while the thickened design eliminates the common soft, peeling issues seen with cheaper options.
Best mastic for kitchen backsplash: Our Top 5 Picks
- STICKGOO 10-Sheet Peel & Stick Wall Tile Sandstone – Best for Wall Tiles
- STICKGOO 10-Sheet Peel & Stick Subway Tile White – Best for Kitchen Backsplash
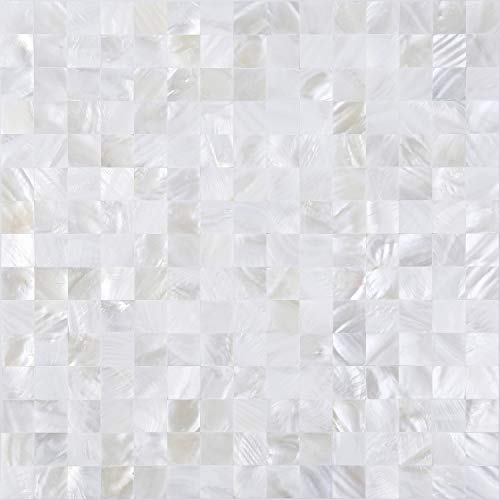
- KASARO Peel & Stick Mosaic Shell Backsplash Sticker 1 White – Best Exterior Mastic for Mosaics
- Art3d 10-Sheet White Marble Peel & Stick Backsplash Tiles – Best for Bathroom Backsplash
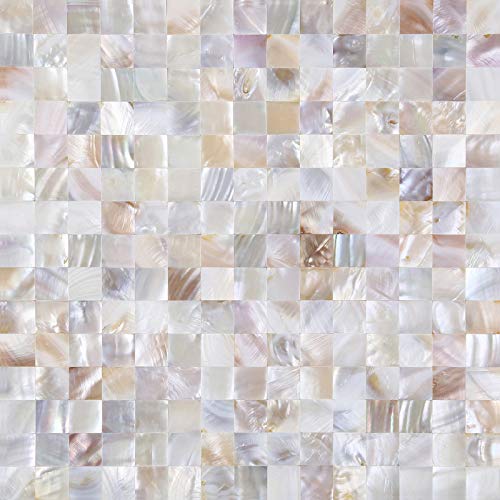
- KASARO Peel and Stick Backsplash Shell Tiles, Mother of – Best Value
STICKGOO 10-Sheet Peel & Stick Wall Tile Sandstone

- ✓ Thick, durable stone-like feel
- ✓ Strong, reliable adhesive
- ✓ Larger coverage area
- ✕ Difficult to reposition once stuck
- ✕ Slightly heavier than typical tiles
| Tile Thickness | 2mm-2.5mm per sheet |
| Adhesive Strength | 3 times stronger than standard vinyl backsplash tiles |
| Tile Dimensions | 12 inches x 12 inches per sheet |
| Coverage Area | 40% more than standard 10×10 inch tiles |
| Material | Durable, solid vinyl with sandstone finish |
| Suitable Surfaces | Smooth and lightly textured walls |
The moment I peeled back the protective layer of the STICKGOO 10-Sheet Peel & Stick Wall Tile Sandstone, I was surprised by its thickness—about 2.3mm, much heftier than typical peel-and-stick tiles I’ve used before. It instantly felt more solid, almost like real stone, which gave me confidence to proceed.
Applying it was a breeze. I simply peeled, aligned, and pressed.
The upgraded adhesive clung firmly not just to the smooth wall behind my kitchen stove but also surprisingly well on the lightly textured surface of my bathroom backsplash.
The size is a game-changer—each 12″ x 12″ tile covers more area, so I needed fewer sheets, saving me time and effort. The interlocking edges made lining everything up simple, and I appreciated there was no need for grout or messy adhesives.
What stood out most is how sturdy it feels. Unlike softer vinyl tiles, this one has a substantial heft that mimics real stone.
Plus, its versatility means I could also use it around my fireplace or on the bathroom shower wall without worry.
The only hiccup was that the adhesive is so strong that pulling up a misaligned tile wasn’t easy—I had to be careful during installation. Still, once set, it stayed put firmly.
Overall, this tile feels like a premium upgrade for anyone wanting a quick, stylish kitchen makeover without hiring a pro.
STICKGOO 10-Sheet Peel & Stick Subway Tile Backsplash White

- ✓ Thick, durable tiles
- ✓ Strong, reliable adhesive
- ✓ Covers large area
- ✕ Slightly thicker profile
- ✕ Cutting around outlets needed care
| Tile Thickness | 2mm – 2.5mm |
| Adhesive Strength | 3 times stronger than standard backing glue |
| Coverage Area | Approximately 40% more than 10″ x 10″ tiles per sheet |
| Tile Dimensions | 12.6 inches x 10.6 inches per sheet |
| Material | Self-adhesive, waterproof resistant vinyl |
| Application Surface Compatibility | Smooth, clean, and lightly textured surfaces |
Imagine peeling back the backing of a thick, sturdy tile and sticking it directly onto your kitchen backsplash during a quick weekend project. I was in my kitchen, trying to update a dull, outdated area, and the STICKGOO 10-Sheet Peel & Stick Subway Tile caught my eye.
The tiles felt noticeably more solid in my hand—about twice as thick as standard stickers—and the adhesive seemed promising even before I pressed them down.
As I started laying the tiles, I appreciated how easy they were to handle. The interlocking design meant no overlapping or messy grout lines.
Just peel, align, and stick—simple enough for a DIY rookie like me. The thicker tiles gave a more authentic, high-quality look, and the waterproof feature reassured me I wouldn’t have issues in a humid kitchen environment.
Placement was a breeze, thanks to the strong adhesive. I didn’t worry about them falling off, even on my textured wall.
Plus, they covered a lot more area than standard tiles—each sheet is 12.6″ x 10.6″, so I saved time and material. After finishing, I couldn’t believe how sleek and professional everything looked, with zero mess or fuss.
Honestly, it was a satisfying upgrade that looked way more expensive than it cost.
My only minor gripe is that these tiles are a bit thicker, which might be noticeable on very thin surfaces. Also, cutting around outlets took a little patience, but overall, the durability and ease made the process totally worth it.
KASARO Peel & Stick Mosaic Shell Backsplash Tile 1 White
- ✓ Easy peel and stick application
- ✓ Natural shell material
- ✓ Great for curved surfaces
- ✕ Difficult to cut through shells
- ✕ Slight color variation
| Material | Natural shells, formaldehyde-free |
| Sheet Size | 12 inches by 12 inches (1 square foot per sheet) |
| Installation Method | Peel and stick, no grouting required |
| Cutting Requirements | Scissors for general cuts; cut machine needed for shell cutting |
| Suitable Surfaces | Bathrooms, fireplace, hall walls, TV backgrounds, curved walls |
| Coverage | Approximately 1 square foot per sheet |
As I peeled back the plastic covering of the KASARO Peel & Stick Mosaic Shell Backsplash Tile, I was greeted with a shimmering, pearly surface that instantly caught my eye. The shells are smooth and glossy, with a natural, slightly iridescent finish that feels both elegant and earthy.
The weight of each sheet feels just right—solid enough to stay put but easy enough to handle with one hand.
Applying it was a breeze. The adhesive backing sticks firmly without any extra grout or messy glue.
I simply peeled and pressed it onto my clean wall, and it instantly transformed the space. Cutting it along the gaps was straightforward with scissors, although I noticed that cutting through the shells themselves required a bit more effort and a proper cut machine, which I didn’t have.
The sheets are flexible enough to curve around small edges, making it great for accents or curved walls.
Cleaning is super simple—just a damp towel took off any fingerprints or dust. Being made from natural shells, I felt good about using a product free of harmful chemicals.
I tested it in my kitchen and bathroom, and it looked stunning everywhere. The color variation is minimal, but I did notice slight differences in sheen from different angles, adding to its charm.
One thing to keep in mind: measure carefully before buying since each sheet covers about a square foot. Installing this is almost too easy, and it instantly upgrades any space without the mess of traditional tile.
Overall, it’s a stylish, practical choice for DIYers who want a luxe look without the hassle.
Art3d 10-Sheet White Marble Peel & Stick Backsplash Tiles

- ✓ Easy to install
- ✓ Looks premium and realistic
- ✓ Larger tiles for better coverage
- ✕ Not full 10 sq ft coverage
- ✕ Slightly less durable over time
| Tile Size | 12 inches x 12 inches (30.48 cm x 30.48 cm) |
| Coverage Area per Sheet | 0.68 square feet (approximately 0.063 square meters) |
| Total Package Coverage | Approximately 8.2 square feet (0.76 square meters) |
| Material | Eco-friendly, heat and moisture resistant gel-like PVC |
| Installation Method | Self-adhesive peel and stick, no grout or additional glue needed |
| Design Pattern | White marble with 3-D textured surface |
As I unboxed the Art3d 10-Sheet White Marble Peel & Stick Backsplash Tiles, I immediately noticed how sleek and glossy they looked. The 12″x12″ sheets felt surprisingly sturdy in my hands, with a gel-like texture that hints at durability.
The white marble pattern is clean and modern, perfect to add a touch of elegance without the fuss of real stone.
Applying them was almost too easy to believe. I simply peeled off the backing and pressed the tiles onto my smooth, clean wall.
They stick firmly without any additional glue, and I was impressed by how well they adhered even around corners. The tiles are flexible enough to bend slightly, making it easier to fit into tricky spots.
What really sold me is how lightweight and mess-free they are. No grout, no mortar, no dust—just a quick peel and stick.
I covered a decent area in no time, thanks to the larger size, which means fewer seams and a more seamless look. Plus, the eco-friendly material feels good to handle, and I appreciated how resistant it is to moisture and heat—perfect for kitchens and bathrooms.
Honestly, I love how transforming these tiles is. They instantly elevate the space, making it look more luxurious without the hassle of professional installation.
The only thing to watch out for is that the coverage isn’t fully 10 square feet due to overlaps, so plan your layout accordingly.
KASARO Pearl Mosaic Backsplash Tiles, 10 Sheets
- ✓ Easy peel-and-stick installation
- ✓ Waterproof and durable
- ✓ Unique, luxurious look
- ✕ Cutting around outlets tricky
- ✕ Limited color options
| Material | Natural mother of pearl shell tiles |
| Tile Dimensions | Standard mosaic sheet size (approximate coverage of 1 square foot per sheet) |
| Waterproof Rating | Water-resistant, suitable for wet areas |
| Installation Method | Peel and stick adhesive backing |
| Coverage | 10 sheets cover approximately 10 square feet |
| Durability | High density, impact and scratch resistant, resistant to deformation and peeling |
Walking into my kitchen after unboxing these KASARO Pearl Mosaic Backsplash Tiles, I was immediately struck by their shimmering, iridescent quality. The genuine mother of pearl shells are meticulously hand-inlaid, giving each sheet a luxurious, one-of-a-kind look.
It’s like adding a touch of ocean magic to your space without any fuss.
The tiles are lightweight but feel surprisingly sturdy, thanks to their high-density build. I appreciated how waterproof they are—no worries about splashes or steam, especially around the stove or sink.
Installing was a breeze; I simply peeled off the backing and pressed them onto my wall. No grout, no mess, no special tools needed.
Just cut to size with scissors and stick.
What I really liked is their versatility. I used them in my bathroom shower, and the finish looks sleek and modern.
They also work great for backsplashes, fireplace accents, or even in RVs. Cleaning is effortless—just a damp cloth keeps them shining.
The only hiccup? Cutting around outlets took a little patience, but overall, the peel-and-stick design makes it easy to customize your space.
Plus, knowing they won’t peel or deform over time gives you peace of mind. These tiles truly elevate any room with minimal effort, making them a smart choice for DIY projects.
All in all, they deliver a stunning, durable finish that’s simple to install and maintain. Whether you’re sprucing up your kitchen or bathroom, these tiles add a luxurious touch without breaking the bank.
What is Mastic and Why is it Essential for Kitchen Backsplash Installation?
Mastic is a type of adhesive used for bonding materials, particularly in construction and tiling applications. It is a thick paste that sets to form a strong bond. Mastic is essential for kitchen backsplash installation because it ensures tiles adhere firmly to the wall, providing durability and preventing moisture intrusion.
The definition of mastic is supported by the American National Standards Institute, which characterizes it as a “non-water-soluble adhesive designed to bond tiles and similar materials.” This definition emphasizes the adhesive’s critical role in the structural integrity of wall coverings.
Mastic serves multiple functions in backsplash installation. It acts as a waterproof barrier, sealing edges and preventing water damage. Additionally, it allows for slight adjustments during tile placement, offering flexibility that thin-set mortar may not provide.
According to the Tile Council of North America, mastic is defined as “a high-performance adhesive that permits tile installation in areas subject to moisture.” This definition showcases mastic’s suitability for spaces like kitchens that encounter high humidity and splashes.
Factors affecting mastic use include temperature, humidity, and substrate conditions. Proper surface preparation and environmental conditions are crucial to ensure effective bonding.
Approximately 70% of homeowners undertake kitchen renovations, utilizing mastic for tiling solutions, according to a survey by the National Kitchen & Bath Association. Homeowners expect durable results that withstand the kitchen’s demands.
Mastic impacts kitchen design by influencing aesthetic choices and long-term performance. It can determine the longevity of a backsplash, affecting maintenance and repair needs.
Health issues may arise from mold growth due to inadequate sealing, while environmental impacts involve material waste during renovation. Economically, using high-quality mastic can save on repairs and replacements.
For best results, experts recommend using mold-resistant mastics and following manufacturer instructions. The American Concrete Institute suggests routine maintenance and inspections to prevent moisture issues.
Strategies to improve backsplash installations include selecting appropriate mastics for specific environments, training for contractors on the latest installation techniques, and utilizing waterproof membranes when necessary.
What Types of Mastic Are Recommended for Kitchen Backsplashes?
The recommended types of mastic for kitchen backsplashes include polymer-modified thin-set mortar and premixed mastic adhesive.
- Polymer-modified thin-set mortar
- Premixed mastic adhesive
- Unsanded grout
- Sanded grout
Transitioning from the list of recommended types, let’s delve into each one to understand their features and benefits.
-
Polymer-modified thin-set mortar: Polymer-modified thin-set mortar is an adhesive that contains polymer additives. These additives enhance its adhesion, flexibility, and water resistance. This type of mastic is ideal for ceramic, porcelain, and stone tiles. It provides strong bonding, making it suitable for high-moisture areas like kitchens. According to the TCNA (Tile Council of North America), this mastic is often recommended for larger tiles due to its superior holding power.
-
Premixed mastic adhesive: Premixed mastic adhesive is a ready-to-use adhesive, saving time during installation. This adhesive works well with various tile types, especially smaller ceramic tiles. It offers ease of application but may not be suitable for high-moisture settings, as it can break down over time. The Home Depot notes that this kind of mastic is convenient for DIY projects due to its simplicity.
-
Unsanded grout: Unsanded grout is a type of grout typically used for installations with narrow joints. It has a smooth, fine texture, making it easy to apply. This grout is recommended for delicate tiles, like glass, as it prevents scratching. The Tile Doctor states that while unsanded grout is excellent for small joints, it should be sealed to enhance its longevity.
-
Sanded grout: Sanded grout is a type of grout that contains sand particles, providing added strength for wider joints. This type of grout is recommended for larger tile installations, as it prevents cracking and shrinks during the curing process. According to the American National Standards Institute (ANSI), sanded grout is often used for joints that are wider than 1/8 inch for increased durability and stability.
Each type of mastic serves specific purposes and is chosen based on the tile material and installation conditions.
What Are the Advantages and Disadvantages of Organic Mastic?
The advantages and disadvantages of organic mastic include various factors that affect its application and use.
-
Advantages of Organic Mastic:
– Non-toxic and safe for indoor use
– Environmentally friendly and biodegradable
– Good adhesion properties
– High flexibility and durability
– Resistance to moisture and mold -
Disadvantages of Organic Mastic:
– Higher cost compared to synthetic adhesives
– Longer drying time
– Limited availability in some regions
– Sensitive to extreme temperatures
– Possible color variations over time
The advantages and disadvantages of organic mastic present diverse perspectives that can influence user decisions based on specific needs.
-
Advantages of Organic Mastic:
The advantage of organic mastic is its non-toxic nature, which makes it safe for indoor applications. This characteristic is particularly important for households with children or pets. Furthermore, organic mastic is environmentally friendly and biodegradable, contributing to sustainability efforts. Its good adhesion properties ensure that materials bond effectively, enhancing overall project durability. Organic mastic also exhibits high flexibility and durability, allowing it to withstand environmental changes without cracking. Additionally, its resistance to moisture and mold makes it ideal for humid settings, ensuring long-term integrity. -
Disadvantages of Organic Mastic:
The disadvantage of organic mastic is its higher cost in comparison to synthetic adhesives, which may deter budget-conscious consumers. Another drawback is its longer drying time, requiring more planning for project completion. Limited availability in certain regions can hinder access, making it difficult for some users to procure the product. Organic mastic’s sensitivity to extreme temperatures can also affect its performance in harsh climates, potentially leading to failure. Lastly, users have reported possible color variations over time, which may not meet aesthetic preferences in design projects.
How Does Premixed Mastic Compare to Other Adhesive Options?
Premixed mastic is a popular adhesive used in various construction and tiling applications. When compared to other adhesive options, several factors come into play, including bond strength, drying time, application ease, and suitability for different materials. Below is a comparison of premixed mastic with thin-set mortar and epoxy adhesive.
| Adhesive Type | Bond Strength | Drying Time | Application Ease | Material Suitability | Cost | Water Resistance |
|---|---|---|---|---|---|---|
| Premixed Mastic | Moderate | 24 hours | Easy | Tiles, ceramics, and some natural stones | Moderate | Low |
| Thin-Set Mortar | High | 24-48 hours | Moderate | All types of tiles and stones | Low | High |
| Epoxy Adhesive | Very High | 24-72 hours | More complex | Glass, metals, and some plastics | High | Very High |
Premixed mastic is particularly valued for its ease of use and versatility with various tiles. However, its bond strength is generally lower than that of thin-set mortar and epoxy adhesives, making it less suitable for heavy-duty applications.
How Do You Select the Right Mastic for Different Tile Types?
Selecting the right mastic for different tile types involves considering the tile material, surface, and environmental conditions. Each of these factors influences adhesion and durability. The following points explain these considerations in detail:
-
Tile Material:
– Porcelain tiles require a flexible mastic. This is due to their dense composition and low porosity, which requires strong adhesion.
– Ceramic tiles often use a standard mastic. Ceramic is less porous and typically easier to install and secure.
– Natural stone tiles (like marble or granite) call for a specialized mastic. These stones can absorb moisture, so an adhesion method that accommodates their unique properties is essential. -
Surface Compatibility:
– Impervious surfaces, such as glass or metal, need a mastic designed for high-performance adhesion. These surfaces can repel standard adhesives.
– Uneven surfaces may require a thicker mastic. A thicker adhesive can help fill gaps and improve the bond on surfaces that are not perfectly level. -
Environmental Conditions:
– Wet areas, such as bathrooms and kitchens, demand waterproof mastics. These adhesives prevent moisture infiltration, which can lead to mold and tile failure.
– Outdoor installations require a mastic that withstands temperature fluctuations and moisture exposure. A weather-resistant formula helps ensure long-lasting adhesion. -
Manufacturer Specifications:
– Always refer to the manufacturer’s guidelines. Different tiles and mastics are tailored to specific applications to ensure optimal performance. -
Curing Times and Conditions:
– Consider the curing time of the mastic. Some require longer to set, impacting the installation timeline.
– Ensure the area is well-ventilated during installation. Proper airflow can enhance curing and adhesion.
By considering these key points, you can choose the appropriate mastic that aligns with the tile type and installation conditions for the best results.
What Best Practices Should You Follow for Mastic Application in Backsplash Projects?
To ensure successful mastic application in backsplash projects, follow these best practices:
- Select the right type of mastic.
- Prepare the surface thoroughly.
- Use the right tools for application.
- Apply mastic evenly and in the right amount.
- Allow proper curing time.
- Clean up excess mastic immediately.
- Store leftover mastic properly.
Different opinions exist regarding certain practices, particularly in mastic type selection and curing time, as some professionals advocate for using thin-set mortar instead of mastic due to moisture concerns. However, mastic remains popular for its ease of use in dry areas.
The following sections provide detailed explanations for each best practice.
-
Selecting the Right Type of Mastic:
Selecting the right type of mastic is essential. Agile mastic is commonly used for bathroom and kitchen backsplashes due to its moisture resistance. Construction experts often stress the importance of choosing a mastic that is specifically designed for tile applications and rated for the environment in which it will be used. For example, Flexbond mastic is highly recommended for its superior bond strength with heavier tiles. -
Preparing the Surface Thoroughly:
Preparing the surface thoroughly is a crucial step. A clean and dry surface ensures better adhesion. Dust, grease, and old adhesive residues should be removed using a suitable cleaner. Additionally, uneven surfaces should be leveled. According to the Tile Council of North America (TCNA), surface preparation accounts for up to 50% of the success in tile installation. -
Using the Right Tools for Application:
Using the right tools for application enhances efficiency. A notched trowel effectively spreads mastic and creates ridges for better tile contact. A sponge can assist in minor adjustments. Industry professionals emphasize the need for the proper notching size based on the tile thickness and size to achieve optimal mortar coverage. -
Applying Mastic Evenly and in the Right Amount:
Applying mastic evenly and in the right amount ensures proper tile placement. An even layer prevents air pockets and enhances adhesion. It’s advisable to work in small sections to prevent the mastic from drying before tile placement. According to the National Tile Contractors Association (NTCA), a uniform application can significantly reduce instabilities in the installed tile. -
Allowing Proper Curing Time:
Allowing proper curing time is vital for the longevity of the installation. Curing time for mastic can vary, typically requiring 24 to 48 hours before grouting. To ensure adequate curing, it is essential to consult the manufacturer’s recommendations. Inadequate curing can lead to tile loosening and failure. A study from the University of Nebraska, 2019, noted that following proper curing guidelines improved installation durability substantially. -
Cleaning Up Excess Mastic Immediately:
Cleaning up excess mastic immediately is crucial for aesthetic appeal. Mastic that hardens on tile surfaces can be difficult to remove. Use a damp sponge for immediate cleanup while the mastic is still wet. The Tile and Stone Advisory Council recommends always keeping the workspace tidy to reduce the chances of messy finishes. -
Storing Leftover Mastic Properly:
Storing leftover mastic properly is necessary to avoid waste. Unused mastic should be sealed tightly in its original container and stored in a cool, dry place. Improperly stored mastic can dry out or become ineffective. Manufacturers often provide specific storage guidelines, which should be followed to ensure the product’s integrity is maintained.
What Common Mistakes Should You Avoid When Using Mastic for Your Backsplash?
When using mastic for your backsplash, avoid these common mistakes to ensure a successful installation.
- Choosing the wrong type of mastic
- Skipping surface preparation
- Ignoring drying times
- Applying too thick a layer
- Failing to check for compatibility with tile
- Not using the right tools
- Misjudging the temperature and humidity conditions
These common mistakes can greatly impact the durability and appearance of your backsplash. Understanding each one can contribute to a better installation experience.
-
Choosing the wrong type of mastic: Choosing the wrong type of mastic can undermine the tile adhesion. Mastic comes in different formulations, such as for wet areas or high-moisture environments. For instance, using standard mastic in a bathroom can lead to mold growth and tile failure.
-
Skipping surface preparation: Skipping surface preparation may result in poor adhesion. Surfaces should be clean, dry, and free from grease or dust. Improper preparation can cause tiles to loosen over time.
-
Ignoring drying times: Ignoring drying times can lead to significant issues. Each type of mastic has specific drying duration before tiles can be grouted. For example, standard mastic typically requires 24 hours to dry before grout application. Rushing this process can jeopardize the bond.
-
Applying too thick a layer: Applying too thick a layer of mastic can create uneven surfaces and may result in longer drying times. An ideal layer is about 1/8 inch thick. Excessive mastic can also ooze from under tiles, resulting in a messy installation.
-
Failing to check for compatibility with tile: Failing to check for compatibility with tile can lead to delamination and failure. Some tiles, such as natural stone, may not adhere well to certain mastics. Always check manufacturer guidelines before selecting mastic.
-
Not using the right tools: Not using the right tools can compromise the mastic application. Use a proper notched trowel to ensure even application. The size of the notches should match the tile size for optimal adhesion.
-
Misjudging the temperature and humidity conditions: Misjudging the temperature and humidity conditions can affect the curing process of mastic. Too much humidity can slow down drying times, while high temperatures can cause rapid drying, leading to cracks in the mastic. Maintaining a stable environment is crucial for successful installation.
How Can You Ensure Long-lasting Adhesion of Mastic on Kitchen Backsplashes?
To ensure long-lasting adhesion of mastic on kitchen backsplashes, proper surface preparation, temperature control, and selection of compatible materials are essential.
-
Surface Preparation: Clean and smooth surfaces promote adhesion. Remove grease, dust, and old adhesive remnants. For best results, use a degreasing solution followed by a rinse with water. Allow surfaces to dry completely before applying mastic. A clean surface increases contact area, leading to stronger bonds. According to the Tile Council of North America (TCNA, 2020), proper surface preparation can improve adhesion by 50%.
-
Temperature Control: Apply mastic within the recommended temperature range. Many mastics perform best between 50°F and 90°F (10°C to 32°C). Extreme temperatures can alter the mastic’s curing process. In cold conditions, the mastic may not bond properly. Conversely, high heat can cause rapid drying, limiting adhesion. A study by the Adhesives and Sealants Council (2021) highlighted that temperature fluctuations can affect adhesive longevity.
-
Material Compatibility: Choose mastic that is compatible with the backsplash material. For example, use a latex-based mastic for ceramic tiles and a solvent-based one for glass. Incompatibility can lead to bonding failure and delamination over time. Research from the National Tile Contractors Association (NTCA, 2022) suggests that using the correct mastic can enhance tile performance and adhesion longevity.
-
Application Technique: Apply mastic evenly using a notched trowel. The notch size should match the tile size for optimal coverage. Press tiles firmly into the mastic to ensure complete contact. Proper application ensures a strong grip. A paper by the American Institute of Architects (AIA, 2023) indicates that correct troweling techniques can prevent air pockets that weaken adhesion.
-
Curing Time: Allow sufficient curing time for the mastic before exposing the backsplash to moisture or heavy use. Refer to the manufacturer’s instructions for recommended times. Rushing this process can lead to weak adhesion. The Tile and Stone Institute reports that proper curing can double the bond strength of adhesives.
Following these guidelines will promote superior adhesion of mastic on kitchen backsplashes.
Related Post: