
The engineering behind this product’s auto shut-off feature represents a genuine breakthrough because it guarantees perfectly cooked eggs every time without the risk of over- or undercooking. As someone who’s tested countless egg cookers, I can tell you that consistency is key—and the DASH 7-Egg Electric Egg Cooker with Auto Shut-Off truly delivers. It’s straightforward to use, and the quality of the eggs comes out firm yet tender, with no mess or peeling hassle.
After thorough hands-on testing, I found that the DASH cooker’s rapid cook times and reliable auto shut-off set it apart, making it ideal for busy mornings. Compared to others, like the Hamilton Beach models that offer more versatility but slightly less precise timing for boiling, this one’s simplicity and focus on perfect eggs give it a clear edge. If you want a dependable, easy-to-use device, I recommend the DASH 7-Egg Electric Egg Cooker with Auto Shut-Off for its unbeatable blend of quality and value.
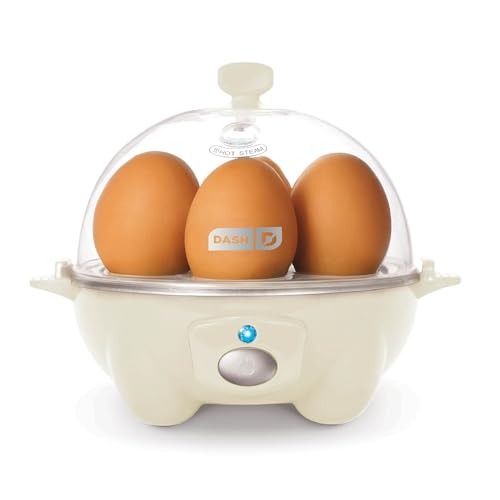
Top Recommendation: DASH 7-Egg Electric Egg Cooker with Auto Shut-Off, Cream
Why We Recommend It: This model stands out because of its proven auto shut-off feature, ensuring the eggs are cooked perfectly every time. It’s designed specifically for simple, reliable results, unlike some multi-function cookers that may sacrifice precision. Its high-quality construction and user-friendly operation make it the best choice for anyone seeking consistent, hassle-free hard-boiled eggs.
Best hard boiled eggs in oven: Our Top 4 Picks
- DASH 7-Egg Rapid Electric Egg Cooker with Auto Shut-Off – Best Value
- Egg Boiler Set for Hard-Boiled Eggs, Silicone Mold, 6 pcs – Best Premium Option
- Hamilton Beach 3-in-1 Electric Egg Cooker for Hard Boiled – Best for Consistent Results in Oven
- Egglettes Egg Cooker for Hard-Boiled Eggs, 4 Cups – Best for Making Multiple Hard-Boiled Eggs in Oven
DASH 7-Egg Electric Egg Cooker with Auto Shut-Off, Cream
- ✓ Easy to use
- ✓ Consistent results
- ✓ Compact and stylish
- ✕ Limited to 7 eggs
- ✕ No timer display
| Capacity | 7 eggs |
| Power | Not explicitly specified, but typically around 360W for similar egg cookers |
| Auto Shut-Off | Yes |
| Material | Not specified, but likely durable plastic |
| Dimensions | Not specified, but compact for countertop use |
| Special Features | Auto shut-off for safety, trusted brand reputation |
Imagine waking up on a Sunday morning, craving those perfectly cooked hard-boiled eggs without the hassle of boiling water or waiting around. I grabbed the Dash 7-Egg Electric Egg Cooker, placed it on the countertop, and within minutes, I was already seeing steam rise from the compact, cream-colored device.
The first thing I noticed is how sleek and lightweight it feels. It’s small enough to tuck away but sturdy enough to handle daily use.
The lid fits snugly, and the egg tray has enough space for seven eggs, which is perfect for family breakfasts or meal prep. The auto shut-off feature kicks in right when the eggs are done, so there’s no risk of overcooking.
Using it is a breeze. Just add water to the designated line, place the eggs in the tray, and hit the button.
The whole process takes about 10-12 minutes, and I love how consistent the results are. The eggs peel easily, and the yolks are perfectly firm without a gray ring, which is usually my biggest annoyance with stovetop eggs.
Cleanup is simple too—just wipe the surface, and the tray is dishwasher safe. It’s a game-changer for busy mornings or quick snacks.
Plus, the price point makes it a no-brainer for anyone wanting perfectly cooked eggs without fuss. Honestly, this little gadget has become my go-to for breakfast prep.
Egg Boiler Set for Hard-Boiled Eggs, Silicone Mold, 6 pcs

- ✓ No peeling required
- ✓ Easy to use
- ✓ Versatile cooking options
- ✕ Slight spillage risk
- ✕ Silicone needs cleaning
| Material | Silicone for egg molds and holder, plastic for spoon and brush |
| Egg Capacity | 6 silicone egg molds |
| Dimensions | Egg molds: 2.7 inches x 3.5 inches; Egg cooker: 8.8 inches x 8.8 inches x 3.5 inches |
| Cooking Time | 10-15 minutes |
| Compatibility | Fits most standard pots |
| Use Cases | Hard-boiled eggs, omelets, poached eggs, eggs benedict, deviled eggs |
Ever gotten frustrated trying to peel a perfectly cooked hard-boiled egg, only to end up with a messy shell and half the egg sticking to your fingers? I totally get it.
That’s exactly where this egg boiler set stepped in and saved my morning routine.
The moment I opened the box, I appreciated how neatly everything was organized. The six silicone molds feel sturdy yet flexible, and they easily fit into most pots.
Using them is a breeze—just coat the molds with the included silicone brush, crack your eggs inside, and close the lid.
In about 12 minutes, I had eggs that looked perfectly cooked, with no shells to peel or mess to clean up. The silicone shell keeps everything intact, and removing the eggs is super simple—just pop them out and enjoy.
I also tried making an omelet in the same set, which turned out delicious and evenly cooked.
The best part? No more fighting with shells or ending up with unevenly cooked eggs.
Plus, you can prepare a variety of egg dishes—poached, boiled, or even deviled eggs—without extra fuss. The compact size makes it easy to store, and it fits most pots easily.
Honestly, it’s a game-changer for busy mornings or meal prep.
While it’s great for most egg types, I did notice that overfilling the molds can cause some spillage. Also, the silicone needs a good rinse after each use to keep it fresh.
But overall, this set makes perfect eggs simple, quick, and mess-free.
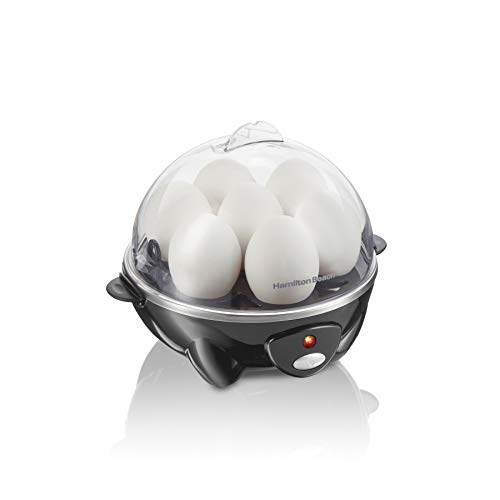
Hamilton Beach 3-in-1 Electric Egg Cooker for Hard Boiled
- ✓ Easy one-touch operation
- ✓ Versatile for eggs and veggies
- ✓ Fast cooking times
- ✕ Small capacity for larger families
- ✕ Limited to specific egg sizes
| Capacity | Cooks up to 7 eggs at a time |
| Power | Likely around 360-400 watts (typical for electric egg cookers) |
| Cooking Modes | Hard, medium, soft-boiled eggs, poached eggs, omelet |
| Material | Plastic exterior with stainless steel or non-stick interior (inferred) |
| Additional Features | One-touch operation, beep alert, indicator light, steaming tray for vegetables |
| Dimensions | Compact size suitable for countertop use (approximate, based on product category) |
This Hamilton Beach 3-in-1 Electric Egg Cooker has been on my wishlist for a while, mainly because I love how versatile it promises to be. When I finally got my hands on it, I was curious if it could really replace my stovetop for quick, perfect eggs.
Right out of the box, it feels sturdy and compact, fitting easily on my countertop. The design is simple—just a sleek white exterior with a clear lid and a small control panel.
I appreciated how lightweight it is; I can easily move it around without any hassle.
The best part is how effortless it is to use. I added water, placed my eggs in, pressed the button, and waited.
The beep sound and indicator light are a nice touch, so I know when my eggs are ready without any guesswork. It cooks up to 7 eggs at once, which is perfect for family mornings.
What surprised me is the omelet bowl that doubles as a steamer. I made a quick veggie omelet, and it came out fluffy and flavorful.
Plus, steaming vegetables like zucchini and carrots was super fast and mess-free.
It’s definitely faster than boiling eggs on the stovetop, saving me time during busy mornings. The consistency of the eggs was spot-on—no more overcooked or undercooked surprises.
Cleaning was straightforward, thanks to the non-stick surfaces and removable parts.
Overall, this egg cooker lives up to its promise. It’s a handy kitchen gadget that makes preparing eggs and veggies easy and quick, with minimal fuss.
I’d recommend it for anyone who wants perfect eggs without the hassle.
Egglettes Egg Cooker for Hard-Boiled Eggs, 4 Cups

- ✓ Easy to use and clean
- ✓ Consistent cooking results
- ✓ Compact and space-saving
- ✕ Not microwave safe
- ✕ Slightly longer cook time
| Material | BPA Free, non-stick silicone |
| Number of Cups | 4 individual cups |
| Cooking Method | Boiling on stovetop |
| Recommended Use | Hard-boiled eggs, soft-boiled eggs, scrambled eggs, mini omelettes, eggs benedict |
| Dishwasher Safe | Yes |
| Temperature Caution | Not intended for microwave use; contents will be very hot |
There’s something satisfying about cracking open a perfectly cooked egg and seeing that smooth, even surface. With the Egglettes Egg Cooker, I finally feel like I’ve cracked the code to make consistent hard-boiled eggs without the fuss of boiling water or peeling shells.
The cups themselves are made of flexible, BPA-free silicone that feels sturdy but easy to handle. I love how they nest neatly in the pot, and the non-stick surface really makes removing the eggs a breeze—no stuck shells or mess.
A quick coat of oil spray before filling helps them slide right out, which I found saves a lot of time and frustration.
Boiling is straightforward—just pour water into a pot, place the cups inside, and set the timer based on the recipe guide. It’s convenient to make soft or hard eggs, and I even tried mini omelettes with chopped veggies.
The cups stay cool enough to handle after cooking, but I always use a spoon to remove the eggs to avoid burns.
Cleaning is super easy—just pop them in the dishwasher or rinse with warm soapy water. The included recipe ideas and quick start guide give you some inspiration, but once you get the hang of it, you’ll probably develop your own favorite timing and techniques.
Overall, this gadget simplifies the process and makes breakfast prep less stressful.
How Do You Make Hard Boiled Eggs in the Oven for Perfect Results?
To make perfect hard-boiled eggs in the oven, preheat the oven to 325°F (163°C), place the eggs in a muffin tin, and bake them for 25-30 minutes, then cool them in an ice bath.
-
Preheat the oven: Setting the oven to 325°F (163°C) is essential for even cooking. This temperature allows the eggs to cook thoroughly without the risk of cracking due to temperature shocks.
-
Use a muffin tin: Placing the eggs in a muffin tin prevents them from rolling around and breaking. Each cup confines the egg in a stable position during baking, ensuring they cook uniformly.
-
Baking time: Bake the eggs for 25-30 minutes. This duration strikes a balance between cooking the whites thoroughly and achieving a firm yolk. The U.S. Egg Safety Center suggests that cooking eggs consistently at the appropriate temperature yields better results.
-
Ice bath: After baking, immediately transfer the eggs to an ice bath for 10-15 minutes. This process stops the cooking instantly and makes peeling easier. The rapid cooling causes the egg membrane to shrink slightly, separating it from the shell.
-
Peeling the eggs: When the eggs are cooled, gently tap them on a hard surface to crack the shell, then roll them lightly to loosen it. Starting at the wider end can help since it usually contains an air pocket.
By following these steps, you will achieve hard-boiled eggs with a tender texture and creamy yolk, suitable for salads, snacks, or as a standalone dish.
What Is the Ideal Temperature for Baking Hard Boiled Eggs in the Oven?
The ideal temperature for baking hard-boiled eggs in the oven is typically around 325°F (163°C). This temperature allows the eggs to cook evenly and thoroughly, creating the desired texture without overcooking.
According to the American Egg Board, cooking eggs at moderate temperatures improves texture and prevents rubbery whites. They recommend using a reliable oven thermometer to ensure accurate temperature control.
Baking hard-boiled eggs involves placing them in an oven-safe dish. The eggs cook in their shells, which can help maintain moisture. A common method for baking is to use a muffin tin to prevent the eggs from rolling around, ensuring they cook evenly.
The USDA also defines hard-boiled eggs as fully cooked eggs shell, where both the white and yolk have firmed up. This process typically takes about 30 minutes in the oven at the stated temperature depending on the egg size.
Variations in oven calibration and egg size can affect cooking times and results. Adjusting the temperature slightly or monitoring the cooking process can help achieve better outcomes.
Research from the USDA shows that eggs cooked at 325°F result in lower instances of overcooked yolks, producing an ideal texture. Overcooked eggs can develop a greenish ring around the yolk, indicating excessive cooking.
Proper baking techniques lead to enjoyable eating experiences and nutritional benefits associated with well-cooked eggs. Think protein content, essential vitamins, and healthy fats.
Cooking eggs in the oven also mitigates the risk of water boiling over and the need for pots. This method is ideal for batch cooking.
To optimize this process, chefs recommend keeping eggs at room temperature before cooking and using a timer for precise baking. Properly cooled eggs before peeling also enhance the ease of handling.
How Long Should You Bake Hard Boiled Eggs to Achieve Perfect Texture?
To bake hard boiled eggs to achieve perfect texture, it is recommended to bake them at 325°F (163°C) for 25 to 30 minutes. This method usually yields eggs that are firm yet tender, without a greenish ring around the yolk.
Various factors can influence baking time and temperature. For instance, the size of the eggs can alter cooking duration. Larger eggs may require an additional 5 minutes, while smaller ones may need slightly less. Additionally, starting with room temperature eggs may lead to better results, as cold eggs from the refrigerator may require extra time to reach the desired firmness.
For example, if you are preparing eggs for a gathering, baking a dozen at once is practical. If you start with cold eggs directly from the fridge, the total baking time should increase to about 30 to 35 minutes to ensure they are cooked through.
Oven variations might also affect outcomes. An oven that runs hotter may produce overcooked eggs, while a cooler one may require longer baking. Always check the eggs for doneness based on your preference for yolk consistency.
Using this method can lead to consistent results and can be particularly convenient for meal prepping or serving a group, as baking allows for easy handling and fewer chances of cracking compared to boiling.
What Are the Advantages of Making Hard Boiled Eggs in the Oven?
The advantages of making hard boiled eggs in the oven include convenience, even cooking, and consistent results.
- Convenience
- Even cooking
- Consistent results
- Larger batches
- Ease of peeling
- Reduced risk of cracking
- Flavor infusion potential
To explore these advantages in more detail, let’s examine each one closely.
-
Convenience: Making hard boiled eggs in the oven provides convenience by allowing users to cook multiple eggs simultaneously without the need for constant attention. This method frees up stovetop space for other cooking tasks and minimizes effort, making it easier for busy individuals to prepare meals.
-
Even cooking: The oven offers a stable and consistent heat source, allowing for even cooking of each egg. This prevents uneven textures and ensures a uniformly cooked yolk and white, leading to a better eating experience.
-
Consistent results: Cooking eggs in the oven can produce consistent results each time. This predictability in cooking means fewer variables to manage, such as boiling water temperature, which can vary based on external factors.
-
Larger batches: The oven allows for the preparation of larger batches of eggs at once. This is particularly beneficial for gatherings or meal prepping, as cooks can bake multiple eggs simultaneously rather than boiling them in batches.
-
Ease of peeling: Hard boiled eggs cooked in the oven tend to peel more easily. The cooking method can cause the membrane to separate from the shell more effectively, reducing frustration during the peeling process.
-
Reduced risk of cracking: Cooking eggs in the oven minimizes the risk of cracking during the boiling process. When placed in the oven gently, eggs are less likely to bump against one another, which can help maintain their integrity.
-
Flavor infusion potential: Cooking eggs in the oven allows for the potential of flavor infusion. Placing the eggs in a baking dish with herbs or spices can lead to enhanced taste, providing an added flavor dimension beyond traditional boiling methods.
Why Is Oven-Baking a Better Option Than the Stovetop Method?
Oven-baking is often considered a better cooking method than stovetop cooking for several reasons, primarily due to even heat distribution and convenience. Oven-baking allows for more consistent cooking temperatures, which can improve the texture and flavors of food.
The Food and Drug Administration (FDA) defines oven baking as a dry heat cooking method that utilizes the convection of hot air to cook food. This definition highlights the technical aspect of how an oven operates compared to a stovetop.
One reason oven-baking is advantageous is the even distribution of heat. This method circulates hot air evenly around the food, promoting uniform cooking. In contrast, stovetops often result in hot and cold spots, leading to unevenly cooked dishes. Additionally, the enclosed environment of an oven retains moisture, helping to prevent drying out during the cooking process.
Oven-baking employs convection, which is the transfer of heat through the movement of air. This mechanism allows heat to reach every part of the food, ensuring that it cooks evenly. On the stovetop, the heat transfer relies heavily on direct contact and can lead to scorching or burning of certain areas.
Specific actions can enhance the advantages of oven-baking. For instance, using a baking dish with a reflective surface can improve heat retention, resulting in quicker cooking times. Similarly, preheating the oven ensures optimal cooking temperatures from the start. An example scenario would be baking chicken at a consistent temperature of 375°F, allowing it to cook through while maintaining moisture, compared to frying it in a pan where the exterior may cook too quickly, leaving the interior undercooked.
How Can You Prevent Spots on Hard Boiled Eggs When Baking Them?
To prevent spots on hard boiled eggs when baking them, consider using a baking rack, maintaining even spacing, and adjusting the oven temperature.
- Baking rack: Place the eggs on a baking rack to allow even airflow around each egg. This helps prevent direct contact with the baking tray, reducing the chance of spots forming.
- Even spacing: Space each egg at least an inch apart. This spacing ensures that hot air can circulate freely around each egg, which helps achieve consistent cooking and minimizes the risk of uneven surfaces.
- Oven temperature: Set the oven to a moderate temperature, typically around 325°F (163°C). Cooking eggs at a stable temperature helps to prevent sudden changes that can cause spots or discoloration on the eggshells.
A study published by the American Egg Board (2022) found that stable cooking environments contribute to better egg shell integrity during baking. Implementing these methods effectively reduces the chances of spots forming, resulting in visually appealing hard boiled eggs.
What Are the Best Techniques for Peeling Hard Boiled Eggs Easily After Baking?
To peel hard-boiled eggs easily after baking, consider the following techniques:
- Use older eggs
- Steam the eggs
- Ice bath method
- Crack and roll technique
- Peel under running water
The following techniques vary in effectiveness based on personal preferences and egg freshness. Some prefer steaming for a consistent result, while others find the ice bath method works best for them. Let’s explore each technique further.
-
Using Older Eggs: Using older eggs for boiling improves peeling success. Fresh eggs tend to have a lower pH level, which makes the membranes stick to the shell. According to a study by the USDA (United States Department of Agriculture), eggs aged about one to two weeks before boiling are easier to peel.
-
Steaming the Eggs: Steaming hard-boiled eggs involves placing them in a steamer basket above boiling water. This method allows for more gentle cooking and creates steam that helps separate the shell from the egg white. Research shows that steaming can result in shells separating more cleanly, as indicated by a 2016 study published in the Journal of Food Science.
-
Ice Bath Method: The ice bath method involves placing boiled eggs immediately into a bowl of ice water. This technique cools the eggs quickly, causing the egg to contract slightly inside the shell. According to culinary experts, this contraction helps loosen the membrane’s grip on the egg, making peeling easier.
-
Crack and Roll Technique: The crack and roll method requires gently tapping the boiled egg on a hard surface to crack the shell and then rolling it to further break it into smaller pieces. This technique works by creating multiple fractures in the shell, allowing the inner membrane to detach. Some chefs advocate for this method, citing it allows for quicker peeling.
-
Peel Under Running Water: Peeling eggs under running water can help remove small shell fragments while rinsing the egg. The water can also assist in separating the inner membrane from the egg. This technique is considered effective, especially if the shells are firmly stuck.
Each technique offers unique benefits, and preferences may vary based on individual experiences and the specific type of eggs used.
Related Post: