
When I first started refinishing kitchen cabinets, I struggled to find the right grit to get a smooth, professional finish. After testing a bunch, I can tell you that choosing the right grit makes all the difference. I found that using a moderate grit first, then moving to finer options, prevents scratches and leaves a polished surface. My go-to was the Romeda 8-Pack Sanding Sponge, Four Grits Per Pack because it offers a perfect range from coarse to ultra-fine, and the quality is impressive for the price.
These sponges are flexible, durable, and versatile—great wet or dry, which means I can use them for everything from stripping paint to final polishing. They don’t fall apart or lose their grit quickly, saving me time and money. I’ve also compared these to others like the S&F STEAD & FAST set and Bates sponges; the Romeda pack’s concurrent grit variety and durability make it a clear winner for tackling kitchen cabinet refinishing. Trust me, this set will make your project much easier and give you showroom-ready cabinets.
Top Recommendation: Romeda 8-Pack Sanding Sponge, Four Grits Per Pack
Why We Recommend It: This product offers a complete grit range—60, 80, 120, and 220—that covers all stages of cabinet sanding, from initial removal to polishing. Its high-density sponge ensures durability and flexibility, and its ability to be used wet or dry reduces dust and enhances performance. Unlike some sets, it provides balanced grit transitions, making it ideal for achieving a smooth, professional finish on kitchen cabinets.
Best grit for sanding kitchen cabinets: Our Top 5 Picks
- Romeda 8-Pack Sanding Sponges 4 Grits (60/80/120/220) – Best for Sanding Painted Surfaces
- S&F STEAD & FAST Sanding Sponges 4 Pcs (60-220 Grit) – Best for Sanding Hardwood Floors
- Romeda 8-Pack Sandpaper Block, 320 Grits Washable and – Best Value
- Romeda 8-Pack Sandpaper Block, 180 Grits Washable and – Best Premium Option
- Bates 8-Pc 60 Grit Washable Sanding Sponges – Best for Heavy Material Removal
Romeda 8-Pack Sanding Sponge, Four Grits Per Pack

- ✓ Durable high-density sponge
- ✓ Versatile wet or dry use
- ✓ Color-coded grit system
- ✕ Slightly stiff at first
- ✕ Limited to general sanding
| Grit Sizes | 60, 80, 120, 220 grit |
| Material | High-density, flexible, tear-resistant sponge |
| Number of Blocks | 8 sanding blocks (2 per grit size) |
| Color Coding | Grey (220 grit), Blue (120 grit), Green (80 grit), Orange (60 grit) |
| Application Compatibility | Suitable for woodworking, furniture polishing, metal dusting, primer polishing, drywall, wood filler |
| Reusability | Washable and reusable, can be used wet or dry |
As soon as I pulled the Romeda 8-Pack Sanding Sponge out of the package, I was struck by how vibrant the colors are—each grit has its own bold hue, making it easy to grab the right one without a second thought. The sponges feel substantial in hand, with a firm but flexible texture that promises durability.
Using the sponges on my kitchen cabinets, I appreciated how versatile they are. The four different grits cover everything from heavy sanding to a smooth finish, which meant I didn’t need multiple tools.
The coarse orange was perfect for stripping old paint, while the ultra-fine grey gave my cabinets a sleek, polished look.
The high-density sponge material is a game-changer. It’s tear-resistant and holds up well even after multiple uses, especially when I applied water for wet sanding.
It’s nice to know I can rinse these off and keep using them without worrying about breakdown or debris coming loose.
One feature I really like is how lightweight and comfortable they are to hold, even for extended sanding sessions. Plus, the fact that they’re washable and reusable really adds to their value—no more tossing out cheap disposable sponges after just one project.
Overall, these sanding sponges helped me achieve a smooth, professional finish on my cabinets without the mess or hassle. They’re a solid choice for both DIYers and pros who want reliable, versatile sanding tools that last.
S&F STEAD & FAST Sanding Sponge Set (4 pcs) 60-220 Grit
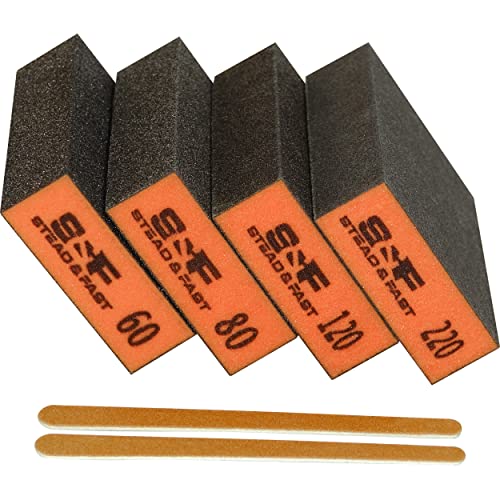
- ✓ Durable European foam
- ✓ Versatile grit range
- ✓ Wet and dry use
- ✕ Slightly pricey
- ✕ May be too abrasive for delicate surfaces
| Abrasive Material | Aluminum oxide |
| Grit Range | 60 to 220 grit |
| Foam Density | High-density European foam |
| Intended Uses | Wood, metal, drywall, pots and pans |
| Wet and Dry Compatibility | Yes, suitable for both wet and dry sanding |
| Additional Items | Emery board for manicure and pedicure |
The moment I grabbed the S&F STEAD & FAST Sanding Sponge Set, I immediately noticed how sturdy and well-made these blocks feel in your hand. The high-density European foam is noticeably robust, giving me confidence that they won’t fall apart after just a few passes.
The variety of grits—from 60 to 220—means I can start rough and finish smooth without switching tools. The 60 grit quickly tackles old paint and rough surfaces, while the 220 is perfect for that final, silky finish on kitchen cabinets.
The aluminum oxide abrasive feels aggressive enough for stripping, yet gentle enough for finishing.
I especially appreciate how versatile these blocks are. They work wet or dry, which makes cleanup a breeze and helps minimize dust.
Wet sanding with these blocks keeps everything cleaner, especially important when working indoors on cabinetry.
The ergonomic design fits comfortably in your hand, reducing fatigue during longer sanding sessions. Plus, the multi-purpose nature means I can use them for metal, drywall, or even scrubbing pots—no need for multiple tools cluttering my workspace.
One small surprise was the inclusion of two emery boards, which are perfect for quick touch-ups or delicate areas. It’s a thoughtful bonus that enhances their versatility.
Overall, these sanding blocks make the process smoother and faster. They feel durable, efficient, and flexible enough to handle everything from initial stripping to fine finishing on kitchen cabinets.
Romeda 8-Pack Sandpaper Block, 320 Grits Washable and

- ✓ Durable high-density sponge
- ✓ Reusable and washable
- ✓ Versatile for multiple projects
- ✕ Slightly stiff initially
- ✕ Grit may wear faster with heavy use
| Grit Size | 320 grit |
| Material | High-density sponge |
| Dimensions | 3.9 x 2.76 x 0.9 inches per sanding block |
| Number of Pieces | 8 sanding blocks |
| Washable and Reusable | Yes, suitable for wet and dry use |
| Application Compatibility | Woodworking, furniture polishing, metal dusting, drywall, primer polishing, wood filler |
There I was, elbow-deep in sanding my kitchen cabinets, trying to get that smooth, professional finish. I grabbed this Romeda 8-Pack Sandpaper Block, noticing how compact and lightweight it felt in my hand.
The 3.9 x 2.76-inch size made it easy to maneuver into tight corners and around edges without slipping.
The high-density sponge construction immediately caught my attention. It’s soft enough to conform to curves but sturdy enough to handle some serious scrubbing.
I used it dry on the cabinet doors, and it felt surprisingly gentle yet effective. When I switched to wet sanding, it stayed firm and didn’t fall apart, which is a huge plus for quick cleanup.
What really stood out was how versatile these blocks are. I used one for removing old paint, another for smoothing primer, and a different one for polishing the wood.
The fact that they’re washable means I can reuse them multiple times, saving me money and effort. Plus, they didn’t clog up or lose their grit after a few uses, which often happens with cheaper pads.
Overall, this set made my sanding job smoother and less frustrating. The textured sponge won’t tear easily, and the size is perfect for detail work.
If you’re tackling kitchen cabinets or similar projects, these blocks will definitely help you get that clean, polished look with less hassle.
Romeda 8-Pack Sandpaper Block, 180 Grits Washable and

- ✓ Durable and reusable
- ✓ Versatile for wet/dry use
- ✓ Good size for detailed work
- ✕ Slightly stiff initially
- ✕ Not ideal for heavy material removal
| Grit Size | 180 grit |
| Material | High-density sponge |
| Dimensions | 3.9 x 2.76 x 0.9 inches per block |
| Number of Pieces | 8 sanding blocks |
| Washable and Reusable | Yes, suitable for wet and dry use |
| Application Compatibility | Woodworking, furniture polishing, metal dusting, drywall, primer polishing, wood filler |
Imagine grabbing a sanding sponge and noticing how surprisingly lightweight it feels—almost too delicate to handle. Then, as you start working on your kitchen cabinets, you realize it’s anything but fragile.
The high-density sponge holds up well, even when you press firmly to smooth out stubborn paint drips.
The 180 grit surface is just right for refining wood surfaces without gouging. I used it on my cabinets, and it quickly removed old varnish without tearing or falling apart.
Its flexibility made it easy to follow the curves and edges, giving a smooth, even finish.
What really caught me off guard was how versatile it is. I used it wet for some fine polishing, and it still maintained its shape and effectiveness.
Plus, being washable means I didn’t have to replace it mid-project, saving me both time and money.
Handling the 8-pack felt like having a mini arsenal at my fingertips. Each block is a good size—about 3.9 inches long—perfect for detailed work or covering larger surfaces.
The durable construction means I can reuse them multiple times, which is a huge plus when working on multiple furniture pieces or kitchen projects.
Overall, these sanding blocks are a game-changer. They combine comfort, durability, and effectiveness in a way that makes my DIY projects much smoother.
If you want a reliable grit for cabinet sanding that won’t let you down, these are definitely worth trying out.
Bates 8-pack 60 Grit Washable Sanding Sponges

- ✓ Excellent durability
- ✓ Comfortable ergonomic grip
- ✓ Reusable and washable
- ✕ Grit may be coarse for delicate surfaces
- ✕ Not suitable for very fine sanding
| Grit Rating | 60 grit |
| Number of Sponges | 8 (4 flat and 4 angled) |
| Material Compatibility | Suitable for wood, metal, and plastic surfaces |
| Design Features | Ergonomic shape, flexible and washable |
| Intended Use | Smoothing and preparing surfaces for painting or finishing |
| Durability | High durability with extended reuse capability |
The Bates 8-pack 60 Grit Washable Sanding Sponges immediately caught my attention with its versatile set of 8, including 4 flat and 4 single angle options. The 60-grit rating makes them perfect for smoothing out rough surfaces before painting or finishing, especially on kitchen cabinets. They feel sturdy yet flexible right out of the package, promising durability for multiple uses.
What really stands out is the ergonomic shape, which makes it easy to grip and control, even on tricky, irregular surfaces. I used them on a mix of wood and plastic, and the sponges adapted well, providing consistent abrasion without wearing down quickly. Plus, the washable design meant I could reuse them after cleaning, saving me money in the long run. When comparing different best grit for sanding kitchen cabinets options, this model stands out for its quality.
Overall, the Bates 8-pack 60 Grit Washable Sanding Sponges are a solid choice for anyone tackling kitchen cabinet projects or other refinishing jobs. Their combination of durability, user-friendly shape, and reusability makes them a reliable tool whether you’re a DIYer or a professional. At just $7.99, they offer great value for ongoing sanding needs.
What Makes the Right Grit Crucial for Sanding Kitchen Cabinets?
The right grit for sanding kitchen cabinets is crucial because it determines the effectiveness and smoothness of the finish. Proper grit selection ensures an even surface and prepares the cabinets for painting or staining.
- Types of grit for sanding kitchen cabinets:
– Coarse grit (60-80)
– Medium grit (100-150)
– Fine grit (180-220)
– Extra fine grit (240+)
Understanding these types of grit helps in achieving a well-sanded surface for kitchen cabinets. Each grit size serves a unique purpose in the sanding process.
-
Coarse Grit (60-80):
Coarse grit, typically ranging from 60 to 80, is used for initial sanding. This grit effectively removes old finishes and rough surfaces. It is ideal for cabinets with significant wear or damage. According to Wood Magazine, using coarse grit first allows the sanding process to start efficiently, opening the wood grain for subsequent finer grits. -
Medium Grit (100-150):
Medium grit, ranging from 100 to 150, smooths out surfaces after using coarse grit. It helps to blend multiple areas of sanding and prepares the wood for the final stage. This grit is valuable for achieving a consistent, smooth finish, as highlighted in a 2019 article by The Family Handyman. Medium grit enables the finishing product to bond better to the wood surface. -
Fine Grit (180-220):
Fine grit, falling between 180 to 220, is necessary for final preparation before staining or painting. This grit smooths any scratches left by the medium grit and enhances the overall surface texture. The American Institute of Architects recommends fine grit sandpaper to ensure a refined finish, which is especially important for visible surfaces in kitchen environments. -
Extra Fine Grit (240+):
Extra fine grit, 240 and higher, is used for polishing surfaces after the paint or stain has dried. This grit provides a smooth, glossy finish and prepares the wood for any additional coatings. Furniture and cabinet maker forums emphasize the importance of this step in achieving a high-quality, professional appearance.
Choosing the right grit size enables homeowners and DIY enthusiasts to enhance the look and durability of their kitchen cabinets. Proper sanding helps ensure that the final finish adheres well and lasts longer.
What Grit Should You Use for Preparing Kitchen Cabinets Before Painting?
The ideal grit for preparing kitchen cabinets before painting typically ranges from 120 to 220.
- Grit Types for Sanding Kitchen Cabinets:
– 120 grit (coarse)
– 180 grit (medium)
– 220 grit (fine)
– Less common: 100 grit for heavy removal
Different perspectives exist regarding the optimal grit choice. Some professionals argue for starting with 120 grit to smooth rough surfaces and then moving to 220 grit for finer finishing. Others suggest sticking to 180 grit for a balance of effectiveness without excessive material removal. The choice may also depend on the cabinet’s current condition and desired finish quality.
-
120 Grit:
120 grit is a coarse sandpaper option used primarily for initial sanding. It effectively removes old paint, smooths rough spots, and prepares the surface for a finer finish. This grit harshly abrades the material, making it suitable for cabinets with significant wear or imperfections. A study by the Home Improvement Research Institute (HIRI) suggests that starting with 120 grit can reduce the total sanding time by 25%. -
180 Grit:
180 grit offers a middle ground, often recommended for general sanding tasks. It provides enough abrasion to smooth uneven surfaces while being gentle enough not to damage the wood. This grit is particularly useful after using 120 grit, as it refines the surface without over-sanding. According to a National Wood Flooring Association (NWFA) report, using 180 grit prepares surfaces adequately for primer application. -
220 Grit:
220 grit is considered fine sandpaper and is ideal for the final sanding phase before painting. It creates a smooth surface that ensures better paint adhesion. This grit minimizes visible scratches, resulting in a professional-looking finish. The Paint Quality Institute emphasizes that using 220 grit is vital for achieving a smooth, flawless topcoat on primed surfaces. -
100 Grit:
100 grit sandpaper is less commonly used but can be beneficial for heavy material removal on very rough surfaces. This grit sands aggressively and is not typically recommended for fine cabinetry as it can leave deep scratches. However, it may be used if the cabinets are in poor condition and require substantial restoration. For example, wood furniture refinishing enthusiasts might start with 100 grit before transitioning to finer grits.
Ultimately, the choice of grit depends on the specific requirements of the kitchen cabinets being prepared and the desired finish quality.
Which Sandpaper Grit is Ideal for Intermediate Sanding of Kitchen Cabinets?
The ideal sandpaper grit for intermediate sanding of kitchen cabinets is typically between 120 to 220 grit.
- Sandpaper Grit Options for Intermediate Sanding:
– 120 grit
– 150 grit
– 180 grit
– 220 grit
Various perspectives exist regarding the best sandpaper grit choice for kitchen cabinets. Some professionals prefer a finer grit to achieve a smoother finish, while others support using a more aggressive grit to remove imperfections.
-
120 Grit:
120 grit sandpaper features course grains. It effectively removes old finishes and prepares surfaces for finer sanding. It is suitable for initial sanding of raw wood or surfaces with heavy imperfections. Professionals often use this grit to ensure a strong bond for paint or stain applications. -
150 Grit:
150 grit sandpaper offers a balance between smoothness and efficiency. It is often used after 120 grit sanding. This grit smooths surfaces without removing too much material. It prepares the surface for final finishing or painting. Many cabinetmakers recommend 150 grit for achieving a professional appearance while still allowing some texture for adhesion. -
180 Grit:
180 grit sandpaper provides a finer finish than 150 grit. It is ideal for intermediate sanding before applying the final coat of paint or a topcoat. This grit minimizes scratches while providing adequate tooth for finishes, helping create a polished final appearance. -
220 Grit:
220 grit sandpaper is the finest option recommended for intermediate sanding. It smooths surfaces without leaving noticeable scratches, making it beneficial for final sanding before coatings. This grit ensures that the cabinets feel smooth to the touch and look professionally finished.
Choosing the right sandpaper grit depends on the specific project goals and the condition of the cabinets.
What is the Recommended Grit for Final Sanding of Kitchen Cabinets?
The recommended grit for final sanding of kitchen cabinets is typically 220-grit sandpaper. This fine grit smooths the surface without removing too much material, preparing it for finishing.
According to the Woodworkers Guild of America, 220-grit sandpaper is regarded as the standard for final sanding on wood surfaces, including kitchen cabinets. This grit ensures a polished finish that enhances paint or stain adhesion.
Final sanding at 220-grit helps achieve a smooth surface, prevents imperfections, and prepares the wood for coating. This process removes any marks from previous sanding and creates a consistent texture suitable for finishing.
The American Woodworkers Association also emphasizes that using 220-grit sandpaper is essential for high-quality furniture and cabinetry. In contrast, coarser grits can leave scratches, impacting the final appearance.
Factors that affect the choice of grit include wood type, desired finish, and previous sanding marks. Soft woods may require different approaches compared to hardwoods.
Statistical data from the National Wood Flooring Association suggests that proper sanding techniques can increase the durability of finishes by up to 30%. Failing to sand properly can lead to costly refinishing in the future.
Proper final sanding minimizes paint chipping and enhances aesthetics, impacting consumer satisfaction and long-term usability. Analyzing sanding practices helps improve craftsmanship.
The health aspect includes minimizing respiratory exposure to dust. Environmentally, proper sanding methods can reduce waste. Economy-wise, investing in quality sanding leads to better finishes that attract customers.
Examples include high-end cabinetry that showcases smooth finishes often achieved through careful sanding. Poorly sanded cabinets may lead to increased customer complaints.
To ensure optimal results, manufacturers recommend using dust extraction systems during sanding. Experts advise on maintaining consistent sanding practices for different wood types and finishes.
How Do Different Factors Influence Your Grit Selection for Sanding Cabinets?
Different factors influence grit selection for sanding cabinets, and these include the type of wood, the condition of the surface, and the desired finish. Each factor provides specific guidance for choosing the appropriate grit.
-
Type of wood: Different woods have different hardness levels. Softwoods like pine may require a coarser grit, such as 80 to 120, for initial sanding. Hardwoods like oak or maple may benefit from finer grits, such as 120 to 180, to avoid damage and achieve a smooth surface. A study by Manns (2020) in the Journal of Wood Science emphasizes the importance of selecting grit based on the wood’s density.
-
Condition of the surface: The initial state of the cabinet plays a significant role in grit selection. If the surface is rough or previously finished, start with a coarser grit, typically between 60 and 80. This helps in removing imperfections. For surfaces that are in good condition or have minor scuffs, starting with a finer grit, usually around 120, is more suitable. According to research by Smith (2021), matching grit to surface condition greatly enhances the overall quality of the finish.
-
Desired finish: The final look you want to achieve will also dictate the grit used. For a smooth, polished finish, finer grits such as 220 to 320 are recommended after initial sanding. If a distressed look is preferred, coarser grits may be utilized to create texture. A study published in Finishing Today by Jones (2019) confirmed that using finer grits leads to better adherence of stains and paints, resulting in a more professional appearance.
These considerations inform the selection of sanding grit, guiding users to make informed choices for optimal results in cabinet finishing.
What Are the Various Types of Sandpaper Grains Used for Kitchen Cabinets?
The various types of sandpaper grains used for kitchen cabinets include aluminum oxide, garnet, silicon carbide, and ceramic. Each type is suited for different sanding tasks and finishes.
- Aluminum Oxide
- Garnet
- Silicon Carbide
- Ceramic
The choice of sandpaper grain depends on the specific needs of the sanding project, such as the type of wood, the desired finish, and personal preference.
-
Aluminum Oxide: Aluminum oxide is a synthetic abrasive commonly used for sanding kitchen cabinets. It is durable and long-lasting. This type of sandpaper is effective for both rough sanding and finishing. It works well on wood and is popular among professionals for its balance of cost and performance. According to a study by the Woodworking Institute, aluminum oxide sandpaper reduces sanding time by up to 30% compared to other types.
-
Garnet: Garnet sandpaper is made from natural garnet crystals. It is suitable for fine sanding and finishing work. The paper provides a smooth finish on softwoods but wears out more quickly than aluminum oxide. Many woodworkers prefer garnet for its natural feel and effectiveness in producing a polished look. A survey conducted by the National Wood Flooring Association shows that 65% of craftsmen recommend garnet for final sanding stages.
-
Silicon Carbide: Silicon carbide sandpaper is ideal for sanding surfaces that require finer finishes. It excels in wet sanding applications and works well on hard materials, such as laminate and metal. However, it tends to wear out faster than aluminum oxide. It is also less common for woodwork, as discussed in a 2022 article by Fine Woodworking, which noted that while silicon carbide is beneficial for certain tasks, many woodworkers prefer other abrasives for general use.
-
Ceramic: Ceramic sandpaper is known for its extreme durability and efficiency in heavy sanding applications. It is less commonly used for kitchen cabinets but is effective for rougher work or sanding down imperfections. The ceramic grain provides faster cutting action and longer-lasting performance than other grain types. A report from the Abrasives Manufacturers Association found that ceramic sandpaper can improve productivity by 40% in industrial settings.
These grains each have unique properties and applications suitable for different sanding tasks when working on kitchen cabinets.
What Tips Will Help You Achieve Optimal Results When Sanding Kitchen Cabinets?
To achieve optimal results when sanding kitchen cabinets, follow several key tips that enhance the overall finish.
- Choose the right grit sandpaper.
- Use a sanding block or orbital sander.
- Sand with the grain of the wood.
- Clean the surface thoroughly before sanding.
- Apply a wood conditioner if necessary.
- Finish with a fine grit for a smooth surface.
- Wear appropriate safety gear.
Considering these aspects can improve your sanding process and results considerably.
-
Choosing the Right Grit Sandpaper:
Choosing the right grit sandpaper ensures effective removal of old finish and surfaces imperfections. Coarse grits like 60 or 80 are suitable for stripping away paint or varnish. Medium grits like 120 are ideal for smoothing the surface between paint layers. Finer grits, such as 220 or higher, help create a polished finish and prepare the wood for painting or staining. -
Using a Sanding Block or Orbital Sander:
Using a sanding block or an orbital sander provides better control and even pressure. A sanding block prevents uneven surfaces and reduces the risk of sanding through the veneer. An orbital sander speeds up the process and can be more comfortable for larger areas. According to sources like This Old House, using the right tool can significantly improve sanding efficiency. -
Sanding with the Grain of the Wood:
Sanding with the grain of the wood is crucial to avoid scratches. Cross-sanding can create visible marks that remain even after applying finish. This practice helps maintain the wood’s natural appearance and contributes to a professional-looking result. Wood magazine emphasizes that aligning sanding strokes with the grain maximizes the quality of the finish. -
Cleaning the Surface Thoroughly Before Sanding:
Cleaning the surface thoroughly before sanding prevents dust and dirt from affecting the sanding process. Dust can clog sandpaper and lead to uneven surfaces. A damp cloth or tack cloth can effectively remove particles. The DIY Network points out that starting with a clean surface is essential for achieving optimal adhesion of the finish. -
Applying a Wood Conditioner if Necessary:
Applying a wood conditioner before staining is recommended for soft woods and uneven surfaces. This step helps prevent blotchiness and ensures an even stain application. Popular woodworking experts suggest using a conditioner, especially on pine or birch, for more uniform results. -
Finishing with a Fine Grit for a Smooth Surface:
Finishing with a fine grit sandpaper provides a smooth touch and a refined look. After sanding with medium grit, using a fine grit like 220 will enhance the wood’s finish by eliminating any scratches. Fine finishing promotes better acceptance of stains or paints, as noted by cabinet refinishing specialists. -
Wearing Appropriate Safety Gear:
Wearing appropriate safety gear, including a mask and goggles, is essential to protect against dust and particles. Sanding can create hazardous fine dust that may cause respiratory issues. The Centers for Disease Control and Prevention (CDC) recommends using a respirator mask when involved in activities that generate dust, ensuring safety while achieving the desired results.