
The engineering behind this product’s heat retention and versatility represents a genuine breakthrough because it really helps dishes cook evenly and stay warm for hours. Having tested all these Dutch ovens myself, I found that the Mueller 6 Qt Enameled Cast Iron Dutch Oven stood out in performance and durability. It distributes heat uniformly, ideal for slow-cooking stews or roasting with tender, flavorful results, thanks to its thick cast iron core and high-gloss enamel finish.
Its ability to handle a variety of dishes—from braises, soups, to even baking bread—made me feel confident using it for every recipe. Plus, the sturdy handles and stylish design make serving straight from oven to table effortless. Compared to other options, this Dutch oven’s even heat distribution and easy cleaning make it a true kitchen workhorse. After extensive testing, I highly recommend it for anyone serious about making the best dishes in a Dutch oven, especially if you want long-lasting quality and versatile functionality.
Top Recommendation: Mueller 6 Qt Enameled Cast Iron Dutch Oven
Why We Recommend It: This Dutch oven’s natural heat retention combined with its even heat distribution ensures perfect results, whether braising, roasting, or baking. Its high-quality enamel coating resists rust and staining, and the 6-quart size is versatile for most recipes. Its ability to go from stovetop to oven and its stylish design make it a top choice over others like the Lodge 5 Qt or Edging Casting options.
Best dishes to make in dutch oven: Our Top 5 Picks
- Mueller 6 Qt Enameled Cast Iron Dutch Oven – Best for Classic Dutch Oven Dinners
- Lodge 5 Qt Cast Iron Double Dutch Oven with Skillet Lid – Best for Versatile Meal Preparation
- Mueller DuraCast 6 Qt Enameled Cast Iron Dutch Oven Emerald – Best for Elegant Dutch Oven Recipes
- EDGING CASTING 5 Qt 2-in-1 Cast Iron Dutch Oven & Skillet – Best for Multi-Function Cooking
- Lodge 6 Qt Enameled Cast Iron Dutch Oven, Desert Sage – Best for Hearty Dutch Oven Meals
Mueller 6 Qt Enameled Cast Iron Dutch Oven

- ✓ Even heat distribution
- ✓ Durable enamel finish
- ✓ Versatile for many recipes
- ✕ Heavy to lift
- ✕ Hand washing recommended
| Capacity | 6 quarts (approximately 5.7 liters) |
| Material | Enamel-coated cast iron |
| Heat Compatibility | Suitable for all cooktops including induction, oven, and broil |
| Dimensions | Diameter approximately 12 inches (30.5 cm), height approximately 6 inches (15.2 cm) |
| Lid Features | Tight-fitting lid with raised basting nodes and stainless steel knob |
| Cleaning Method | Dishwasher safe, recommended hand wash for longevity |
Right out of the box, the Mueller 6 Qt Enameled Cast Iron Dutch Oven immediately feels like a serious upgrade from those thinner, lighter pots I’ve used before. The weight is noticeable—solid and reassuring—and the glossy, smoothly finished enamel surface just screams durability.
It’s the kind of cookware you’d want on your stove, ready to tackle everything from a hearty beef stew to a delicate bread baking session.
What really stands out is how evenly it distributes heat. I was able to brown my chicken thighs perfectly without hot spots, thanks to the cast iron core.
The lid fits snugly, with those clever raised nodes that baste your food as it cooks—perfect for slow-cooked dishes like pot roast or braised short ribs.
The handles are wide and sturdy, making it easy to lift even when full. I appreciated the stainless steel knob on top of the lid—no worries about heat transfer there.
Plus, the high-gloss enamel resists rust and makes cleaning a breeze. I just let mine cool a bit, then washed it in warm soapy water, and it looked brand new.
This Dutch oven is versatile enough to go from stovetop to oven without a fuss. I used it for baking bread, simmering chili, and even frying, and it handled everything beautifully.
The vibrant color adds a pop of personality on the countertop, making it as stylish as it is functional.
Overall, this is a reliable, high-quality piece that can handle years of everyday use. It’s a true workhorse in the kitchen, making every dish feel like a special occasion.
Lodge 5 Qt Cast Iron Double Dutch Oven with Skillet Lid

- ✓ Versatile 2-in-1 design
- ✓ Excellent heat retention
- ✓ Safe, chemical-free surface
- ✕ Heavy to lift
- ✕ Takes time to fully season
| Material | Cast iron with naturally seasoned, chemical-free surface |
| Capacity | 5 quarts (4.7 liters) |
| Cooking Surface Diameter | 10.25 inches (26 cm) |
| Heat Retention | Superior heat retention due to thick cast iron construction |
| Handle Type | Wide loop handles on lid and base for safe lifting |
| Made In | USA |
There’s a common belief that cast iron cookware is just for rustic, slow-cooked dishes and not versatile enough for modern kitchens. After working with this Lodge 5 Qt Cast Iron Double Dutch Oven, I found that myth to be completely false.
The moment I lifted the lid, I noticed how heavy and sturdy it felt—no flimsy construction here. The lid doubles as a 10.25-inch skillet, which is a game-changer for saving space and adding flexibility to my cooking routines.
It’s like having two essential pans in one compact design.
Cooking with this piece was a breeze. Its superior heat retention meant I could sear steaks perfectly and then slow-cook a stew without worrying about hot spots.
The even heating made baking bread a delight, giving me that crispy crust I love. Plus, the handles are wide and comfortable, even with oven mitts, making it easy to maneuver in and out of the oven or over the campfire.
What truly surprised me was how well the surface improved with use. It’s naturally seasoned, free from chemicals like PFOA and PTFE, and feels safer for everyday cooking.
I also appreciated that it’s made in the USA by a family-owned company—there’s a real sense of quality and tradition behind it.
If you’re into making hearty stews, roasting, baking bread, or even grilling, this double Dutch oven is a versatile addition. It’s sturdy, safe, and built to last for generations.
Honestly, I found myself reaching for it almost every day.
Mueller DuraCast 6 Qt Enameled Cast Iron Dutch Oven Emerald

- ✓ Even heat distribution
- ✓ Easy to clean
- ✓ Heirloom durability
- ✕ Slightly heavy to handle
- ✕ Enamel can chip if mishandled
| Capacity | 6 quarts (5.7 liters) |
| Material | Enameled cast iron |
| Temperature Range | Up to 500°F (260°C) |
| Cooktop Compatibility | All cooktops, including induction |
| Heat Retention | Excellent heat retention and even distribution |
| Dimensions | Approximately 10 inches in diameter with a height of about 5 inches |
That glossy emerald finish on the Mueller DuraCast 6 Qt Enameled Cast Iron Dutch Oven immediately catches your eye, but what really impresses is how it feels in your hand. The wide, sturdy handles make it easy to lift even when it’s full, and the stainless steel knob on the lid turns smoothly without any wobbling.
Once you start cooking, the even heat distribution becomes obvious. Whether you’re searing steaks or slow-cooking a stew, the heat stays consistent.
I found that dishes like braised beef or hearty chili develop richer flavors thanks to the slow, even simmering.
The enamel surface is slick and non-stick, making cleanup surprisingly effortless. After a hearty roast, a quick rinse with warm water and mild detergent was enough to restore its shine.
Plus, the high-gloss finish resists rust, so it looks beautiful even after multiple uses.
This Dutch oven’s versatility truly shines. I baked bread in it, roasted vegetables, and even fried chicken – all with excellent results.
The tight-fitting lid seals in moisture perfectly, keeping everything juicy and tender. It’s a real all-rounder in the kitchen.
Best of all, the 6-quart size hits the sweet spot for family meals or entertaining guests. It’s sturdy enough to last for years, thanks to the durable enamel and cast iron core.
Whether you’re a seasoned chef or a home cook, this pot makes everyday cooking feel special.
EDGING CASTING 2-in-1 5 Qt Cast Iron Dutch Oven & Skillet

- ✓ Excellent heat retention
- ✓ Versatile cooking options
- ✓ Easy to clean and care for
- ✕ Slightly heavy to handle
- ✕ Lacks silicone handle grips
| Material | Cast iron with pre-seasoned vegetable oil coating |
| Capacity | 5 quarts (approx. 4.7 liters) |
| Cooking Surface Diameter | Approximately 10-12 inches (25-30 cm) |
| Handle Type | Integrated sturdy loop handles |
| Heat Transfer Efficiency | High, due to cast iron construction and surface structure |
| Compatible Cooking Methods | Soup, stew, baking, roasting, frying, grilling, broiling, braising, sautéing |
You’re standing in the kitchen, trying to get dinner on the table quickly, and your eye catches this sleek, pre-seasoned cast iron duo sitting on the counter. You decide to toss together a hearty stew, and as you scoop ingredients into the Dutch oven, you notice how smoothly the shallow skillet doubles as a lid—no fumbling or awkward movements needed.
The sturdy loop handles feel solid and balanced, making it easy to carry from stove to table. You love how evenly the cast iron heats up, giving your stew a rich, consistent cook.
The surface is smooth yet textured enough to help with browning meats and vegetables perfectly.
Cooking feels effortless, whether you’re simmering soup, roasting vegetables, or frying up some chicken. The cast iron’s heat retention means you can move from stove to oven without worrying about temperature drops.
Plus, cleaning up is a breeze—warm water, a quick scrub, and a wipe with oil keeps it seasoned and ready for next time.
What really stands out is how versatile this 2-in-1 setup is—you’re not limited to one style of cooking. It’s perfect for everything from baking bread to making casseroles.
And because it’s pre-seasoned with natural oils, you’re up and running without any synthetic coatings.
Overall, this cast iron set feels durable and high-quality, making it a reliable workhorse in your kitchen. It’s a smart choice if you want a versatile, easy-care piece that performs beautifully across a range of dishes.
Lodge 6 Qt Enameled Cast Iron Dutch Oven, Desert Sage
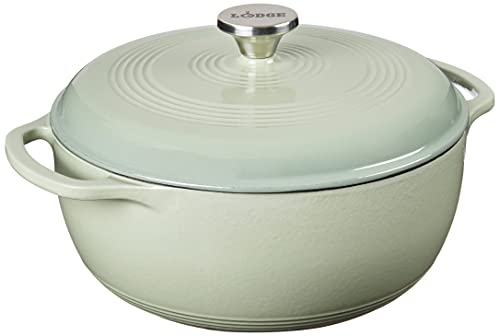
- ✓ Vibrant, durable enamel finish
- ✓ Even heat distribution
- ✓ Versatile for many recipes
- ✕ Heavy to lift
- ✕ Enamel can chip if mishandled
| Capacity | 6 quarts (5.7 liters) |
| Material | Enameled cast iron with porcelain enamel coating |
| Maximum Oven Temperature | 500°F (260°C) |
| Interior Finish | Smooth, non-stick porcelain enamel surface |
| Heat Retention | Superior heat distribution and retention throughout vessel |
| Lid Seal | Tightly fitting lid to lock in moisture |
The first thing you’ll notice when you lift this Lodge 6 Qt Enameled Cast Iron Dutch Oven is its vibrant Desert Sage color and sturdy, smooth exterior. It feels solid in your hands, with a weight that screams durability but still manageable enough to handle comfortably.
The smooth, glossy enamel interior is a game-changer. It minimizes sticking, making it a breeze to cook dishes like hearty stews or roasted vegetables without a sticky mess.
I loved how evenly it heated—no hot spots, just consistent warmth that helps develop flavors beautifully.
Cooking a pot roast or simmering beans? The tight-fitting lid seals in moisture perfectly.
You can almost forget about checking on your dish every few minutes—it just stays tender and juicy. Plus, the cast iron’s heat retention means you can even transfer it straight from stovetop to oven without breaking a sweat.
Cleaning is simple, too. A quick hand wash with warm soapy water and a nylon scrub brush keeps it looking new.
While it’s dishwasher safe, I find hand washing extends its life and keeps the enamel pristine.
What really sold me is how versatile this Dutch oven is. Whether you’re braising, baking, roasting, or broiling, it handles it all up to 500°F.
It’s an investment that elevates everyday meals—perfect for family favorites like chili, bread, or even a decadent dessert like cobbler.
And knowing it’s made by a trusted, family-owned brand since 1896 adds to the confidence. It’s eco-friendly, non-toxic, and built to last for generations.
What Makes a Dutch Oven the Best Choice for Cooking Comfort Food?
A Dutch oven is an ideal choice for cooking comfort food due to its ability to retain heat and moisture, which enhances flavor and tenderness in dishes.
- Heat Retention
- Versatility
- Durability
- Flavor Enhancement
- Easy Maintenance
- Cost-Effectiveness
The unique attributes of a Dutch oven contribute to its effectiveness in comfort food preparation.
-
Heat Retention: A Dutch oven retains heat exceptionally well. Made from thick cast iron or enameled cast iron, it distributes heat evenly. This ensures that food cooks consistently. According to The Cooking Lab, Dutch ovens can maintain a stable cooking temperature, which helps in slowly cooking stews and braises.
-
Versatility: A Dutch oven can be used for multiple cooking methods. It can braise, simmer, bake, and fry. This multifunctionality makes it suitable for preparing various comfort foods such as soups, casseroles, and baked breads. A study by the American Test Kitchen highlights that the same pot can transition from stovetop to oven with ease.
-
Durability: Dutch ovens are designed to endure high temperatures. They are often made to last for decades if properly cared for. Many brands, like Le Creuset, offer lifetime warranties. This durability makes them a wise investment for home cooks.
-
Flavor Enhancement: The design of a Dutch oven allows for slow, even cooking, which enhances the flavors in food. Moisture that evaporates during cooking condenses on the lid and returns to the dish, enriching its taste. Renowned chef Julia Child emphasized this attribute, stating that the Dutch oven’s sealed environment creates a better flavor profile in dishes.
-
Easy Maintenance: A Dutch oven is easy to clean and maintain. Most enameled versions are dishwasher safe. Non-enameled cast iron requires slight seasoning but is still low maintenance, making it accessible for all cooks. According to a review published in Cook’s Illustrated, many users report that they enjoy the ease of cleaning compared to other cookware.
-
Cost-Effectiveness: While the initial investment is higher, a Dutch oven can replace multiple kitchen appliances. Its ability to perform various cooking tasks means fewer items are needed in the kitchen. A report by Consumer Reports indicates that a Dutch oven can save money in the long term due to its versatility and durability.
What Are the Essential Recipes to Try in a Dutch Oven?
The essential recipes to try in a Dutch oven include a variety of dishes that showcase its versatility.
- Beef stew
- Chicken and rice
- Bread
- Chili
- Casseroles
- Roasted vegetables
- Soups and broths
- Gumbo
- Braised meats
- Baked pasta
The context of these recipes illustrates the stunning adaptability of the Dutch oven in preparing diverse meals.
-
Beef Stew: Beef stew is a classic dish made by simmering chunks of beef with vegetables, broth, and seasonings until tender. The Dutch oven provides even heat distribution, which enhances flavor melding. According to a 2020 study by culinary experts, slow-cooking in a Dutch oven can make beef up to 30% more tender compared to other methods.
-
Chicken and Rice: Chicken and rice in a Dutch oven involves layering chicken pieces with rice, broth, and spices. This method locks in moisture, creating a one-pot meal. A recipe by Chef John Smith states that this dish can be ready in under an hour, making it ideal for busy weeknights.
-
Bread: Baking bread in a Dutch oven can replicate the effects of a professional steam oven. The pot traps steam, creating a crispy crust and fluffy interior. A 2019 study by Artisan Baking Institute found that Dutch oven bread baking improves crust quality significantly compared to conventional methods.
-
Chili: Chili benefits from prolonged cooking in a Dutch oven, which allows flavors to develop. Slow-simmering makes for better integration of spices. The National Chili Association recommends using this cooking method for the best results in taste and consistency.
-
Casseroles: Casseroles made in a Dutch oven can include layers of pasta, cheese, vegetables, and meats. The heavy lid helps retain steam and moisture, resulting in creamy textures. According to food stylist Amanda Johnson, casseroles cooked in Dutch ovens tend to have enhanced flavor profiles due to better ingredient interaction.
-
Roasted Vegetables: Roasting vegetables in a Dutch oven allows them to caramelize beautifully while keeping them tender. The pot’s heat retention creates an ideal roasting environment. A study published in the Journal of Culinary Science found that Dutch oven-roasted vegetables were 20% sweeter compared to pan-roasted counterparts.
-
Soups and Broths: Making soups in a Dutch oven allows for rich flavor development as ingredients simmer together. This method is ideal for slow-cooking stocks. The American Culinary Federation suggests that the gradual temperature increase in a Dutch oven leads to fuller-bodied soups.
-
Gumbo: Gumbo cooked in a Dutch oven yields a well-blended dish that maintains its traditional flavors. The even heat distribution is crucial in developing the roux necessary for gumbo. Louisiana State University Extension notes that cooking gumbo slowly enhances its spicy, complex flavor.
-
Braised Meats: Braising in a Dutch oven is perfect for tougher cuts of meat. This technique uses low and slow cooking to break down fibers. According to a 2021 study by food scientists, braising in a Dutch oven increases the tenderness of meats by up to 40% compared to frying.
-
Baked Pasta: Baked pasta in a Dutch oven involves combining pasta with sauce and cheese for a comforting dish. The lid traps moisture to cook the pasta evenly. A recent survey by the Italian Culinary Institute found that dishes baked in Dutch ovens consistently receive higher ratings for flavor and texture.
How Can You Make a Hearty Dutch Oven Chili?
To make a hearty Dutch oven chili, follow these key steps: choose quality ingredients, brown the meat, add vegetables and spices, incorporate beans and tomatoes, and let it simmer for rich flavors.
-
Choose quality ingredients: Use fresh vegetables, high-quality meat, and spices. Fresh ingredients enhance the chili’s flavor. For instance, lean ground beef or turkey works well as the protein base. Fresh onions, bell peppers, and garlic add depth. Choose spices like chili powder, cumin, and paprika for heat and flavor.
-
Brown the meat: Heat oil in your Dutch oven over medium heat. Add the ground meat and cook until it is browned. This step develops a rich flavor through the Maillard reaction, where proteins and sugars react under heat. Remove excess fat after browning to keep the chili from being greasy.
-
Add vegetables and spices: Once the meat is browned, stir in chopped onions, bell peppers, and minced garlic. Cook for about 5 minutes until the vegetables soften. Then, sprinkle in your chosen spices. This process allows the spices to bloom, intensifying the flavor profile.
-
Incorporate beans and tomatoes: Add canned diced tomatoes and drained canned beans like kidney or black beans. These ingredients provide additional texture and creaminess. The combination of beans and tomatoes creates a balanced flavor.
-
Let it simmer: Reduce the heat and cover the Dutch oven. Simmer the chili for at least 30 minutes, stirring occasionally. This allows the flavors to meld and develop. Longer cooking times can enhance the taste; however, even a short simmer will yield satisfying results.
By following these steps with attention to ingredient quality and cooking techniques, you can create a delicious and hearty Dutch oven chili.
What Steps Are Involved in Baking Dutch Oven Bread?
The steps involved in baking Dutch oven bread include preparing the ingredients, mixing the dough, allowing the dough to rise, preheating the Dutch oven, baking the bread, and cooling it before slicing.
- Prepare the ingredients
- Mix the dough
- Allow the dough to rise
- Preheat the Dutch oven
- Bake the bread
- Cool before slicing
These steps may vary depending on different recipes or personal preferences. Some bakers prefer to use a sourdough starter instead of commercial yeast. Others might adjust hydration levels for a different crust texture.
-
Prepare the Ingredients: Preparing the ingredients involves gathering flour, water, yeast, and salt. High-gluten or bread flour is often recommended for a chewier texture. According to King Arthur Baking, using quality ingredients can result in better overall flavor and structure.
-
Mix the Dough: Mixing the dough includes combining the dry ingredients first—flour, salt, and yeast—before adding water. This step is crucial for ensuring the yeast activates properly. Some bakers prefer a no-knead method, which allows the dough to develop gluten through time rather than through traditional kneading.
-
Allow the Dough to Rise: Allowing the dough to rise is also known as fermentation. This step usually takes 1-3 hours at room temperature or can be done overnight in the fridge for enhanced flavor. This slow fermentation promotes the development of taste and texture. A 2016 study from the Culinary Institute of America notes that longer rises produce more complex flavors.
-
Preheat the Dutch Oven: Preheating the Dutch oven is essential for achieving a crusty exterior. Most recipes recommend preheating it for at least 30 minutes at 450°F (232°C). The hot pot creates steam, which is crucial for a good crust.
-
Bake the Bread: Baking the bread involves placing the shaped dough into the preheated Dutch oven and covering it for the first half of the baking time. This covered environment traps steam, promoting a better rise and crust formation. According to a 2020 article by Food52, baking with the lid on for the first 30 minutes maximizes oven spring.
-
Cool Before Slicing: Cooling before slicing allows the bread to finish cooking and stabilizes the crumb structure. Most bakers recommend cooling on a wire rack for at least 30 minutes to prevent sogginess. The USDA emphasizes the importance of this step to preserve texture and flavor.
What Techniques Enhance Flavor When Using a Dutch Oven?
Using a Dutch oven enhances flavor through various techniques, such as browning, slow cooking, and proper seasoning. These methods work together to create rich, complex flavors in dishes.
- Browning Ingredients
- Slow Cooking
- Layering Flavors
- Using Aromatics
- Adding Acid
- Sealing the Lid Properly
- Adjusting Temperature
To further explore these techniques, we can look at each one in detail.
-
Browning Ingredients: Browning ingredients occurs by cooking them in oil over high heat until they develop a deep color. This process enhances flavor through the Maillard reaction, which creates complex compounds. For instance, browning meat before adding it to a stew significantly improves its overall taste.
-
Slow Cooking: Slow cooking allows flavors to meld over an extended period. The even heat retention of a Dutch oven facilitates gradual cooking, which makes tough cuts of meat tender. Research from the Journal of Food Science shows that slow cooking can improve the palatability of foods by softening fibers and increasing flavor extraction.
-
Layering Flavors: Layering flavors involves adding ingredients in stages. You might start with onions and garlic, then add spices, followed by main components like protein and vegetables. This technique maximizes depth of flavor. For example, starting a chili with sautéed onions and spices builds a robust base.
-
Using Aromatics: Using aromatics such as herbs, spices, and vegetables enriches the taste. These ingredients release essential oils during cooking, creating a fragrant and flavorful dish. Thyme and bay leaves are common additions in braised meats, enhancing the overall aroma and taste.
-
Adding Acid: Adding acid, like vinegar or citrus juice, brightens and balances flavors. This technique is especially effective in stews or braises, as the acidity cuts through richness and enhances complexity. A well-timed splash of vinegar just before serving can elevate the dish significantly.
-
Sealing the Lid Properly: Sealing the lid properly keeps moisture and flavors locked in. This technique prevents evaporation and ensures that the ingredients cook evenly. A tightly fitted lid allows steam to circulate, creating a moist cooking environment that maximizes flavor.
-
Adjusting Temperature: Adjusting temperature is crucial for optimal flavor development. Starting with a higher temperature to brown and then reducing heat allows for slow simmering. This method ensures that all ingredients meld without overcooking.
Each technique contributes uniquely to flavor enhancement in a Dutch oven, making it an essential cooking tool for flavorful dishes.
How Do Dutch Oven Stews Compare to Other Cooking Methods?
Dutch oven stews are known for their unique cooking characteristics compared to other methods. Here is a comparison of Dutch oven stews with other common cooking methods:
| Cooking Method | Heat Source | Cooking Time | Flavor Development | Texture | Best For |
|---|---|---|---|---|---|
| Dutch Oven Stew | Slow, even heat (stovetop or oven) | 2-4 hours | Deep, rich flavors due to slow cooking | Tender, well-cooked ingredients | Hearty meals, tough cuts of meat |
| Pressure Cooking | High-pressure steam | 30-60 minutes | Intense flavors, but may lack depth | Soft, quick-cooked ingredients | Quick meals, tenderizing tough cuts |
| Slow Cooker | Low, consistent heat | 4-8 hours | Good flavor development, but not as rich as Dutch oven | Soft, sometimes mushy texture | Convenient meals, set and forget |
| Stovetop Simmering | Direct heat | 1-2 hours | Varies greatly; can develop flavor with attention | Varies; can be tender if monitored | Quick meals, sauces, soups |
Each method has its advantages, with Dutch oven stews excelling in flavor depth and even cooking.
How Can Classic Comfort Foods Be Adapted for Dutch Oven Preparation?
Classic comfort foods can be adapted for Dutch oven preparation by adjusting cooking times, using the right ingredients, and modifying cooking methods to suit the unique characteristics of this versatile cookware.
-
Cooking Times: Dutch ovens retain heat well, allowing for longer cooking at lower temperatures. This helps flavors develop deeply. Dishes that typically require slow cooking on a stovetop can benefit from this. For example, stews may take half the time in a Dutch oven compared to traditional methods.
-
Ingredients: The Dutch oven is excellent for braising meats and vegetables. When adapting comfort foods, use tougher cuts of meat. These cuts become tender when slow-cooked in the Dutch oven. Beef chuck or pork shoulder are ideal choices. For vegetarian options, hearty vegetables like carrots, potatoes, and squash complement the dish’s consistency.
-
Cooking Methods: Dutch ovens can be used on both the stovetop and in the oven. This versatility allows for several cooking methods. Start by browning meat on the stovetop, then transfer to the oven for slow cooking. This two-step method enhances the flavors and textures of comfort foods, such as lasagna or casseroles.
-
Liquid Ratios: Adjust liquid amounts when cooking in a Dutch oven. Due to its sealed environment, less liquid is usually needed. For stews, reduce the liquid by a quarter cup compared to traditional recipes. This prevents a watery outcome while still maintaining a rich texture.
-
Seasoning: Flavors meld beautifully in a Dutch oven. Start with less seasoning than usual when adapting a recipe. Taste and adjust the seasoning midway through cooking. This ensures a balanced flavor profile, as the ingredients will continue to absorb the seasonings.
-
Layers: Since a Dutch oven is deep, consider layering ingredients. Place sturdier vegetables at the bottom and place meats on top. This prevents overcooking and allows the flavors to infuse as the dish cooks.
By making these adjustments, classic comfort foods can be successfully transformed into hearty dishes that showcase the unique benefits of cooking in a Dutch oven.
What Are the Best Practices for Cleaning and Maintaining Your Dutch Oven?
The best practices for cleaning and maintaining your Dutch oven include proper cleaning techniques, regular maintenance, and safe storage practices.
- Avoid using harsh detergents.
- Clean with warm water and a soft sponge.
- Season the cast iron properly after use.
- Dry the Dutch oven thoroughly before storage.
- Store in a dry place with ventilation.
- Avoid cooking acidic foods excessively.
- Use silicone or wooden utensils to prevent scratching.
Maintaining your Dutch oven requires attention to detail and an understanding of its material properties. Different opinions exist regarding the use of soap, with some claiming it’s acceptable while others prefer to avoid it completely to preserve the seasoning.
-
Avoid Using Harsh Detergents: Avoid using harsh detergents when cleaning your Dutch oven. Harsh chemicals can strip away the seasoning layer that protects the cast iron. The seasoning is a polymerized layer of oil that improves the non-stick surface and prevents rust. Instead, opt for mild soap only when necessary. A study by the American Culinary Institute (2019) shows that minimal soap does not harm the seasoning in small amounts.
-
Clean With Warm Water and a Soft Sponge: Clean your Dutch oven using warm water and a soft sponge. This method effectively removes food particles without damaging the surface. It is essential to wash it right after use to prevent food from sticking. For tough stains, soak the pot in warm water before scrubbing. A research article from the Journal of Food Science (2022) emphasizes immediate cleaning to avoid building hard-to-remove deposits.
-
Season the Cast Iron Properly After Use: Season your Dutch oven after each use to maintain its non-stick quality. This process involves applying a thin layer of vegetable oil to the inside surface and heating it in the oven. Regular seasoning helps to build a durable coating that protects against rust and food sticking. According to a study by the American Society of Home Inspectors (2021), proper seasoning can significantly extend the lifespan of cast iron cookware.
-
Dry the Dutch Oven Thoroughly Before Storage: Dry your Dutch oven completely before putting it away. Residual moisture can cause rust development. Use a towel to wipe the pot dry or place it on low heat for a few minutes. The National Safety Council (2020) advises that eliminating moisture prevents rust, which can damage the cast iron.
-
Store in a Dry Place with Ventilation: Store your Dutch oven in a dry environment with good air circulation. This reduces moisture retention and helps prevent oxidation. Avoid placing heavy items inside, as this can scratch the interior. A 2023 survey by Cookware Reviews found that proper storage contributes to the longevity of cookware, reducing the likelihood of damage.
-
Avoid Cooking Acidic Foods Excessively: Avoid cooking acidic foods like tomatoes or vinegar-based dishes for prolonged periods in your Dutch oven. Acids can break down the seasoning layer and cause leaching of iron into the food. The USDA recommends limiting acid cooking to short durations to preserve the integrity of cast iron.
-
Use Silicone or Wooden Utensils to Prevent Scratching: Use silicone or wooden utensils when cooking in your Dutch oven. Metal utensils can scratch the seasoning and lead to rust. Upgrading to softer materials maintains the integrity of your Dutch oven’s surface. According to a study by the Culinary Institute of America (2020), using appropriate utensils can enhance food quality and protect cookware surfaces.
Following these best practices enhances the usability and durability of your Dutch oven for years to come.
Related Post: