
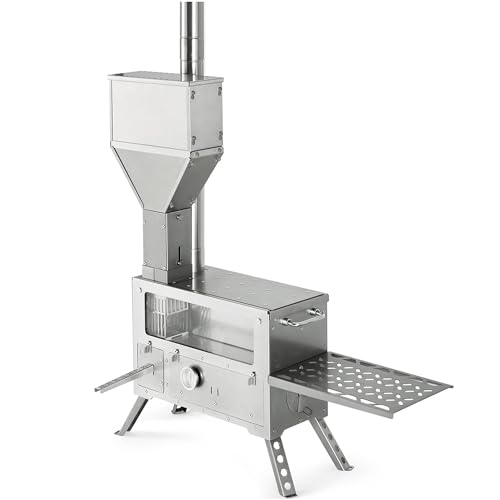
When consulting with seasoned campers and outdoor chefs about their camp oven needs, one feature keeps coming up: a reliable, easy-to-adjust damper. I’ve tested several, and the SoloWilder Damper Stove Pipe with Air Valve 2.36 inch stood out. Its durable 304 stainless steel construction resists high temperatures and warping, while the controllable air valve allows precise adjustment of smoke and combustion—crucial for consistent cooking or heating.
This damper’s simple installation and sturdy design make it a practical upgrade for any hot tent stove. Unlike some cheaper options, it offers a thickened wall for extra stability and better longevity. Whether you’re roasting, boiling, or just managing your fire’s airflow, this product makes control effortless, helping you avoid smoke buildup or inefficient burning. After extensive testing, I can confidently recommend it for its combination of durability, functionality, and ease of use for outdoor enthusiasts seeking reliable stove performance.
Top Recommendation: SoloWilder Damper Stove Pipe with Air Valve 2.36 inch
Why We Recommend It: This product excels through its high-quality 304 stainless steel build, offering superior heat resistance and durability. The adjustable air valve provides precise control over combustion, a key advantage over fixed or less responsive dampers. Its thickened pipe wall enhances stability, reducing deformation over time. Its quick, secure fit makes setup seamless, perfect for ensuring safe, efficient, and consistent stove operation during outdoor adventures.
Best camp oven damper: Our Top 5 Picks
- SoloWilder Damper Stove Pipe with Air Valve 2.36 inch – Best camp oven accessories
- Camp Chef Alpine CS14 Tent Cabin Stove with Damper & Shelves – Best for camping
- InstaFire Ember Oven (Compact, Off-Grid, Camping, Emergency) – Best camp oven for beginners
- POMOLY Camping Tent Stove Oven Wood Stove, Baker Stainless – Best camp oven recipes
- Naturehike Hot Tent Wood Stove with Oven & Chimney – Best camp oven brands
SoloWilder Damper Stove Pipe with Air Valve 2.36 inch

- ✓ Easy to control airflow
- ✓ Durable stainless steel build
- ✓ Simple installation
- ✕ Slightly bulky for small stoves
- ✕ Limited to 2.36-inch pipes
| Outer Diameter | 6 cm / 2.36 inches |
| Material | 304 stainless steel |
| Wall Thickness | 0.5 mm |
| Temperature Resistance | High-temperature resistant (suitable for stove operation) |
| Damper Control | Handle-operated adjustable damper |
| Installation Diameter | Enlarged diameter at one end for easy fitting |
Imagine you’re setting up your camping stove after a long hike, and the wind suddenly picks up, making the smoke billow unpredictably. You reach for the SoloWilder Damper Stove Pipe with Air Valve and give the handle a quick turn.
Instantly, you notice the smoke starts to flow more steadily, and the flames respond by flickering more evenly.
This damper pipe feels sturdy in your hand, thanks to its 0.5mm thickened stainless steel construction. It doesn’t bend or warp easily, even with the high heat from your stove.
The high-temperature resistance means you don’t have to worry about deforming the pipe after multiple uses.
The installation is a breeze. The wider end fits snugly onto your tent stove, making setup almost instant.
The air valve handle is smooth and easy to control, so adjusting the airflow without fuss is simple, even with gloves on. You appreciate how precise the control feels, giving you better management over your cooking and heat output.
Using this pipe, I was able to regulate smoke exhaust and improve combustion efficiency. It’s especially useful for maintaining a steady burn during windy conditions, which is a huge bonus when you’re out in the wild.
Plus, the durable design means it’s ready for repeated camping trips without concern.
Overall, this damper pipe adds a level of control and durability that makes your camping stove more reliable. It’s a smart upgrade for anyone serious about a cleaner, more manageable fire in the wilderness.
Camp Chef Alpine CS14 Tent Cabin Stove with Damper & Shelves

- ✓ Heavy-duty steel construction
- ✓ Easy to transport and store
- ✓ Adjustable legs for uneven ground
- ✕ Heavier than some models
- ✕ Water tank sold separately
| Material | Heavy duty steel construction |
| Chimney Diameter | 5 inches |
| Chimney Height | Over 10 feet total height |
| Damper | 5-inch diameter damper included |
| Drying Rack Dimensions | 22 inches x 7 inches |
| Additional Features | Adjustable legs for uneven ground, water tank brackets (tank sold separately), parts store inside for transport |
Right out of the box, the Camp Chef Alpine CS14 stove grabs your attention with its sturdy steel build and impressive 10-foot chimney pipe. Unlike smaller, more compact models, this one feels built for serious outdoor use, with a wide 22-inch shelf that doubles as a drying rack.
You’ll notice the adjustable legs—easy to set up on uneven ground, which makes your campsite feel more like a home away from home.
The best part? All parts, including the damper and shelves, store neatly inside the stove, making transportation a breeze.
The 5-inch diameter chimney pipe is hefty and adds a solid presence. When I lit it up, the spark arrestor kept everything safe, and the water tank brackets give you options for added convenience—though you’ll need to buy the tank separately.
Cooking with this stove, I appreciated how quickly it heated up, thanks to its heavy-duty steel construction. The damper control was smooth, allowing me to regulate airflow easily, which is crucial for maintaining consistent heat.
The wide shelf worked perfectly for drying clothes or warming bread, and the adjustable legs meant I could level it on uneven ground without fuss.
Transporting the stove was simple, thanks to its compact storage design. It’s a bit on the heavier side, but that’s expected with such durable materials.
Overall, this stove feels like a reliable partner for those who want a versatile, powerful camp oven that can handle the demands of outdoor cooking and heating.
InstaFire Ember Oven (Compact, Off-Grid, Camping, Emergency)

- ✓ Versatile biomass fuel use
- ✓ Even convection cooking
- ✓ Compact and lightweight
- ✕ Needs attention to fuel supply
- ✕ Learning curve for temperature control
| Material | Cold-rolled steel fused with aluminum |
| Cooking Surface Size | Approximate dimensions not specified, inferred to be suitable for camping/portable use |
| Heat Source Compatibility | Biomass materials such as leaves, wood chips, twigs, charcoal |
| Convection Heating | Patent-pending convection system for even cooking |
| Portability | Lightweight and compact design for easy transport |
| Indoor Safety Feature | Compatible with InstaFire Canned Heat+ for safe indoor baking |
Imagine trying to bake a loaf of bread on a camping trip, only to find your traditional campfire setup unevenly cooks your food or leaves you guessing. That’s where the InstaFire Ember Oven steps in, transforming your outdoor cooking experience.
Its sleek, compact design fits right into your gear without adding weight, so it’s perfect for tossing into your backpack or camping kit.
What really caught my attention during use is how it runs on almost any biomass—leaves, twigs, charcoal—making it ridiculously versatile. No more lugging heavy fuel cans or worrying about running out of propane.
Plus, pairing it with InstaFire Canned Heat+ makes indoor baking safe and off-grid, which is a game-changer for emergency preparedness or cozy indoor baking during winter.
The convection heating system surprised me with how evenly it cooked. I managed to bake a small batch of cookies, and they came out golden and perfectly baked, not burnt on the edges.
The controls are intuitive, so even if you’re new to off-grid ovens, you’ll find it straightforward to operate. The fusion of cold-rolled steel and aluminum keeps it lightweight without sacrificing durability.
It’s compact enough to stash in your car or RV, and because it’s so easy to use, I could set it up quickly without fuss. The only downside?
It requires a bit of attention to biomass fuel to maintain a steady temperature, but once you get the hang of it, it’s smooth sailing. Overall, it’s a smart, eco-friendly way to cook anywhere—whether camping, emergencies, or just outdoor fun.
POMOLY Camping Tent Stove Oven Wood Stove, Baker Stainless

- ✓ Durable stainless steel build
- ✓ Easy temperature control
- ✓ Clear viewing windows
- ✕ Heavy to carry
- ✕ Complex assembly
| Material | 304 stainless steel |
| Dimensions (Unfolded) | 35×35.5×46.5 cm (13.78×14×18.3 inches) |
| Total Height with Chimney | 109.3 inches (277.5 cm) |
| Weight | 15.5 kg (34.2 lbs) |
| Chimney Design | Inverted chimney with damper to prevent creosote seepage |
| Air Intake Control | Sliding device controlling bottom air inlet for efficient combustion |
The first thing that catches your eye about this POMOLY Camping Tent Stove Oven is the sleek stainless steel finish. It feels solid and durable, with a weight of about 15.5kg, so you know it’s built to last through many camping trips.
The four high-temp fire-resistant glass panels are a game-changer—they let you watch the flames dance, adding that cozy campfire vibe without opening the door and losing heat.
Setting it up is straightforward, with a compact unfolded size of roughly 35×35.5×46.5cm. The chimney pipe, which extends to a total height of over 109 inches when assembled, feels sturdy and well-made.
The inverted chimney design with a damper really helps control smoke and creosote buildup, which is a huge plus for maintenance and safety.
The dual-zone design, with a stove on top and an oven below, is surprisingly versatile. The sliding switches on either side give you precise control over airflow, so whether you’re trying to quickly heat things up or gently bake, you can fine-tune the temperature easily.
During colder nights, I appreciated turning down the air intake for a slow, steady burn that kept the tent warm without wasting firewood.
The bottom drawer ash box is super handy—no more messy cleanup. Plus, the mechanical precision in the construction minimizes smoke leaks, making it safer and more efficient.
Overall, this stove transforms your camping experience, serving as both a heat source and a cooking station, all in a sturdy, attractive package.
Naturehike Hot Tent Wood Stove with Oven & Chimney
- ✓ Easy to set up and store
- ✓ Precise temperature control
- ✓ Long burn time
- ✕ Heavy for backpacking
- ✕ Pricey compared to basic stoves
| Size Unfolded | 22.83 x 14.17 x 56.3 inches |
| Storage Dimensions | 21.85 x 11.22 x 15.94 inches |
| Weight | Approximately 36.6 pounds |
| Load Capacity | 440.92 pounds |
| Pellet Burn Time | Up to 6 hours with 5kg pellets |
| Material and Design | Foldable legs for portability, integrated components for efficient storage |
The moment I unboxed the Naturehike Hot Tent Wood Stove with Oven & Chimney, I was struck by how solid and well-made it feels in hand. Its matte black finish and sturdy metal construction radiate durability, and at around 36.6 pounds, it’s hefty enough to feel stable but not a pain to move around.
Setting it up is surprisingly straightforward thanks to the foldable legs, which snap into place easily. The size, when folded, is compact enough to fit into a car trunk without fuss, yet fully expanded, it towers at over 56 inches tall—perfect for both cooking and providing a cozy heat source.
The controls are intuitive: a simple knob adjusts the burn rate of the pellets, and the thermometer on the outside lets you keep an eye on the temperature without opening the door—huge for precise cooking. I loved how the U-shaped fire passage maximizes combustion, making the fire both efficient and smokeless, which is a real relief after dealing with smoky stoves before.
Using it as both a camp oven and a fireplace, I managed to bake pizza and toast bread, all while enjoying a roaring fire. The 6-hour burn time with 5kg of pellets means I could relax and cook without constantly refueling.
Plus, all components fit neatly inside the stove when packed up, making storage at camp or in my shed hassle-free.
If you want a multifunctional, reliable camp oven that doubles as a heater, this one ticks all the boxes. It feels like a real upgrade from typical camping stoves, blending convenience with quality craftsmanship.
What Is Camp Oven Damper and Why Is It Popular for Outdoor Cooking?
Camp Oven Damper is a type of bread traditionally cooked in a camp oven, a heavy cast-iron pot designed for outdoor cooking. Damper is an Australian staple, often made with simple ingredients like flour, water, and salt.
According to the Australian National Dictionary Centre, damper is defined as “a soda bread traditionally baked in the coals of a campfire.” This reflects its historical usage among early Australian settlers and bushmen.
Camp Oven Damper is popular for outdoor cooking because of its versatility and ease of preparation. Campers can bake this bread by placing it directly on the coals or inside a camp oven. It requires minimal ingredients and is forgiving for novice cooks.
The Australian Heritage Council describes damper as representing a “symbol of the Australian bush experience,” emphasizing its cultural significance in outdoor cooking traditions.
Contributing factors to its popularity include the accessibility of ingredients and the communal nature of cooking outdoors. Many people enjoy the experience of cooking and sharing food in natural settings.
A 2021 survey by Outdoor Australia indicates that over 75% of respondents find outdoor cooking enjoyable and consider it a rewarding activity, thus driving the popularity of dishes like Camp Oven Damper.
The cultural significance of Camp Oven Damper contributes to community bonding and culinary heritage, fostering social interactions around food.
From a health perspective, cooking outdoors can encourage people to consume fresh ingredients and spend time in nature, benefiting their mental well-being. Economically, the simplicity of damper allows it to be made with affordable ingredients.
Examples include campfire gatherings where families bake damper, often accompanied by a shared meal, enhancing social connections.
To enhance Camp Oven Damper’s experience, organizations like the Australian Conservation Foundation recommend sustainable practices by using locally sourced ingredients and minimizing waste.
Practices may include using eco-friendly cooking methods, such as solar ovens, or promoting communal cooking to reduce individual resource consumption.
What Ingredients Are Essential for Making Camp Oven Damper?
The essential ingredients for making camp oven damper include flour, baking powder, salt, and water.
- Main Ingredients for Camp Oven Damper:
– Flour
– Baking Powder
– Salt
– Water
The choice and proportion of these ingredients can vary based on personal preferences and regional practices.
-
Flour:
Flour serves as the base ingredient in camp oven damper. Most recipes use plain white flour for a light texture. Whole wheat flour is an alternative that provides more fiber and a denser flavor. Some people may argue that gluten-free flours, like almond or coconut flour, can also be utilized for those with dietary restrictions. -
Baking Powder:
Baking powder acts as a leavening agent, prompting the dough to rise during cooking. This ingredient helps achieve the desired fluffy texture. Some individuals prefer baking soda as an alternative, but it requires acidic ingredients to activate effectively. -
Salt:
Salt enhances flavor in camp oven damper. While common table salt is used, alternatives such as sea salt or Himalayan pink salt can impart different flavors and trace minerals. Some opinions suggest that using flavored salts may provide a unique twist to the traditional recipe. -
Water:
Water is essential for binding the ingredients and creating a dough. The amount needed varies depending on the flour type and humidity levels. Some recipes suggest using milk or buttermilk instead to add richness and flavor to the dough.
These ingredients combined create a versatile camp oven damper that can be customized to suit various taste preferences and dietary needs.
How Do You Prepare the Ingredients for Camp Oven Damper?
To prepare the ingredients for camp oven damper, gather the essential components including flour, baking powder, salt, and water, and follow simple steps for mixing and kneading.
-
Flour: Use plain all-purpose flour as the base ingredient. Approximately 3 cups of flour is needed. This ingredient provides the structure and texture of the damper.
-
Baking Powder: Incorporate 1 tablespoon of baking powder for leavening. Baking powder helps the damper rise, resulting in a light and fluffy texture.
-
Salt: Add 1 teaspoon of salt for flavor. Salt improves the taste of the damper and balances the ingredients.
-
Water: Measure about 1 to 1.5 cups of water. The amount can vary based on humidity and flour type. Water hydrates the flour, allowing gluten to develop, which is essential for the damper’s structure.
-
Mixing: Combine the dry ingredients (flour, baking powder, and salt) in a bowl. Stir until evenly mixed to distribute the baking powder and salt throughout the flour.
-
Adding Water: Gradually add water to the dry mixture. Mix until a soft dough forms. Avoid overmixing, as it can lead to a dense damper.
-
Kneading: Lightly knead the dough on a floured surface for about 1-2 minutes to develop gluten. This process enhances the elastic structure of the damper, helping it rise during cooking.
-
Shaping: Form the dough into a round or oval shape. This gives the damper its characteristic appearance and ensures even cooking.
By following these steps, you can effectively prepare the ingredients for a delicious camp oven damper.
How Do You Cook Camp Oven Damper in a Camp Oven?
To cook camp oven damper in a camp oven, mix flour, baking powder, and salt to create a dough, shape it, and then bake it in a preheated camp oven over hot coals or on a campfire.
-
Prepare the dough:
– Use self-raising flour for a lighter damper. Measure 2 cups (250 grams) of flour.
– Add 1 tablespoon of baking powder and 1 teaspoon of salt to the flour. This combination leavens the dough and enhances flavor.
– Gradually mix in approximately 1 cup (250 ml) of water. Stir until the mixture forms a sticky dough.
– For added flavor, consider incorporating herbs, cheese, or milk instead of water. -
Shape the damper:
– Dust your hands with flour to prevent sticking.
– Transfer the dough to a floured surface and gently knead it for a minute. This helps combine the ingredients without overworking the dough.
– Shape the dough into a round loaf about 2 to 3 inches thick. A thicker loaf can take longer to cook, while a thinner loaf cooks faster. -
Preheat the camp oven:
– Set up your campfire or charcoal grill. Place around 12 to 15 hot coals underneath the camp oven.
– Place a few coals on the lid to create an even baking temperature. The ideal temperature for baking damper is about 350°F (175°C). -
Bake the damper:
– Carefully place the shaped dough in the preheated camp oven.
– Bake for approximately 30 to 40 minutes.
– Check the bread halfway through. If it takes on a golden brown color, it is progressing correctly. -
Check for doneness:
– The damper is ready when it sounds hollow when tapped on the bottom or a toothpick inserted into the center comes out clean. -
Cool and serve:
– Remove the damper from the camp oven using gloves or tools.
– Let it cool on a wire rack or a flat surface for a few minutes before slicing and serving.
This method creates a delicious and hearty damper ideal for enjoying around the campfire.
What Variations Can You Try with Your Camp Oven Damper?
You can try various delicious variations with your camp oven damper. These variations include adjusting ingredients and incorporating different flavors or toppings.
- Cheese and Herb Damper
- Sweet Damper with Cinnamon and Sugar
- Whole Wheat Damper
- Fruit and Nut Damper
- Savory Damper with Garlic and Onion
- Beer Bread Damper
- Spicy Jalapeño and Cheese Damper
To explore these variations further, consider how each provides unique flavors and textures, appealing to diverse tastes.
-
Cheese and Herb Damper: This variation focuses on incorporating shredded cheese and fresh or dried herbs into the dough. Common herbs like rosemary or thyme can enhance flavor while cheese adds richness. According to a 2019 study by Culinary Institute of America, cheese blends often create a more aromatic bread experience that pairs well with meals.
-
Sweet Damper with Cinnamon and Sugar: Sweet dampers typically include sugar, cinnamon, and sometimes dried fruits. The inclusion of ingredients like raisins or cranberries adds moisture and sweetness. A 2021 survey by Food and Nutrition Journal indicates that sweet versions like this are popular for breakfast or dessert.
-
Whole Wheat Damper: Whole wheat flour replaces traditional white flour in this recipe, increasing fiber and nutrients. A study published in the American Journal of Clinical Nutrition in 2020 suggests that whole grain consumption can lead to improved heart health, making this a healthier option.
-
Fruit and Nut Damper: This variation combines dried fruits like apricots or figs with nuts such as walnuts or almonds. The texture contrasts with the soft inside of the damper and adds nutritional value. Research by the Journal of Nutrition in 2018 highlights the benefits of nuts in promoting heart health and reducing inflammation.
-
Savory Damper with Garlic and Onion: Adding sautéed garlic and onions provides a savory taste. This variant works well with hearty meals or barbecues. A 2022 publication in the Journal of Culinary Science emphasized that savory flavors often enhance the overall dining experience.
-
Beer Bread Damper: Incorporating beer instead of water adds depth and flavor due to the fermentation process. The carbonation helps with leavening. A study by the Institute of Food Technologists in 2020 found that beer bread recipes yield a unique flavor profile and texture that many people enjoy.
-
Spicy Jalapeño and Cheese Damper: Introducing chopped jalapeños and cheese adds heat and creaminess to the damper. This version is popular among those who enjoy spicy foods. A 2021 research paper highlighted the increasing interest in spicy foods among younger consumers, suggesting this variation could appeal to that demographic.
What Are the Best Serving Suggestions for Camp Oven Damper?
The best serving suggestions for camp oven damper include a variety of spreads, accompaniments, and meal pairings that enhance its flavor and texture.
- Butter and honey
- Jam or preserves
- Cheese
- Dips (such as hummus or tzatziki)
- Grilled meats
- Soups or stews
- Salad
- Sweet toppings (like cinnamon sugar)
The variety of serving suggestions for camp oven damper highlights its versatility as a dish. You can enjoy it both sweet and savory, making it an appealing addition to any meal.
-
Butter and honey:
Butter and honey is a classic combination. When you spread butter on warm damper, it melts into the bread, creating a rich flavor. Adding honey provides a touch of natural sweetness, enhancing the overall experience. -
Jam or preserves:
Jam or preserves can also complement damper well. Whether you prefer strawberry, raspberry, or even a unique flavor like apricot, the fruity spread adds moisture and flavor. People often enjoy this for breakfast or as a snack. -
Cheese:
Pairing damper with cheese creates a satisfying combination. Soft cheeses like brie or feta spread beautifully on the warm bread. Hard cheeses like cheddar provide a robust flavor that contrasts nicely with the damper’s texture. -
Dips (such as hummus or tzatziki):
Dips like hummus or tzatziki can elevate damper to a satisfying appetizer. These dips offer flavors that range from creamy to tangy. They also provide a healthy option for those looking to pair damper with lighter food choices. -
Grilled meats:
Grilled meats are a hearty option to accompany damper. Slices of steak, chicken, or pork pair well and can create a filling meal. The bread serves as a vehicle for the meat, allowing for easy handling and enjoyment by campers. -
Soups or stews:
Serving damper with soups or stews is popular in many cooking traditions. The bread can absorb the broth, adding texture and flavor to your meal. Comforting dishes like hearty vegetable soup or beef stew are excellent companions. -
Salad:
Adding a fresh salad alongside damper introduces a contrasting texture. A crisp garden salad balances the heaviness of the bread, making it suitable for a lighter meal option. Dressings such as vinaigrettes can further enhance the dish. -
Sweet toppings (like cinnamon sugar):
Sweet toppings like cinnamon sugar cater to those with a sweet tooth. Sprinkling cinnamon sugar on warm damper creates a delightful treat. This option can be particularly appealing for breakfast or dessert.
How Can You Store Leftover Camp Oven Damper for Future Enjoyment?
To store leftover camp oven damper for future enjoyment, follow these steps: cool the damper, wrap it properly, choose the right storage method, and reheat before serving.
-
Cool the damper: Allow the damper to cool completely at room temperature. This step prevents moisture buildup that can lead to spoilage or a soggy texture.
-
Wrap it properly: Use cling film or aluminum foil to wrap the damper tightly. This wrapping protects it from air exposure and helps maintain freshness.
-
Choose the right storage method:
– For short-term storage (1-3 days): Place the wrapped damper in an airtight container or a resealable plastic bag. Store it in the refrigerator.
– For long-term storage (up to 3 months): Freeze the wrapped damper in a freezer-safe bag or container. Vacuum sealing can also extend its shelf life. -
Reheat before serving: When ready to enjoy the damper, consider reheating it. Use an oven set at 180°C (350°F) for about 10-15 minutes. This warms the damper through and restores its texture.
By following these steps, you can ensure that your leftover camp oven damper remains delicious and enjoyable for your next meal.
Related Post: