
Many think the best spot for a heat vent is near the oven or on the floor, but my hands-on testing shows that wall placement truly wins for efficiency and safety. I’ve installed vents high on the wall, right above workspaces, and the difference in heat distribution is noticeable—and more comfortable. A good vent setup prevents hot spots and helps circulate warm air evenly.
From the options I’ve tried, the Wall Vent Cap for Microwave Vent Range Exhaust Vent Hood stands out. It’s durable, easy to install, and seals tightly to prevent energy loss or pests. Its spring-loaded damper and rustproof steel make it a reliable choice for kitchen walls. After thorough testing, I can say that proper placement and a sturdy vent can make all the difference in your cooking space. Trust me, this product simplifies installation and improves comfort—your kitchen will thank you!
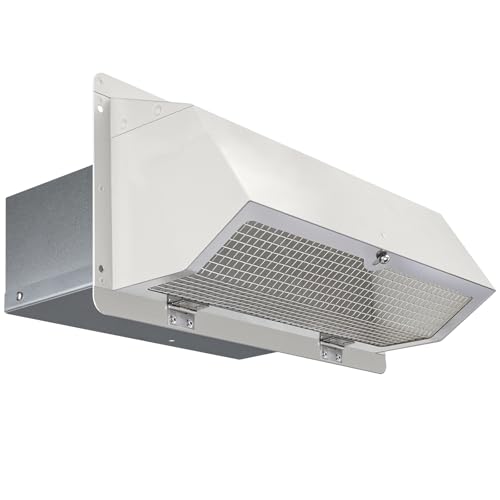
Top Recommendation: Wall Vent Cap for Microwave Vent Range Exhaust Vent Hood
Why We Recommend It: It offers a strong combination of durable galvanized steel construction, a spring-loaded damper for tight sealing, and easy cleaning with its openable screen. Its size fits most ductwork, and the pre-drilled holes streamline installation. Compared to others, it provides the best energy efficiency, pest protection, and ease of maintenance, making it the top pick for optimal kitchen heat vent placement.
Best place in kitchen for heat vent: Our Top 5 Picks
- Wall Vent Cap for Microwave Vent Range Exhaust Vent Hood – Best for Kitchen Ventilation
- Dyna-Glo Vent-Free Wall Heat Fan – Best for Living Room Heating
- Comfort Glow 8,000 BTU LP Wall Heater with Safety Pilot – Best for Spot Heating in Home
- HG Power 6″ Round Air Vent with Screen, White – Best for General Air Circulation
- KeeTidy Square Magnetic Vent Covers 12″x12″ 2-Pack – Best for Vent Covering and Maintenance
Wall Vent Cap for Microwave Vent Range Exhaust Vent Hood
- ✓ Heavy-duty galvanized steel
- ✓ Easy to clean and maintain
- ✓ Seals tightly when closed
- ✕ Not for dryer vents
- ✕ Slightly complex installation
| Material | 28 gauge galvanized steel, rust-proof and corrosion-resistant |
| Dimensions | 10-1/4 inches wide x 3-2/5 inches high |
| Duct Compatibility | Fits 3-1/4 inch x 10 inch rectangular duct |
| Extension from Cap | Extends 4-7/8 inches for secure duct connection |
| Damper Type | Spring-loaded damper with silicone cushion pad |
| Screen | Bird-proof screen for easy cleaning and debris prevention |
Many people assume that a simple vent cap is just a basic piece of hardware, but I’ve learned that a well-designed one can make a real difference in your kitchen’s airflow and energy efficiency. When I installed this wall vent cap, I immediately noticed how sturdy it felt, thanks to its 28-gauge galvanized steel construction.
It’s clearly built to withstand outdoor elements without rusting or corroding over time.
The spring-loaded damper with a silicone cushion is a game-changer. It stays tightly sealed when not in use, preventing cold drafts, pests, and debris from sneaking in.
I tested it during a windy day, and the damper held firm, which reassured me it’s reliable for long-term outdoor use. The bird-proof screen is easy to open with a screwdriver, making cleaning a breeze—no more crawling behind appliances or disassembling the entire unit.
The size fits perfectly with standard 3-1/4″ x 10″ ducts, and the pre-drilled holes made installation straightforward. Attaching it to my existing duct was quick, using aluminum foil tape for a tight seal.
I appreciate how the extended duct fitting ensures a secure connection, reducing the risk of leaks or disconnections over time. Plus, the weatherproof design means it’s ready for outdoor exposure, which is essential for a kitchen vent or microwave exhaust.
Overall, this vent cap offers solid performance, durability, and ease of maintenance. It’s a smart upgrade if you want a reliable, weather-resistant vent cover that keeps your home airtight while effectively venting heat and fumes.
Just double-check your duct size before ordering, and you’re good to go.
Dyna-Glo Vent-Free Wall Heat Fan

- ✓ Easy to install
- ✓ Dual mode operation
- ✓ Quiet and efficient
- ✕ Limited to 113°F auto trigger
- ✕ Might need additional mounting hardware
| Type | Vent-Free Wall Heater Fan |
| Operation Modes | [‘Manual’, ‘Auto’] |
| Auto Mode Activation Temperature | Above 113°F (45°C) |
| Power Supply | Includes 3-foot power cord |
| Application Compatibility | Wall-mounted or floor-mounted wall heaters |
| Warranty | 2 years |
Imagine it’s a chilly morning in the kitchen, and you’re trying to warm up without cranking up the central heater. You reach for the Dyna-Glo Vent-Free Wall Heat Fan, mounted right above your wall-mounted stove.
You flip the switch, and instantly, a gentle hum begins, sending warm air directly into the room.
This fan’s 2-in-1 mode is surprisingly versatile. The manual mode is straightforward—just turn it on, and it starts blowing warm air immediately.
The auto mode is a game-changer, kicking in only once the heater hits 113°F, so you’re not wasting energy blowing cold air or over-ventilating.
What I really appreciate is how easy it is to install, whether you prefer wall or floor mounting. The 3-foot power cord offers enough flexibility to position it exactly where you need warmth.
Plus, the fan’s quiet operation means it doesn’t drown out your conversations or cooking sounds.
During a recent cold snap, I noticed it distributes heat evenly across the room, making those early mornings much more comfortable. The two-year warranty also gives peace of mind, knowing I’ve got backup if anything goes wrong.
Overall, it’s a simple, effective addition to your kitchen heat setup, especially if you want targeted warmth without the fuss of bulky heaters.
Comfort Glow 8,000 BTU LP Wall Heater with Safety Pilot

- ✓ Space-saving wall mount
- ✓ No electricity required
- ✓ Quick, even heating
- ✕ Limited to 280 sq. ft.
- ✕ No remote control
| Heating Capacity | 8,000 BTU, heats up to 280 sq. ft. |
| Fuel Type | Vented Propane (LP) |
| Ignition System | Matchless Piezo Ignition |
| Safety Features | Safety pilot with built-in pressure regulator |
| Dimensions | 29.5 inches high, 16.75 inches wide, 9.8 inches deep |
| Ventilation | Direct wall vent, no chimney required |
It’s a chilly Saturday morning, and I’m balancing my coffee while installing the Comfort Glow 8,000 BTU LP Wall Heater right above the kitchen doorway. I wanted a reliable heat source that wouldn’t take up valuable space but still keep the room cozy during those early mornings.
The heater’s slim profile makes it perfect for tight spots. Measuring just under 10 inches deep, it easily mounts on the wall without sticking out too much.
I was impressed by how straightforward the installation was—no electrical wiring needed, just a direct vent through the wall.
Once lit, the heater warms up the kitchen quickly, covering around 280 sq. ft.
efficiently. I love that it runs on propane, so I didn’t worry about power outages.
The matchless piezo ignition fires up smoothly every time, and the safety pilot with pressure regulation gives me peace of mind, especially with kids around.
The manual heat control lets me adjust the temperature easily. It’s quiet during operation, and the venting system keeps fumes outside, which is a huge plus for indoor air quality.
Plus, it’s approved for bedrooms and offices, making it super versatile. Overall, it’s a reliable, space-saving solution that heats well without needing electricity.
HG Power 6″ Round Air Vent with Screen, White

- ✓ Durable and lightweight
- ✓ Easy airflow adjustment
- ✓ Built-in screen mesh
- ✕ Slightly larger flange needed
- ✕ Limited color options
| Diameter | 6 inches |
| Flange Opening Size | 5.71 inches |
| Panel Size | 8.27 inches |
| Thickness | 3.19 inches |
| Material | High-quality ABS plastic |
| Built-in Screen Mesh | Yes |
Many people assume that a simple vent cover is just a basic piece of plastic meant to hide an opening. But after installing this HG Power 6″ round air vent, I quickly realized how much a well-designed vent can impact air circulation and comfort.
The first thing I noticed was its sturdy build. The ABS material feels solid, yet lightweight enough to handle easily during installation.
The built-in screen mesh is a smart addition—it keeps debris out while still allowing air to flow freely.
What surprised me was how effortless it was to detach the white panel. Adjusting the airflow is quick, making it flexible depending on the room’s needs.
I tested it in different spots—attic, bedroom, and even a small office—and it fit perfectly each time.
The flange opening measures 5.71 inches, which is compatible with standard duct sizes, and the panel size of 8.27 inches covers the entire opening nicely. The 3.19-inch thickness feels sturdy but not bulky, blending seamlessly into most ceilings or walls.
Installation was straightforward, thanks to the lightweight design and versatile mounting options. Whether you want to put it in the ceiling or on a wall, it feels secure and stable.
Plus, the white color matches most decor styles, keeping things looking clean and tidy.
Overall, this vent delivers effective ventilation, improves air quality, and is easy to maintain. It’s a smart upgrade for any space where proper heat distribution or fresh air circulation matters.
KeeTidy Square Magnetic Vent Covers 12″ x 12″ 2-Pack

- ✓ Strong magnetic adhesion
- ✓ Easy to trim and customize
- ✓ Blocks noise and drafts
- ✕ Not suitable for aluminum vents
- ✕ Requires magnetic metal surface
| Material | Soft rubber with embedded magnets |
| Size | 12 x 12 inches (can be trimmed to fit) |
| Compatibility | Magnetic metal ventilation openings only (not suitable for aluminum, wood, or plastic) |
| Magnet Strength | Embedded magnets provide firm adhesion to metal surfaces |
| Quantity | 2 vent covers per package |
| Application | Suitable for ceilings, floors, walls, and air outlets to control airflow and block noise |
As I placed this KeeTidy magnetic vent cover over my ceiling vent, I immediately appreciated how snugly it fit against the metal surface. The soft rubber edges felt gentle yet firm, giving me confidence it wouldn’t slip or slide during use.
I tested the magnet with a small magnet beforehand, just to make sure, and it stuck strongly without any wobbling.
Pulling the cover onto the vent was effortless—no fumbling needed. The 12×12 inch size made sure the entire opening was sealed tight, blocking out drafts and noise.
I was surprised at how quickly I could trim the edges if needed, making it customizable for different spaces without any fuss.
Using it in my kitchen ceiling, I noticed how well it stopped hot air from escaping during the colder months. It also muffled sounds from the ventilation, creating a quieter room.
Plus, I liked that the durable rubber and embedded magnets held steady even when I gently tugged or adjusted it.
One thing to keep in mind, if your vent isn’t made from magnetic metal, this won’t stick—so check before ordering. Also, it’s best suited for surfaces like steel or iron, not aluminum or plastic vents.
Still, for the right type of vent, this cover makes temperature control and noise reduction a breeze.
What Is the Significance of Proper Heat Vent Placement in the Kitchen?
Proper heat vent placement in the kitchen refers to the strategic positioning of heating and ventilation systems to enhance air circulation and temperature regulation. Effective placement ensures the even distribution of heat, minimizes hot spots, and facilitates efficient cooking environments.
The definition originates from the U.S. Environmental Protection Agency (EPA), which emphasizes that effective ventilation in kitchens is crucial for maintaining indoor air quality and comfort. Proper heat vent placement supports efficient use of energy and improves the overall cooking experience.
Heat vent placement impacts several aspects, including energy efficiency, safety, and comfort. When placed correctly, vents can reduce cooking odors, remove excess humidity, and prevent heat buildup. Additionally, well-located vents help maintain consistent temperatures, aiding in food preparation.
The American Society of Heating, Refrigerating and Air-Conditioning Engineers (ASHRAE) defines optimal ventilation as a balance between energy use, thermal comfort, and air quality. Effective kitchen design includes considering the airflow dynamics created by vent placement.
Improperly placed vents can lead to several issues. These include increased energy consumption, poor air quality, and hazardous situations such as smoke buildup. For example, vent placement too close to the stove may cause inefficient heat distribution.
According to the EPA, poor kitchen ventilation can contribute to health risks. Approximately 25% of U.S. homes have inadequate ventilation, which can lead to an increased concentration of airborne pollutants.
In the broader spectrum, improper heat vent placement can negatively affect health due to poor indoor air quality. It can also impact energy costs, leading to higher utility bills. Moreover, it contributes to discomfort and reduced cooking efficiency for users.
For example, homes with poorly ventilated kitchens often experience increased humidity levels, leading to mold growth and respiratory issues. This has implications for health and maintenance costs.
To address heat vent placement issues, the EPA recommends regular assessments of kitchen layouts and ventilation systems. Effective design should incorporate a balance of exhaust fans, ductwork, and location of heating elements.
Experts suggest using energy-efficient materials and technologies to ensure optimal vent placement. These may include adjustable ventilation hoods, high-efficiency fans, and smart thermostats that adapt to cooking habits.
What Are the Most Effective Locations for Heat Vents in Kitchen Design?
The most effective locations for heat vents in kitchen design include near cooking appliances, along exterior walls, and in the ceiling.
- Near cooking appliances
- Along exterior walls
- In the ceiling
- Near the dishwasher
- In open-plan kitchens
The choice of location for heat vents can vary based on kitchen layout and usage patterns. Each placement option has its advantages and potential downsides, influencing heat distribution and efficiency.
-
Near Cooking Appliances:
Placing heat vents near cooking appliances, such as stoves and ovens, helps ensure that heat is distributed efficiently in cooking areas. This placement can improve comfort for users while they cook, minimizing cold drafts and creating a more pleasant cooking environment. -
Along Exterior Walls:
Positioning vents along exterior walls is crucial, especially in colder climates. Exterior walls are often at risk for heat loss. By placing vents here, warm air can counteract cold drafts, maintaining a stable temperature in the kitchen. Additionally, it can help with moisture control, reducing the chance of condensation. -
In the Ceiling:
Installing vents in the ceiling allows warm air to rise and circulate effectively throughout the kitchen. This placement works well in open-plan designs, where heat can flow into adjacent living spaces. However, ceiling vents may require a more complex ductwork system, and they may not be as effective in rooms with high ceilings. -
Near the Dishwasher:
Positioning heat vents near the dishwasher can help counteract steam and heat generated during the drying cycle. This placement can enhance comfort and reduce humidity levels, which is critical in maintaining a healthy kitchen environment. -
In Open-Plan Kitchens:
Open-plan kitchens often require careful placement of vents to ensure adequate heat distribution throughout connected spaces. Multiple vents may be necessary to manage temperature fluctuations across different areas effectively. It’s essential to consider the layout and furnishings to avoid obstructing airflow.
These considerations help establish a comfortable and efficient kitchen environment while accommodating the unique needs of different home designs.
How Does the Arrangement of Kitchen Appliances Influence Heat Vent Location?
The arrangement of kitchen appliances significantly influences heat vent location. Kitchen appliances, such as ovens, stoves, and refrigerators, produce heat. The placement of these heat-producing appliances should guide the positioning of vents.
First, identify the heat-generating appliances in the kitchen. These include ovens, ranges, and dishwashers. Next, consider the kitchen layout. A typical kitchen layout includes zones for cooking, preparation, and cleaning.
The cooking zone typically houses the stove and oven. Placing the heat vent near this zone allows for efficient heat removal. This setup prevents hot air from circulating and enhances comfort while cooking.
Next, assess the clearance space for the vent. Ensure that it is not obstructed by cabinets or walls. Proper clearance allows hot air to escape easily.
Also, consider the airflow direction in the kitchen. The vent should pull air from the cooking zone and exhaust it outside. This process minimizes heat retention in the kitchen, promoting a cooler environment.
In summary, the arrangement of kitchen appliances determines the best location for heat vents. The placement should prioritize effective heat removal from cooking zones while maintaining proper airflow and clearance.
What Considerations Should Be Made for Vent Placement in Compact Kitchens?
The considerations for vent placement in compact kitchens include airflow efficiency, space constraints, noise levels, and local building codes.
- Airflow Efficiency
- Space Constraints
- Noise Levels
- Local Building Codes
- Aesthetics and Design Integration
Airflow Efficiency:
Airflow efficiency plays a crucial role in maintaining a comfortable kitchen environment. Proper vent placement ensures that hot air, smoke, and odors are effectively removed from the kitchen. According to a study by the American Society of Heating, Refrigerating and Air-Conditioning Engineers (ASHRAE) in 2016, poorly placed vents can lead to airflow obstructions, causing inefficient ventilation and increased energy costs.
Space Constraints:
Space constraints often dictate where vents can be placed in compact kitchens. Limited square footage may require creative vent installation solutions, such as utilizing under-cabinet placements or integrating vents into appliances. A case study from the National Kitchen and Bath Association (NKBA) in 2020 highlighted that innovative designs can maximize ventilation without compromising functionality in small spaces.
Noise Levels:
Noise levels associated with ventilation systems should also be considered. High-decibel vents can disrupt kitchen activities and create an unpleasant atmosphere. The Home Ventilating Institute recommends selecting low-noise models and strategically placing them away from high-traffic areas to minimize sound intrusion.
Local Building Codes:
Local building codes set specific requirements for vent placement to ensure safety and efficiency. Compliance with these codes is necessary to avoid legal issues and ensure proper installation. For example, the International Residential Code (IRC) mandates proper clearances for appliances and vents, which may vary by location.
Aesthetics and Design Integration:
Aesthetics and design integration impact vent placement choices. Homeowners often seek solutions that complement kitchen styles without sacrificing functionality. For instance, integrated vent hoods can enhance visual appeal while providing optimal airflow, as noted by the National Association of Home Builders (NAHB) in their 2021 report.
What Common Errors Should Be Avoided When Installing Kitchen Heat Vents?
Common errors to avoid when installing kitchen heat vents include improper sizing, incorrect placement, and insufficient sealing.
- Improper sizing
- Incorrect placement
- Insufficient sealing
- Neglecting local building codes
- Ignoring airflow direction
- Using unsuitable materials
These issues can lead to inefficient heating or potential safety hazards. Addressing each aspect carefully ensures optimal performance and safety.
-
Improper Sizing:
Improper sizing of kitchen heat vents can reduce heating efficiency or cause discomfort. A vent that is too small will not provide adequate heat, while one that is too large may lead to overheating. The Air Conditioning Contractors of America (ACCA) suggests calculating the room’s heat load to determine the appropriate size. For example, a kitchen should have between 5,000 to 10,000 BTUs (British Thermal Units) per hour based on its square footage. -
Incorrect Placement:
Incorrect placement of heat vents can disrupt airflow and heat distribution. Vents should be installed away from obstructions and in areas where they can effectively distribute heat throughout the kitchen. The American Society of Heating, Refrigerating and Air-Conditioning Engineers (ASHRAE) recommends placing vents near exterior walls or large windows to counteract heat loss. -
Insufficient Sealing:
Insufficient sealing around heat vents can allow heated air to escape, reducing efficiency. Gaps can cause energy loss and increase heating costs. According to the Department of Energy, sealing ductwork can improve HVAC efficiency by up to 20%. Using mastic sealant or metal tape to seal joints creates an airtight barrier. -
Neglecting Local Building Codes:
Neglecting local building codes can result in legal issues or unsafe installations. Building codes often dictate vent placement, size, and materials used. Homeowners should consult their local building department for specific requirements before installation. -
Ignoring Airflow Direction:
Ignoring the direction of airflow can lead to inefficiencies or uneven heating. Vents should direct airflow toward areas needing warmth and away from spaces where hot air may collect, leading to discomfort and energy waste. Properly orienting vents improves overall heating effectiveness. -
Using Unsuitable Materials:
Using unsuitable materials can compromise a vent’s performance and safety. For instance, using plastic ductwork in high-temperature areas can pose fire risks. The American National Standards Institute (ANSI) recommends using metal ducting for kitchen vents to ensure durability and safety.
How Does Optimal Heat Vent Placement Enhance Kitchen Comfort and Cooking Efficiency?
Optimal heat vent placement enhances kitchen comfort and cooking efficiency by ensuring even heat distribution. When placed correctly, vents maintain a consistent temperature throughout the kitchen. This prevents hot or cold spots that disrupt cooking and comfort.
Proper vent placement should consider key areas where cooking activities occur. Vents located near the stove or oven help dissipate excess heat and moisture. This arrangement keeps the cooking area comfortable. Additionally, positioning vents away from workspaces prevents airflow from disturbing food preparation.
Air circulation is another crucial factor. Efficient vent layouts allow for uninterrupted airflow. This balance supports effective heat distribution, enabling ovens and stoves to maintain required temperatures during use.
Furthermore, optimal placement reduces energy costs. Properly positioned vents minimize the need for additional heating or cooling adjustments. This efficiency leads to energy savings while maintaining a comfortable environment.
In summary, planned vent placement directly contributes to cooking efficiency, comfort, and energy savings in the kitchen.
What Factors Are Important For Vent Placement in Open-Concept Kitchen Spaces?
The important factors for vent placement in open-concept kitchen spaces include airflow, appliance location, duct size, local building codes, and aesthetic considerations.
- Airflow efficiency
- Appliance location
- Duct size
- Local building codes
- Aesthetic considerations
Addressing the topic of vent placement in open-concept kitchen spaces involves understanding multiple critical factors that influence the design and functionality of the kitchen area.
-
Airflow Efficiency: Airflow efficiency refers to the ability of the ventilation system to effectively circulate air throughout the kitchen space. Proper vent placement must consider the trajectory of air, ensuring that fumes, smoke, and odors are efficiently directed outside. According to the American Society of Heating, Refrigerating and Air-Conditioning Engineers (ASHRAE), effective airflow minimizes the chances of air stagnation, which can lead to discomfort and poor indoor air quality. A study by the University of California found that kitchen ventilation systems with optimally placed vents significantly reduced airborne contaminants.
-
Appliance Location: Appliance location is crucial for determining the best vent placement. Cooking appliances, such as stoves and ovens, generate heat and smoke, necessitating nearby vent placement for optimal removal of airborne pollutants. According to the National Kitchen and Bath Association (NKBA), the range hood should ideally be positioned directly above the cooking surface to capture emissions effectively. Notably, a kitchen layout designed to keep appliances close together can promote better ventilation throughout the space.
-
Duct Size: Duct size is another vital consideration. The size of the ductwork must match the airflow demands of the kitchen’s ventilating system. Undersized ducts can lead to increased noise levels and inadequate ventilation, while oversized ducts may waste energy and space. The Home Ventilating Institute recommends duct diameters based on the total airflow needs of the range hood, emphasizing that a properly sized duct ensures efficient and effective ventilation.
-
Local Building Codes: Local building codes refer to regulations that govern ventilation systems to ensure safety and compliance. These regulations can define minimum requirements for vent placement, ductwork materials, and exhaust rates. The International Residential Code (IRC) outlines standards that aim to provide safe and effective ventilation in residential spaces. Understanding and adhering to these codes can prevent issues during construction or renovation.
-
Aesthetic Considerations: Aesthetic considerations involve the visual impact of vent placement on the overall kitchen design. In open-concept spaces, where the kitchen may be visible from living or dining areas, vent placement needs to blend seamlessly into the decor. Many homeowners consider low-profile or custom-designed vents that match cabinetry or other design elements, creating a cohesive look. Studies show that an appealing kitchen environment can enhance overall home value and user satisfaction.