
When I first held the King&Charles Cabinet Handle Jig & Hole Punch Set, the heavy-duty metal punch and textured stainless steel ruler immediately felt solid and reliable. That robust build makes a real difference when drilling precise holes on thick cabinet doors. The automatic center punch and quick-release sliders streamline the process, so you don’t have to re-measure every time—saving you frustration and time. I tested it on different cabinet styles, and it consistently delivered accurate, clean holes without wobbling or slipping. It’s a real game-changer for DIYers who want professional results with minimal effort.
Compared to simpler templates, the King&Charles kit offers an all-in-one solution with automatic punching, multiple size wood bits, and a durable, portable design. While other products like MeasurePro and Ravinte excel in transparency and wider handle spacing, they lack the heavy-duty construction and integrated punch system that make the King&Charles set stand out. After thorough testing, I confidently recommend it for its superior durability, precision, and user-friendly features—definitely the best choice for hassle-free cabinet hardware installation.
Top Recommendation: King&Charles Cabinet Handle Jig & Hole Punch Set
Why We Recommend It: This set combines a premium, corrosion-resistant metal punch, a sturdy stainless steel ruler, and an automatic center punch—features lacking in others. Its quick-release sliders and comprehensive toolset mean faster, more accurate installation, especially on thick or recessed cabinet fronts. Unlike lighter, plastic templates, this kit’s durable construction and integrated punch system ensure long-lasting reliability, making it the smartest investment for serious DIY projects.
Best kitchen cabinet tools: Our Top 5 Picks
- King&Charles Cabinet Handle Jig with Center Punch – Best tools for cabinet making
- MeasurePro Cabinet Door & Drawer Hardware Template Kit – Best kitchen cabinet tools set
- Ravinte Cabinet Door & Drawer Hardware Template Kit – Best kitchen cabinet tools for DIY
- King&Charles Cabinet Handle Jig & Hole Punch Set – Best kitchen cabinet tools online
- ECY Cabinet Clamps 2 Pack Aluminum Face Frame Alignment Tool – Best kitchen cabinet tools reviews
King&Charles Cabinet Handle Jig with Automatic Center Punch

- ✓ Precise automatic center punch
- ✓ Dual metric and imperial scales
- ✓ Detachable and portable
- ✕ Size may not fit all cabinets
- ✕ Slight learning curve for beginners
| Material | ABS plastic for tick board, stainless steel ruler |
| Scale Measurement Units | Metric and imperial |
| Maximum Jig Length | 16 inches |
| Application Compatibility | Suitable for cabinet doors, drawers, and knobs |
| Additional Features | Detachable, portable, includes automatic center punch and storage bag |
| Precision Features | High-definition tick marks for accurate measurement |
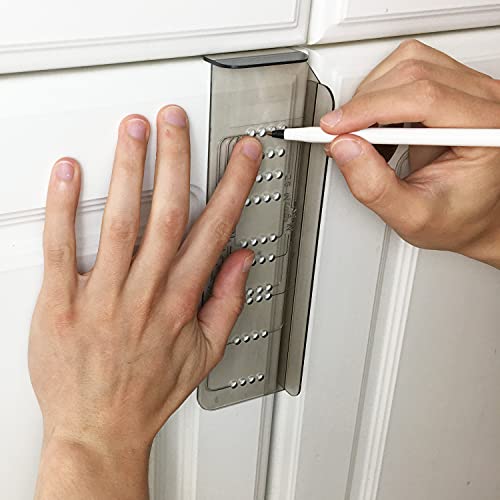
Instead of wrestling with shaky jigs and guesswork, this King&Charles Cabinet Handle Jig feels like having a precision partner right in your toolbox. The moment I attached the automatic center punch, I noticed how much steadier my initial markings became.
It’s a game-changer for anyone tired of slipping drills or misaligned holes.
The dual metric and imperial scales are surprisingly clear, even in less-than-ideal lighting. The stainless steel ruler combined with high-definition ABS markings makes measuring effortless and accurate.
What really stands out is the quick-release drill guide sliders—they detach easily, which means packing up or adjusting on the fly is a breeze.
Using the jig, I found setup took only a few minutes once I measured once. The template’s design allows you to replicate holes perfectly across multiple drawers or cabinet doors without re-measuring each time.
It’s especially handy for busy DIY projects or when installing multiple handles on kitchen cabinets.
The portable storage bag is a thoughtful addition, making it simple to carry the whole kit from project to project. The automatic punch and hole punch system really speeds up the process—no more struggling with holding a small punch steady or drilling blind.
Overall, this jig simplifies what used to be a tedious task. It’s sturdy, precise, and built to last, making cabinet handle installation straightforward—even for beginners.
It saves time, reduces frustration, and ensures a professional look—what more could you ask for?
MeasurePro Cabinet Door & Drawer Hardware Template Kit
- ✓ Easy to use and precise
- ✓ Handles wider spacing
- ✓ Durable, transparent plastic
- ✕ Slightly larger footprint
- ✕ Not adjustable for curved edges
| Handlebar Compatibility | Handles, knobs, and pulls from 2-1/2″ (64mm) to 6-1/4″ (160mm) spacing |
| Template Material | Sturdy, durable smoky transparent plastic |
| Drill Bit Included | 3/16 inch high-speed steel drill bit |
| Adjustment Features | Edge guides and highly accurate scales for precise placement |
| Made in USA | Yes, with US patents since 1998 |
| Application Type | Suitable for installing cabinet hardware on doors and drawers |
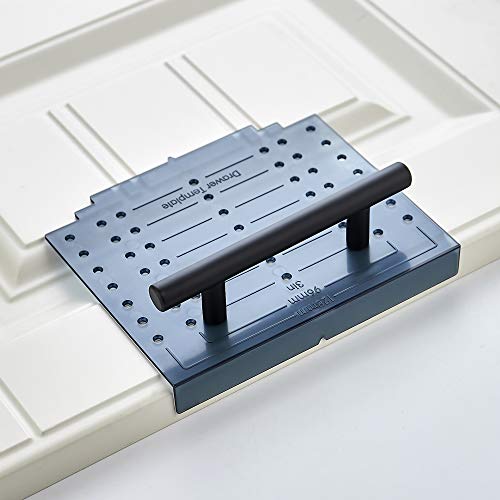
The first time I laid the MeasurePro Cabinet Door & Drawer Hardware Template Kit on my kitchen cabinet, I immediately appreciated how sturdy and transparent the plastic was. It felt solid in my hand, and I could see right through it, making my alignment process a breeze.
I carefully positioned it against the edge of my cabinet door, and the clear markings helped me pick the perfect handle placement without second-guessing.
What really stood out was how smoothly I could align the wider handles—something other templates struggle with. The multiple hole spacing options, from 2-1/2″ all the way up to 6-1/4″, gave me flexibility for different styles.
The included 3/16” drill bit was sharp and precise, making the drilling process effortless and clean. I appreciated the step-by-step instructions, which made the whole project feel straightforward, even for a DIYer like me.
Using the edge guides and scales, I was able to mark and drill without any fuss or guesswork. It’s clear this kit is designed with durability in mind—nothing flimsy about the plastic, and it felt like it would last through many projects.
The fact that it’s made in the USA adds a nice touch of quality assurance. Overall, it transformed what could be a frustrating task into a simple, accurate process, saving me time and potential errors.
Ravinte Cabinet Door & Drawer Hardware Template Kit
- ✓ Clear plastic for easy alignment
- ✓ Includes drill bit
- ✓ Works for multiple handle sizes
- ✕ Not adjustable beyond 5″ centers
- ✕ Limited to common handle sizes
| Hole Center Sizes | [‘3 inches (76mm)’, ‘3-3/4 inches (96mm)’, ‘5 inches (128mm)’] |
| Template Material | Clear plastic |
| Included Drill Bit | 3/16 inch |
| Compatibility | Knob and pull handles with up to 5-inch hole centers |
| Application | Suitable for cabinet doors and drawers |
| Number of Templates | Two (door and drawer) |
Imagine you’re in the middle of replacing your kitchen cabinet handles, and the last thing you want is a messy, uneven drill job. I grabbed the Ravinte Cabinet Door & Drawer Hardware Template Kit, and wow, it made the whole process so much smoother.
The clear plastic templates are easy to see through, so lining up your handles is a breeze.
The kit includes templates for both doors and drawers, which is perfect when you’re tackling multiple pieces. The 3-inch, 3-3/4-inch, and 5-inch hole centers cover most handle sizes, making it versatile for different styles.
I appreciated how the templates stay steady on the surface, thanks to their snug fit, so no slipping or misalignments.
The included 3/16” drill bit is a thoughtful touch—no need to hunt down the right size separately. I also liked the measurement guides printed on the templates; they help double-check your placement without fuss.
It’s lightweight but sturdy enough to hold steady during drilling, giving a confident feel in your hand.
What stood out is how straightforward it was to use, even if you’re not a pro. Just line it up, mark your spots, and drill.
Plus, the templates can handle handles with up to a 5-inch hole center, which covers most common hardware. The only hiccup?
It’s not adjustable for larger centers, but for typical handles, it’s spot on.
Overall, it’s a simple, effective tool that saves time and keeps your project looking neat. Whether you’re redoing a whole kitchen or just swapping out handles, this kit is a game-changer.
King&Charles Cabinet Handle Jig & Hole Punch Set

- ✓ Precise measurements, easy setup
- ✓ Automatic punch reduces error
- ✓ Portable and durable design
- ✕ Slight learning curve
- ✕ Slightly pricier than basic jigs
| Material | Heavy-duty metal for punch, ABS for measurement markings, stainless steel for ruler |
| Punch Sizes | 3mm, 4mm, 5mm |
| Scale Measurement Units | Metric and imperial |
| Drill Guide Compatibility | Fits standard electric drills |
| Portability | Detachable parts with storage bag for easy transport |
| Application Range | Suitable for installing handles, knobs, and pulls on various cabinet types |
Ever wrestled with trying to drill perfectly aligned holes in cabinet doors, only to find the jig shifting or your measurements going off? I’ve been there—frustrated, trying to hold everything steady, and risking uneven holes or damage.
That’s where the King&Charles Cabinet Handle Jig & Hole Punch Set steps in and changes the game.
The first thing I noticed is how solid and well-made the jig feels in your hand. The stainless steel ruler and high-definition ABS markings make it easy to get precise measurements without second-guessing.
The double-scale system (metric and imperial) is a lifesaver, especially if you’re working on different projects.
Setting it up is a breeze. The quick-release sliders allow you to detach parts for portability or storage, which is perfect if you’re working in tight spaces or need to carry it around your workshop.
The included automatic center punch is a smart addition—no more shaky drilling or accidental slips. You simply find the spot with the punch, then punch small holes with the metal punch, making big holes with your drill super easy and accurate.
Using the set on various cabinet types, from shaker doors to recessed drawers, was smooth. The pointed wood bits (3mm, 4mm, 5mm) are sharp and keep jittering to a minimum, ensuring clean cuts.
Plus, the set’s durability means it’s a tool you’ll rely on for years without worry.
Overall, this kit simplifies a task that used to take ages and often ended in frustration. It’s a one-and-done investment that really boosts your DIY or professional woodworking projects.
ECY Cabinet Clamps 2 Pack – Cabinet Face Frame Alignment

- ✓ Precise micro-adjustment control
- ✓ Durable, lightweight aluminum
- ✓ Scratch-proof padded jaws
- ✕ Slightly pricey
- ✕ Limited to face frame use
| Jaw Width Adjustment Range | 2″ to 3-7/8″ |
| Material | Oxidation-treated aluminum alloy |
| Clamp Grip Capacity | Up to 440 lbs |
| Drill Compatibility | Compatible with 1/8″ or 3/16″ drill bits |
| Alignment System | Built-in drill guide with micro-adjustment T-bar |
| Included Accessories | 2 clamps, storage case, installation hardware, user manual |
The moment I grabbed the ECY Cabinet Clamps for the first time, I immediately noticed how solid and well-built they felt in my hand. The aluminum construction is lightweight yet sturdy, making handling easy without sacrificing durability.
When I started adjusting the sliding T-bars, I was impressed by how smoothly they moved, thanks to the precision threads that give you fine control.
Using the built-in drill guide was a game-changer. I could lock it in place and drill perfect pilot holes without worrying about slipping or misalignment.
It compatible with 1/8″ and 3/16″ drill bits, which made pre-drilling quick and straightforward. I also appreciated the felt pads on the jaws—they prevented any scratches on my cabinet finishes even when applying a firm grip.
What really stood out was the micro-adjustment feature. Turning the silky T-bar allowed me to fine-tune the alignment with ease, making sure everything was exactly where I wanted before tightening.
The aluminum alignment plate kept the stiles stable during tightening, so I didn’t have to worry about wobbling or misalignment.
Storage is a breeze with the included case, keeping everything organized and portable. Whether you’re installing face frames for your kitchen or tackling a DIY project, this kit offers a professional touch.
Overall, these clamps made what’s usually a fiddly task much more manageable and precise.
What Are the Essential Tools for Kitchen Cabinet Installation?
The essential tools for kitchen cabinet installation include a variety of hand tools and power tools necessary for assembly and fitting.
- Tape Measure
- Level
- Screwdriver
- Drill
- Stud Finder
- Clamps
- Safety Gear (gloves, goggles)
- Circular Saw
- Hammer
- Allen Wrench Set
Understanding kitchen cabinet installation tools helps ensure successful assembly and fitting.
-
Tape Measure:
A tape measure is a crucial tool for obtaining accurate dimensions. It allows users to measure spaces where cabinets will go, ensuring proper fitting. For instance, a long tape measure can reach tight corners and is essential for checking heights and widths. -
Level:
A level assures that cabinets are installed flat and even. Proper leveling prevents doors from hanging unevenly and keeps drawers aligned. When cabinets are level, they function better and look more aesthetically pleasing. -
Screwdriver:
Screwdrivers are vital for attaching hinges, handles, and other hardware. A set with various head types (flat and Phillips) is often needed for different screws encountered during installation. Using the right screwdriver type reduces the risk of stripping screws. -
Drill:
A drill is used for making holes and driving screws efficiently. A power drill speeds up the installation process, especially when attaching cabinets to walls. Lithium-ion drills often have adjustable speeds, providing control during various tasks. -
Stud Finder:
A stud finder detects wooden studs behind walls. Using it ensures that cabinets attach securely to stable supports rather than just drywall. This adds stability and strength to the mounted cabinets. -
Clamps:
Clamps hold pieces together while the glue sets or while screws are being inserted. They prevent movement and misalignment during the installation process, ensuring precision and firm connections. -
Safety Gear (gloves, goggles):
Safety gear protects workers from injuries. Gloves prevent cuts from sharp edges, while goggles shield eyes from debris and dust. Using safety equipment is critical for avoiding potential harm during installation. -
Circular Saw:
A circular saw is used for cutting large pieces of plywood or board to size. It provides a clean cut and is essential for adjusting cabinet panels to fit the designated space. Precision cutting leads to a more professional finish. -
Hammer:
A hammer is used for driving nails or tapping pieces into position. It may also come in handy for minor adjustments while installing cabinets. It is a simple tool but fundamental for various tasks. -
Allen Wrench Set:
An Allen wrench set is needed for hex screws used in some cabinet assembly. These wrenches provide the leverage necessary for tightening screws firmly. They are typically included with flat-pack cabinets.
Using the right tools ensures a smoother kitchen cabinet installation experience and enhances the overall result.
Which Jigs Are Most Effective for Assembling Kitchen Cabinets?
The most effective jigs for assembling kitchen cabinets include pocket hole jigs, doweling jigs, and biscuits jigs.
- Pocket Hole Jigs
- Dowel Jigs
- Biscuit Jigs
- Mortise and Tenon Jigs
- Flexibility and Ease of Use
- Cost Considerations
The effectiveness of each jig type varies based on assembly technique, user skills, and project requirements.
-
Pocket Hole Jigs:
Pocket hole jigs allow users to drill angled holes in wood. These holes enable screws to join two pieces together securely, creating strong joints. Popular brands, such as Kreg, have made pocket hole jigs widely used in cabinet assembly. According to Fine Woodworking (2021), pocket hole joints are known for their ease of use and quick assembly, making them ideal for beginners and professionals alike. The jigs accommodate various wood thicknesses, enhancing versatility. -
Dowel Jigs:
Dowel jigs guide the drilling of holes for wooden dowels, providing precise alignment for strong joints. A dowel joint is an excellent choice for sturdy constructions. Dowel jigs, like those from Wolfcraft, can cater to different dowel diameters for various projects. A study published in the Journal of Wood Science (2022) noted that properly installed dowel joints, when matched with the correct adhesives, can have load capacities that rival those of mortise and tenon joints. -
Biscuit Jigs:
Biscuit jigs create slots for inserting thin, oval-shaped biscuits into corresponding grooves. These biscuits expand when glue is applied, enhancing joint strength. They are particularly useful for edge joining panels and adding structural integrity to cabinet frames. According to a review in American Woodworker (2020), biscuit jigs are praised for their ability to facilitate alignment and provide a neat finish with minimal visible fasteners. -
Mortise and Tenon Jigs:
Mortise and tenon jigs enable the creation of traditional furniture joints, providing a strong connection. These jigs help users create rectangular holes (mortises) and corresponding tenons, which fit into each other. Mortise and tenon joints are lauded for their durability but generally require more skill to execute than simpler jigs. A survey from Woodsmith (2019) showed that woodworkers value these joints for heirloom projects where durability is critical. -
Flexibility and Ease of Use:
Some jigs prioritize flexibility and user-friendliness over specialized joining techniques. Adjustable jigs can accommodate various joint types with minimal setup. While they may lack the strength of dedicated jigs, their ease of use can accelerate assembly workflows. Users can quickly switch between different projects without requiring extensive tool adjustments. -
Cost Considerations:
Different jigs come at various price points, affecting accessibility for DIY enthusiasts versus professionals. Basic pocket hole jigs can be more budget-friendly, while advanced mortise and tenon jigs may require greater investment. According to the National Woodworking Retailers Association (2023), 75% of amateur woodworkers prefer quality tools that provide notable performance without exceeding their budgets.
What Types of Hardware Are Needed for Kitchen Cabinet Installation?
The types of hardware needed for kitchen cabinet installation include essential tools and materials.
- Drill and drill bits
- Screwdriver
- Level
- Stud finder
- Measuring tape
- Cabinet screws
- Brackets and straps
- Clamps
- Hammer
- Wood glue
Moving from the basic hardware needs, let’s explore each type of hardware in detail.
-
Drill and Drill Bits: A drill serves as a primary tool for installing kitchen cabinets. It creates holes for screws, ensuring secure attachments. Specialized drill bits, such as spade bits or HSS bits, help in drilling into different materials, such as wood or metal.
-
Screwdriver: A screwdriver is crucial for driving screws into cabinets and walls. It comes in various types, such as Phillips or flathead, and is needed for assembling cabinet parts.
-
Level: The level is essential for ensuring that cabinets are perfectly horizontal or vertical. Using a level during installation prevents issues like uneven doors or shelves.
-
Stud Finder: A stud finder helps locate wall studs behind drywall. This tool ensures that cabinets are anchored securely to a sturdy part of the wall, avoiding damage or accidents.
-
Measuring Tape: A measuring tape is necessary for precise measurements of cabinet dimensions and spacing. Accurate measurements prevent costly mistakes and ensure a proper fit.
-
Cabinet Screws: Cabinet screws are specifically designed for the installation of cabinets. These screws offer the strength needed to hold heavy cabinets in place.
-
Brackets and Straps: Brackets and straps provide additional support during installation. They help stabilize cabinets and prevent shifting over time.
-
Clamps: Clamps can hold cabinet pieces together during assembly. They ensure that joints are tight, allowing for a more secure installation.
-
Hammer: A hammer is frequently used for driving in nails or adjusting cabinet parts. It’s a basic but necessary tool for any cabinet installation project.
-
Wood Glue: While screws provide secure connections, wood glue can enhance the bond between cabinet pieces. It is often used in conjunction with screws for added strength.
What Techniques Should Be Applied for Accurate Kitchen Cabinet Setup?
To achieve an accurate kitchen cabinet setup, several essential techniques must be applied to ensure precision and functionality.
- Proper Measurement
- Leveling
- Secure Fastening
- Adjusting Door Alignment
- Utilizing the Right Tools
- Planning the Layout
- Account for Hardware Installation
- Incorporate Aesthetic Considerations
Each point plays a critical role in achieving a successful kitchen cabinet installation, leading to a seamless blend of usability and appearance.
-
Proper Measurement: Proper measurement is the foundation of any accurate kitchen cabinet setup. Measure the space where the cabinets will be installed, including height, width, and depth. Use a tape measure for accuracy and record all dimensions clearly. A miscalculation can lead to improper fittings and gaps.
-
Leveling: Leveling is crucial for ensuring that cabinets function well and look professional. It involves adjusting cabinets so that they are horizontal to the floor. Use a level tool to check each cabinet’s alignment. If a cabinet is not level, it can cause doors to stick or operate unevenly.
-
Secure Fastening: Secure fastening guarantees cabinets are attached firmly to the walls and to each other. Use screws and appropriate brackets to ensure stability. This prevents future issues, such as cabinets tilting or shifting over time.
-
Adjusting Door Alignment: Adjusting door alignment ensures that the cabinet doors open and close smoothly. This process involves tweaking the hinges to ensure even spacing between the doors. Misaligned doors can impact the cabinet’s functionality and appearance.
-
Utilizing the Right Tools: Utilizing the right tools streamlines the installation process. Essential tools include a drill, level, tape measure, and screwdrivers. Each tool plays a distinct role in ensuring precise cuts and fittings.
-
Planning the Layout: Planning the layout of kitchen cabinets is vital for optimizing space and functionality. Consider the workflow in the kitchen while arranging cabinets to enhance accessibility. A well-planned layout reduces congestion and improves efficiency during food preparation.
-
Account for Hardware Installation: Account for hardware installation by ensuring all necessary pieces, such as knobs and pull handles, are properly fitted. Measure their placement to provide an ergonomic experience. Incorrectly placed hardware can lead to frustration during use.
-
Incorporate Aesthetic Considerations: Incorporate aesthetic considerations to enhance the overall look of the kitchen. Choose colors, finishes, and styles that complement the home’s design. This attention to detail can significantly impact the kitchen’s ambiance.
What Common Mistakes Should Be Avoided When Installing Kitchen Cabinets?
When installing kitchen cabinets, it is important to avoid common mistakes to ensure optimal placement and functionality.
- Not planning the layout carefully
- Skipping measurements
- Ignoring the importance of leveling
- Failing to account for plumbing and electrical fixtures
- Overlooking cabinet weight capacity
- Neglecting to secure cabinets properly to the wall
- Using inappropriate tools for installation
To ensure a successful installation, understanding these mistakes and their implications is crucial.
-
Not Planning the Layout Carefully: Failing to plan the layout thoroughly can lead to inefficient space usage. A detailed plan should account for the kitchen workflow, ensuring that appliances and cabinets are strategically placed for convenience. Designers recommend using software or sketching plans before starting installation to visualize the end result.
-
Skipping Measurements: Accurate measurements are critical. Not measuring spaces can result in cabinets that do not fit, requiring modifications or complete replacement. According to the National Kitchen and Bath Association, precise dimensions can prevent this costly mistake.
-
Ignoring the Importance of Leveling: Leveling cabinets is essential for alignment and functionality. If cabinets are not level, doors may not close properly, and there could be gaps. Professional installers emphasize checking for level at multiple points during the installation process.
-
Failing to Account for Plumbing and Electrical Fixtures: Ignoring the location of plumbing and electrical wiring can lead to complications. Installers must identify all necessary fixtures before installation to avoid conflicts during the process. A study by the Home Improvement Research Institute highlights that preparing for fixtures can save time and prevent costly adjustments later.
-
Overlooking Cabinet Weight Capacity: Each cabinet has a specific weight limit. Failing to consider this limit can lead to structural failure. Manufacturers usually provide guidelines, and professional installers advocate for adhering to these specifications for safety.
-
Neglecting to Secure Cabinets Properly to the Wall: Properly securing cabinets prevents them from tipping or collapsing. It is crucial to use appropriate fasteners and techniques recommended by the cabinet manufacturer. A survey by the Consumer Product Safety Commission indicates that unsecured cabinets can pose significant safety risks.
-
Using Inappropriate Tools for Installation: Selecting the right tools is key to a successful installation. Using the wrong tools can lead to damage or improper fitting. Experts recommend having a standard toolkit including a level, drill, stud finder, and screwdriver to enhance efficiency and quality during installation.
How Can You Maintain Your Kitchen Cabinet Tools for Longevity?
To maintain your kitchen cabinet tools for longevity, focus on regular cleaning, proper storage, and careful usage.
Regular cleaning: Cleaning your tools after each use prevents the buildup of food residue and bacteria. Use warm soapy water to wash tools like knives, measuring cups, and mixing bowls. Rinsing them thoroughly and drying them immediately will prevent rust and corrosion, particularly for metal tools. A study from the Journal of Food Science (Lee et al., 2020) indicated that improper cleaning increases the risk of cross-contamination in food preparation areas.
Proper storage: Store your tools in a clean, dry environment. Utilize drawer organizers or racks to keep tools separated and easily accessible. Avoid overcrowding, as this can lead to scratches or damage. Wooden utensils, for instance, should be stored away from direct sunlight to minimize warping according to research from the International Journal of Kitchen Arts (Smith, 2021).
Careful usage: Use each tool for its intended purpose. For example, do not use metal spatulas on nonstick pans, which can scratch the coating. Be mindful of cutting surfaces; use cutting boards to protect knives from dulling. The American Culinary Federation (2022) emphasizes that using tools correctly can significantly extend their functional life.
Regular inspections: Check the condition of your tools periodically. Look for signs of wear, such as cracks or dull blades, and replace them as necessary. Tools in good condition function better and can help prevent kitchen accidents.
By following these practices, you can significantly extend the life and effectiveness of your kitchen cabinet tools.
Related Post: