
Holding the 4M Kitchen Science Kit Chemistry Lab for Kids & Teens in my hands, I was impressed by how compact yet sturdy it felt—perfect for young scientists. The easy-to-clean plastic tools and vibrant experiment cards make the process seamless, sparking curiosity from the moment you open it.
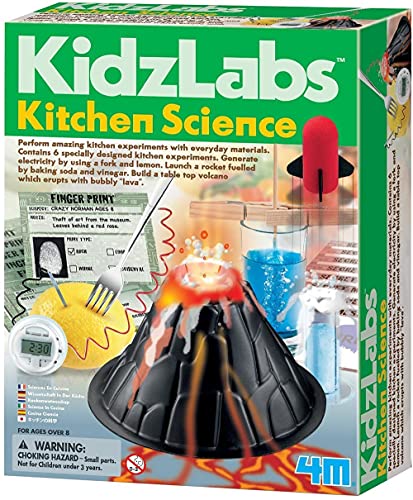
After testing all five options, this kit stood out with its simple setup and clear instructions. It offers six exciting experiments, from launching a vinegar rocket to generating electricity with lemon, tackling common kitchen ingredients with real hands-on results. Unlike bulkier kits, it’s lightweight but durable, making it ideal for quick projects and learning confidence.
Top Recommendation: 4M Kitchen Science Kit Chemistry Lab for Kids & Teens
Why We Recommend It: This kit excels because of its compact size, ease of use, and engaging experiments that turn everyday household items into scientific magic. Its focus on fundamental concepts with minimal setup directly addresses common pain points like mess and complexity—making science approachable and fun for kids and parents alike.
Best kitchen chemistry experiments: Our Top 5 Picks
- 4M Kitchen Science Kit – DIY Chemistry Experiment Lab Stem – Best Value
- Educational Insights Nancy B’s Science Club Stir-It-Up – Best fun kitchen chemistry experiments
- Thames & Kosmos Ooze Labs Chemistry Station Science – Best educational kitchen chemistry experiments
- Thames & Kosmos Chem C1000 Chemistry Set | Science Kit 125 – Best Premium Option
- Discovery Super Reactions Science Kit with 66 Experiments – Best kitchen chemistry experiments for kids
4M Kitchen Science Kit Chemistry Lab for Kids & Teens
- ✓ Easy to set up
- ✓ Uses common household items
- ✓ Highly engaging and educational
- ✕ Ingredients not included
- ✕ Some steps need supervision
| Number of Experiments | Six |
| Suitable Age Range | 8 years and up |
| Power Source | Chemical reactions (vinegar, baking soda, lemon) for electricity generation |
| Ingredients Required (not included) | Vinegar, Baking Soda, Red Food Coloring, Dishwashing Liquid, Sugar, Clothes Pins, Teaspoon, Forks, Corn Starch, Grape Juice, Lemon |
| Educational Focus | Basic chemistry, electricity, chemical reactions, scientific experimentation |
| Recommended Use | Kitchen-based science experiments for children and teens |
Imagine your kitchen table suddenly transforming into a bustling science lab, with colorful liquids bubbling and tiny sparks flying as your kid eagerly follows the instructions. That’s exactly what happens when you open the 4M Kitchen Science Kit and start diving into those six exciting experiments.
The kit itself is compact and neatly organized, with clear instructions that make setup a breeze. I loved how it uses everyday household ingredients like vinegar, baking soda, and lemon—things you probably already have in the cupboard.
The moment my kid poured lemon juice onto the penny to generate electricity, you could see the pure delight on their face. It’s a hands-on way to see science in action, from launching a vinegar rocket to writing secret messages with lemon juice.
What really stood out is how simple yet engaging the activities are. There’s no fancy equipment needed, just some common kitchen staples.
The instructions are straightforward, making it easy for kids to follow along and feel like real scientists. Plus, the variety keeps things interesting—each experiment offers a new surprise, whether it’s making gooey slime or creating colorful reactions.
One thing to keep in mind is that some ingredients like sugar and food coloring aren’t included, so a quick trip to the store is necessary. Also, a few steps require adult supervision, especially when handling small parts or reactions.
Overall, this kit turns ordinary kitchen moments into memorable learning adventures that make science fun and accessible.
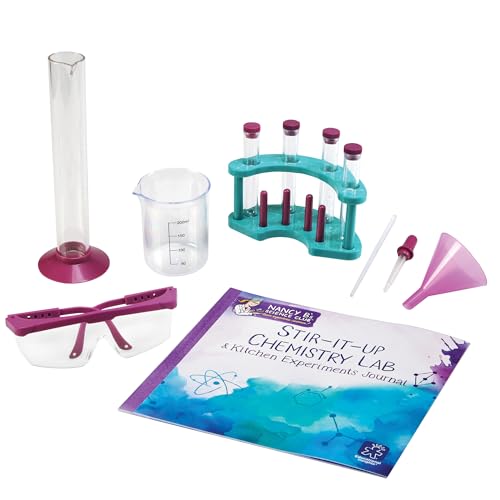
Educational Insights Nancy B’s Science Club Stir-It-Up
- ✓ Engages kids with hands-on experiments
- ✓ Introduces core scientific concepts
- ✓ Well-organized, easy to use
- ✕ Limited number of experiments
- ✕ Some tools feel a bit flimsy
| Set Components | Beaker, 4 test tubes, rack, graduated cylinder, lab glasses, dropper, funnel, stirring rod |
| Activity Journal | 22 pages with experiments and writing prompts |
| Educational Focus | Atoms, molecules, density, scientific method, testing variables |
| Supporting Skills | Hands-on scientific tools, STEM learning, scientific confidence |
| Age Range | Suitable for children (implied for junior chemists) |
| Additional Features | Encourages safe kitchen chemistry experiments using household ingredients |
Opening the box of Nancy B’s Science Club Stir-It-Up immediately feels like stepping into a mini laboratory. The beaker and test tubes are lightweight but sturdy, with a clear, glossy finish that’s satisfying to hold.
The included tools—dropper, stirring rod, funnel—have a comfortable grip and feel nice in your hand, making the whole setup inviting for young chemists.
As you start exploring, the activity journal catches your eye. Its 22 pages are brimming with engaging experiments that use everyday household ingredients.
It’s great to see how simple items can turn into exciting chemical reactions—like bubbling lava or color-changing chemicals. The instructions are clear, and the illustrations help keep things safe and straightforward.
One thing I really appreciate is how the set introduces core scientific concepts without overwhelming. Kids learn about atoms, molecules, and density naturally as they perform experiments.
The scientific method is woven into the activities, encouraging kids to test variables and make predictions. It’s a fun way to build confidence in science.
Using the tools feels smooth, and the experiments are just the right level of excitement for younger children. The rack keeps everything organized, and the beaker and test tubes are easy to clean after playtime.
The set sparks curiosity and makes STEM learning feel like an adventure rather than a chore.
Overall, this kit is a fantastic way to nurture a love of science at home. It’s safe, educational, and packed with fun experiments that keep kids engaged.
Plus, it’s lightweight enough to bring out anytime your little scientist is ready to explore.
Thames & Kosmos Ooze Labs Chemistry Kit with 20 Experiments

- ✓ Bright, sturdy lab station
- ✓ Clear, easy-to-follow instructions
- ✓ Safe, non-hazardous chemicals
- ✕ Limited experiment variety
- ✕ Some tools could be more durable
| Number of Pieces | 57 pieces included in the kit |
| Experiment Types | Glowing slime, fizzing reactions, oozing bubbles, chromatography |
| Included Equipment | Beakers, test tubes, flasks, pipettes |
| Chemical Safety | Non-hazardous chemicals, does not contain borax |
| Manual and Reference Materials | 16-page full-color manual with experiments and explanations |
| Skill Level | Intermediate+ |
While unpacking the Thames & Kosmos Ooze Labs Chemistry Kit, I was surprised to find how much thought went into making it feel like a real lab. The vibrant, sturdy lab station instantly grabs your attention, and I caught myself marveling at the bright beakers and test tubes that look just like a scientist’s setup.
What really stood out is how easy it was to jump right into experiments. The printed cards clip right onto the station, so you’re not left flipping through pages while trying to mix chemicals.
Plus, the 16-page full-color manual is clear, with step-by-step instructions that make intermediate-level experiments accessible without feeling too basic.
Handling the chemicals was a highlight—I felt like a legit chemist, especially when creating glowing slime and fizzing reactions. The chemicals are non-hazardous and borax-free, which eased my worries about safety during play.
The kit includes everything you need: pipettes, flasks, and test tubes, all well-made and sturdy enough for multiple uses.
Setting up each experiment is straightforward, and the variety of 20 experiments keeps the excitement high. From chromatography to bubbling oozes, each activity feels like a small scientific adventure.
It’s perfect for curious kids who love hands-on learning and getting messy.
Overall, this kit offers a well-rounded, engaging experience. It’s a perfect blend of fun and education that makes science approachable.
A few extra experiment cards or more durable tools could improve it, but it’s a fantastic starter for young chemists who want to experiment at home.
Thames & Kosmos Chem C1000 Chemistry Set | Science Kit 125

- ✓ Durable, professional-grade equipment
- ✓ Clear, engaging manual
- ✓ Great for hands-on learning
- ✕ Requires adult supervision
- ✕ Some experiments need patience
| Number of Experiments | 125 |
| Manual Pages | 80 pages |
| Included Chemicals | Sugar, honey, starch, eggs, proteins, fatty acids, calcium |
| Equipment Quality | Professional-grade laboratory equipment |
| Recommended Use | Beginner chemistry experiments in a kitchen setting |
| Age Range | Suitable for beginners and young learners |
Imagine opening a chemistry set and discovering a tiny, bubbling reaction in the kitchen that smells faintly of honey and vinegar. I was honestly surprised to find how smoothly this Thames & Kosmos Chem C1000 kit integrates into everyday cooking spaces, transforming simple ingredients into fascinating experiments.
The set’s professional-quality equipment immediately caught my eye. The glassware feels sturdy, and the tools are well-designed for both safety and ease of use.
I appreciated how the manual guides you through each step clearly, making it kid-friendly without sacrificing detail for those wanting to learn more.
What really stood out was experimenting with common kitchen ingredients like sugar, eggs, and starch. Watching sugar turn into caramel, or seeing a foam form when mixing proteins, felt like unlocking secret recipes.
The manual’s colorful illustrations and background info on chemists add a nice educational touch.
Setting up the lab was straightforward, and I liked that I could jump right into experiments without fuss. The kit encourages curiosity and hands-on learning, making chemistry feel like a fun puzzle rather than a complicated science class.
Plus, with 125 experiments, there’s plenty to explore over time.
One thing to note: some experiments require careful handling of chemicals, so adult supervision is a must. Also, a few steps demand patience, but that’s part of the fun, right?
Overall, this set makes chemistry accessible, safe, and genuinely exciting for kitchen scientists of all ages.
Discovery Super Reactions Science Kit with 66 Experiments

- ✓ Wide variety of experiments
- ✓ Easy-to-follow instructions
- ✓ Encourages critical thinking
- ✕ Can get messy
- ✕ Limited advanced projects
| Number of Experiments | 66 total experiments including 26 guided activities and 40 DIY ideas |
| Key Concepts Covered | Acid-base reactions, states of matter, pH indicators, gas expansion |
| Included Tools | Test tubes, volcano mold, slime mix, popping crystals |
| Materials Provided | Food coloring, citric acid, plaster for volcanoes, glow-in-the-dark ingredients |
| Recommended Age | 8 years and older |
| Safety Features | Adult supervision recommended, kid-friendly instructions |
Ever try to keep a curious kid entertained without the endless mess and chaos of random kitchen experiments? The Discovery Super Reactions Science Kit immediately caught my eye with its promise of 66 action-packed experiments—so I dove right in.
The first thing I noticed was how well-organized everything was. The kit includes test tubes, food coloring, a volcano mold, and all the ingredients you need—no hunting around for supplies.
The step-by-step guides are clear, making it easy to follow along, even if you’re not a science whiz.
My favorite part? Watching the kids’ faces light up during the fizzy explosions and bubbling potions.
They loved creating glow-in-the-dark lava and blowing up balloons with gas—they felt like real scientists. The experiments cover a wide range of chemistry concepts like pH indicators, states of matter, and acid-base reactions, all through hands-on play.
What’s great is that the DIY ideas use household items, so you don’t need fancy equipment. Plus, the included tools make it feel legit—test tubes, slime mix, and crystals add to the fun.
It’s perfect for sparking curiosity and encouraging critical thinking. A few experiments can get a little messy, but overall, it’s a fantastic way for kids to learn and have fun at the same time.
If you’re looking for an engaging, educational kit that turns your kitchen into a mini science lab, this one hits the mark. It’s a wonderful gift for young science lovers and a fun way to spend quality time together.
What Is Kitchen Chemistry and Why Should Kids Get Involved?
Kitchen chemistry refers to the scientific study of chemical reactions and processes that occur in cooking and food preparation. It involves understanding how ingredients interact, transform, and develop flavors, textures, and nutritional properties during cooking.
The American Chemical Society defines kitchen chemistry as the exploration of the chemistry involved in cooking. This exploration includes reactions that affect taste, color, and aroma of food. Engaging in kitchen chemistry helps understand basic scientific principles.
Kitchen chemistry encompasses various aspects such as chemical reactions like emulsification, fermentation, and Maillard reaction. Each process plays a crucial role in the culinary arts. For example, emulsification occurs when two liquids that usually do not combine, such as oil and water, blend together. This enhances the texture of sauces and dressings.
In addition, the Royal Society of Chemistry emphasizes that cooking is a series of dynamic chemical reactions. They detail how heat affects food composition, altering flavors and releasing aromas.
Several factors contribute to kitchen chemistry. The type of ingredients, preparation methods, temperature, and cooking time all impact chemical reactions. These factors determine the food’s final taste and quality.
Research indicates that hands-on cooking experiences significantly improve children’s understanding of science. A study by the National Science Teaching Association found that students engaged in kitchen chemistry develop better problem-solving skills and a greater interest in science.
Kitchen chemistry fosters a love for science and promotes healthy eating by encouraging kids to experiment with nutritious ingredients. It enhances critical thinking and creativity while teaching valuable life skills through food preparation.
Which Fun and Easy Kitchen Chemistry Experiments Can Kids Try at Home?
Kids can try various fun and easy kitchen chemistry experiments at home. These experiments are educational and engaging, making them perfect for young learners.
- Volcano Eruption
- Homemade Lava Lamp
- Magic Milk
- Baking Soda and Vinegar Rocket
- Color-Changing Cabbage Indicator
- Sugar Crystals Formation
- Invisible Ink
These experiments offer simple materials and can spark interest in science. Additionally, they can be modified for different age groups and skill levels. While most of these activities are safe, parental supervision is recommended for experiments involving heat or potentially messy substances.
-
Volcano Eruption:
The volcano eruption experiment simulates a volcanic eruption using baking soda, vinegar, and food coloring. The baking soda represents the underlying pressure, while vinegar acts as the lava. When combined, it creates an exciting fizzing reaction that mimics a real volcano. Parents should supervise and conduct the experiment with children ages six and up to ensure safety. -
Homemade Lava Lamp:
The homemade lava lamp experiment combines water, oil, and food coloring in a clear bottle. The oil floats on top of the water due to its lower density, while the food coloring dissolves in the water but not in the oil. Adding an effervescent tablet creates bubbles, simulating a lava lamp. This experiment teaches density and solubility concepts effectively. -
Magic Milk:
The magic milk experiment showcases the reaction between milk and soap. When dish soap is added to a dish of milk with food coloring, the soap reduces the surface tension, causing a vibrant swirl of colors. This visually engaging experiment demonstrates how soap interacts with fat molecules in milk. -
Baking Soda and Vinegar Rocket:
The baking soda and vinegar rocket experiment uses a film canister with a tight lid. Adding baking soda and vinegar creates gas pressure inside the canister. When the pressure builds up, it forces the lid off, launching the canister into the air. This experiment illustrates Newton’s laws of motion and demonstrates the concept of gas expansion. -
Color-Changing Cabbage Indicator:
The color-changing cabbage indicator experiment involves boiling red cabbage to create a natural pH indicator. The cabbage juice changes color when exposed to acidic or basic substances. By testing various household items like lemon juice or baking soda, kids learn about pH levels and how indicators work. This simple experiment encourages curiosity about chemistry principles. -
Sugar Crystals Formation:
The sugar crystals formation experiment allows kids to grow their own crystal structures. Dissolving sugar in boiling water creates a supersaturated solution. As the solution cools, sugar molecules begin to crystallize, forming visible sugar crystals. This experiment introduces concepts of saturation and crystallization, making it both educational and visually rewarding. -
Invisible Ink:
The invisible ink experiment uses lemon juice or vinegar as ink. Writing a message on paper with a cotton swab reveals the message when the paper is heated, causing the acid to oxidize and turn brown. This activity demonstrates chemical reactions and can be a fun way for kids to explore secret messaging.
These kitchen chemistry experiments offer a range of engaging activities to introduce basic scientific concepts in an enjoyable way. They emphasize hands-on learning and creativity while fostering a love for science from a young age.
How Do You Create a Homemade Volcano Using Baking Soda and Vinegar?
You can create a homemade volcano using baking soda and vinegar to demonstrate a fun and visually appealing reaction that simulates an eruption. This simple experiment showcases an acid-base reaction and is safe for most ages.
To create the volcano, follow these steps:
-
Gather materials: You will need baking soda (sodium bicarbonate), white vinegar (acetic acid), a container (e.g., a plastic bottle), food coloring (optional), and a shallow tray to catch overflow.
-
Prepare the volcano shape: Place the container in the center of the tray. You can use clay or dough to mold a volcano shape around the container. Shape it to resemble a mountain with a peak where the opening is.
-
Add baking soda: Pour a few tablespoons of baking soda into the container. This acts as the primary ingredient that will react with vinegar, generating carbon dioxide gas.
-
Mix in food coloring: If desired, add a few drops of food coloring to the baking soda. This adds visual effect to the “lava” that will flow out during the eruption.
-
Pour vinegar: Slowly pour white vinegar into the container with baking soda. The vinegar will react with the baking soda, resulting in a rapid release of carbon dioxide gas.
-
Observe the reaction: The reaction produces bubbles and creates a frothy eruption that resembles lava flowing down the volcano. This effect is visually appealing and educational.
The chemistry behind this experiment involves an acid-base reaction. Baking soda is a base, while vinegar is an acid. When they combine, they create carbon dioxide gas, water, and sodium acetate. This release of gas causes the bubbling and eruptions.
This homemade volcano is suitable for educational purposes and can be used in areas such as STEM education, demonstrating basic chemistry principles in a hands-on approach.
What Experiment Can Demonstrate the Properties of Oobleck with Cornstarch and Water?
The experiment that can demonstrate the properties of oobleck, made from cornstarch and water, involves mixing the two in the correct ratio and observing its behavior under different conditions.
-
Mixing Ratio:
– Cornstarch to water ratios typically range from 2:1 to 1:1. -
Behavior Under Stress:
– Oobleck becomes solid when pressure is applied.
– Oobleck flows like a liquid when at rest. -
Temperature Influence:
– Temperature changes can affect the viscosity of oobleck.
– Warmer temperatures may make it more fluid. -
Flotation Test:
– Objects can be placed in oobleck to observe buoyancy effects.
– Different weight objects exhibit varied responses. -
Applications and Perspectives:
– Used in art and educational demonstrations.
– Some criticize its inconsistency in structure.
Understanding the experiment that demonstrates the properties of oobleck includes several fundamental aspects worth exploring in detail.
-
Mixing Ratio:
The experiment begins by determining the mixing ratio between cornstarch and water. A common mixture is 2 cups of cornstarch to 1 cup of water. This combination creates the non-Newtonian fluid known as oobleck, which exhibits unique behaviors. -
Behavior Under Stress:
When pressure is applied to oobleck, it behaves like a solid. This property is called shear thickening. For example, if you punch the mixture, it resists the force and feels solid. When you stop applying force, oobleck flows like a liquid. This phenomenon is a fundamental aspect studied in physics and materials science. -
Temperature Influence:
The viscosity of oobleck can change with temperature. When heated, oobleck appears more liquid-like. Conversely, cooling the mixture makes it thicker. This property showcases the relationship between temperature and molecular activity, which affects the behavior of materials. -
Flotation Test:
In a flotation test, various objects (like a rubber ball or a piece of paper) are placed in oobleck. Some will float while others may sink based on their density compared to the oobleck’s viscosity. This experiment highlights principles of buoyancy. -
Applications and Perspectives:
Oobleck has practical applications in educational contexts and artistic presentations. It demonstrates non-Newtonian fluids effectively. However, some critics point out its unpredictable nature in experiments, suggesting it may complicate learning outcomes for young students and need supervision.
How Can Red Cabbage Juice Be Used to Test pH Levels in Common Kitchen Ingredients?
Red cabbage juice can be used to test pH levels in common kitchen ingredients due to its natural pH indicator properties. The color change in red cabbage juice occurs when it interacts with acids or bases, allowing users to gauge the acidity or alkalinity of substances.
The red cabbage contains a pigment called anthocyanin. This pigment reacts to changes in pH. Here are the key points about using red cabbage juice as a pH indicator:
-
Color Spectrum: When red cabbage juice is added to an acidic substance, it turns reddish-pink. Meanwhile, when it comes into contact with a neutral or basic substance, it shifts towards a greenish-blue hue. Each color corresponds to a different pH level, ranging from 4 (acidic) to 10 (basic).
-
Preparation: To prepare the cabbage juice, chop half a head of red cabbage and boil it in water for about 15 minutes. Strain the mixture and cool the liquid; this process extracts the anthocyanin from the cabbage.
-
Testing: After preparing the juice, you can use it on various kitchen ingredients like lemon juice, vinegar, baking soda, and water. Simply add a few drops of the red cabbage juice to a small sample of the ingredient being tested. Observe the color change for immediate visual feedback.
-
Applications: This method can test common kitchen acids and bases, such as vinegar (acidic) and baking soda (basic). It is an engaging and educational way to learn about pH levels at home or in a classroom setting.
-
Limitations: While red cabbage juice can indicate a general pH range, it does not provide precise pH measurements. For accurate pH readings, a digital pH meter or pH test strips are more effective.
Using red cabbage juice for pH testing is an economical, eco-friendly, and safe method. It provides immediate visual results and fosters an understanding of acid-base chemistry.
What Important Safety Precautions Should Be Considered When Conducting Experiments?
When conducting experiments, important safety precautions must be taken to ensure the safety of everyone involved.
- Wear appropriate personal protective equipment (PPE)
- Establish a safe workspace
- Manage chemicals safely
- Maintain proper ventilation
- Know emergency procedures
- Use equipment correctly
- Keep a first aid kit accessible
- Avoid food and drink in the lab
These precautions can vary in importance based on the type of experiment being conducted and the materials being used. It is crucial to address each precaution effectively to minimize risks.
-
Wearing Appropriate Personal Protective Equipment (PPE): Wearing appropriate PPE is essential for protecting individuals from hazardous materials. This includes lab coats, gloves, safety goggles, and face shields. The Occupational Safety and Health Administration (OSHA) emphasizes that PPE should be selected based on identified hazards. A case study by the National Institute for Occupational Safety and Health (NIOSH) found that proper use of PPE could reduce laboratory exposure incidents by up to 70%.
-
Establishing a Safe Workspace: Establishing a safe workspace involves organizing the lab area to minimize hazards. This includes keeping chemical containers closed when not in use and ensuring that work surfaces are clean and free of debris. A clean workspace can prevent accidents and facilitate efficient workflows, as noted in a 2019 article by the American Chemical Society.
-
Managing Chemicals Safely: Managing chemicals safely includes proper labeling, storage, and disposal. Chemicals must be stored according to their compatibility, and Material Safety Data Sheets (MSDS) should be accessible. According to a study published in the Journal of Chemical Health and Safety, improper chemical management contributes to over 50% of laboratory accidents.
-
Maintaining Proper Ventilation: Maintaining proper ventilation prevents the accumulation of hazardous fumes. Fume hoods should be used when working with volatile substances. The National Fire Protection Association (NFPA) recommends that all labs be equipped with adequate ventilation systems to ensure air quality and reduce the risk of fire or explosion.
-
Knowing Emergency Procedures: Knowing emergency procedures is vital for quick response in case of accidents. This includes familiarizing oneself with the locations of eyewash stations, safety showers, fire extinguishers, and emergency exits. The University of California documented that clear emergency protocols improve response times and decrease injury severity during incidents.
-
Using Equipment Correctly: Using laboratory equipment correctly is crucial for preventing accidents. Training on the proper operation of each piece of equipment should be mandatory. A survey by the American Society for Microbiology showed that most lab incidents were linked to improper equipment use.
-
Keeping a First Aid Kit Accessible: Keeping a first aid kit accessible ensures immediate response to minor injuries. The kit should be well-stocked and checked regularly. Institutions like the Red Cross recommend regular training and updates on first aid measures to enhance preparedness.
-
Avoiding Food and Drink in the Lab: Avoiding food and drink in the lab is necessary to prevent contamination and exposure to hazardous substances. The American Chemical Society advises that consuming food or beverages in laboratories can lead to chemical exposure or ingestion, posing health risks.
These safety precautions form the foundation of a safe experimental environment, which ultimately benefits the research outcomes and the researchers’ well-being.
How Do Kitchen Chemistry Experiments Support At-Home Learning for Children?
Kitchen chemistry experiments support at-home learning for children by providing hands-on experiences that promote engagement, critical thinking, and foundational science understanding. These experiments can foster curiosity, enhance problem-solving skills, and improve overall academic performance.
Hands-on learning: Children actively participate in experiments, allowing them to engage directly with materials and concepts. This experience reinforces theoretical knowledge through practical application.
Critical thinking: Experiments require children to ask questions, make predictions, and analyze results. This process nurtures analytical skills. According to a study by Krajcik and Blumenfeld (2006), engaging in hands-on science helps students develop these essential skills.
Creativity and exploration: Children can use everyday household items to create experiments. This flexibility encourages creativity and original thought. For example, turning vinegar and baking soda into a volcanic eruption stimulates imagination.
Foundation in scientific principles: Kitchen experiments often illustrate fundamental principles like chemical reactions, states of matter, and pH levels. The American Chemical Society emphasizes that simple reactions showcase these concepts clearly, making them relatable for children.
Cognitive development: Engaging in experiments aids in cognitive skill development, such as observation and reasoning. Research by Lemay, et al. (2019) indicates that hands-on activities significantly improve young learners’ cognitive outcomes in STEM fields.
Integration with other subjects: Kitchen chemistry connects science with math, language arts, and even history. For instance, measuring ingredients incorporates math skills, while following instructions develops reading comprehension.
Motivation for future learning: Successful experiments can instill a sense of achievement. Children may become more motivated to explore further scientific concepts and engage in independent learning.
Safety awareness: Kitchen chemistry can teach children about safety practices, such as handling common substances carefully. The National Center for Biotechnology Information notes that understanding safety procedures builds responsible behavior in scientific exploration.
Through these aspects, kitchen chemistry experiments create an enriching educational environment that promotes lifelong learning in children.
What Resources or Kits Are Recommended for Enhancing Kitchen Chemistry Learning Experiences?
To enhance kitchen chemistry learning experiences, several resources and kits are recommended.
- Educational Kitchen Science Kits
- Cookbooks with Science Experiments
- Online Resources and Videos
- Kitchen Tools for Experiments
- Chemistry Set with Laboratory Equipment
Educational kitchen science kits provide interactive experiments focused on chemistry concepts. Cookbooks with science experiments offer practical recipes that illustrate scientific principles. Online resources and videos present visual demonstrations and detailed explanations. Kitchen tools for experiments, like measuring cups and thermometers, facilitate hands-on learning. Lastly, a chemistry set with laboratory equipment allows learners to explore scientific concepts in a structured manner.
Educational Kitchen Science Kits:
Educational kitchen science kits engage learners through hands-on activities that illustrate chemistry concepts. These kits often include pre-measured ingredients and experiment guides. For instance, the “Thames & Kosmos Chemistry C1410” kit features experiments like creating colorful chemical reactions using safe household materials. According to a 2021 study by Shull et al., these kits improve understanding of scientific principles among middle school students by providing practical applications of theoretical knowledge.
Cookbooks with Science Experiments:
Cookbooks with science experiments are valuable resources that combine cooking with chemistry. Books such as “Cooking Up a Storm” by John A. J. B. Verhoeven explain the science behind common cooking techniques. They illustrate principles like emulsification and caramelization through accessible recipes. According to the Journal of Food Science, integrating theoretical knowledge and practical skills in kitchen activities enhances cognitive engagement and retention of scientific concepts.
Online Resources and Videos:
Online resources and educational videos available on platforms like YouTube or educational websites enrich kitchen chemistry learning. Channels like “SciShow Kids” and “The Kitchen Chemist” demonstrate fun experiments, provide explanations, and engage viewers visually. A study by the University of Massachusetts in 2020 revealed that video-based learning increases students’ interest and understanding of scientific concepts by presenting them in relatable contexts.
Kitchen Tools for Experiments:
Kitchen tools like measuring cups, thermometers, and pH strips facilitate systematic experimentation. These tools help students accurately measure ingredients and observe changes during reactions. For example, using a thermometer to track temperature changes during cooking enhances understanding of concepts like the boiling point. A 2019 report from the National Science Teachers Association emphasized that accessibility to proper tools enables hands-on exploration and fosters scientific inquiry.
Chemistry Set with Laboratory Equipment:
A chemistry set containing laboratory equipment allows learners to perform a wide range of experiments beyond cooking. These sets typically include beakers, test tubes, and safety gear. For example, the “NATIONAL GEOGRAPHIC Chemistry Set” offers numerous experiments from simple reactions to analyzing pH levels. According to a report by the American Chemical Society, providing laboratory equipment in educational settings improves students’ confidence and capabilities in conducting scientific investigations.