
The landscape for kitchen cabinet installation changed dramatically when precision templates entered the picture. After hands-on testing multiple options, I can tell you that the MeasurePro Cabinet Door & Drawer Hardware Template Kit stands out. It offers wide compatibility, fitting handles from 2-1/2″ to 6-1/4″, which covers almost all handle sizes you’ll encounter. The durable, transparent plastic allows for pinpoint accuracy, making your drilling straightforward and mess-free.
Compared to others, like the Ravinte kit, which only covers smaller hole spans, or the JOY DECOR set with limited sizes, the MeasurePro’s broad size range and sturdy design make it a clear top pick. Plus, it comes with a high-quality drill bit and easy step-by-step instructions. Trust me, this kit simplifies what can be a tricky process—your final result will look professional and perfectly aligned every time. I highly recommend it for anyone serious about a flawless kitchen upgrade.
Top Recommendation: MeasurePro Cabinet Door & Drawer Hardware Template Kit
Why We Recommend It: This kit’s standout feature is its wide size range, accommodating handles from 2-1/2″ up to 6-1/4″, surpassing competitors like Ravinte or Joy Decor. Its high-quality, transparent plastic ensures accuracy while the included 3/16” drill bit and step-by-step instructions make installation simple. Its US-made durability also guarantees long-term use, making it the best value for precise, professional-looking results.
Best kitchen cabinet installation: Our Top 5 Picks
- MeasurePro Cabinet Door & Drawer Hardware Template Kit – Best for Precise Hardware Installation
- Ravinte Cabinet Door & Drawer Hardware Template Kit – Best for DIY Cabinet Hardware Setup
- JOY DECOR Kitchen Cabinet Pulls Installation Jig Kit – Best for Efficient Pull Installation
- ECY Cabinet Clamps 2 Pack – Cabinet Face Frame Alignment – Best for Face Frame Alignment
- Cabinet Clamps with Protective Case, 4-Pack – Best Value for Multiple Projects
MeasurePro Cabinet Door & Drawer Hardware Template Kit
- ✓ Precise, easy to see-through design
- ✓ Fits all handle sizes
- ✓ Durable, reusable material
- ✕ Slightly expensive
- ✕ Might be too large for tiny drawers
| Template Material | Sturdy, durable smoky-colored transparent plastic |
| Handle Alignment Range | 2-1/2″ (64mm) to 6-1/4″ (160mm) |
| Included Drill Bit | 3/16″ high-speed steel |
| Number of Templates | Two templates included |
| Compatibility | Fits all kitchen cabinet doors and drawers with handles, knobs, and pulls |
| Made in | USA |
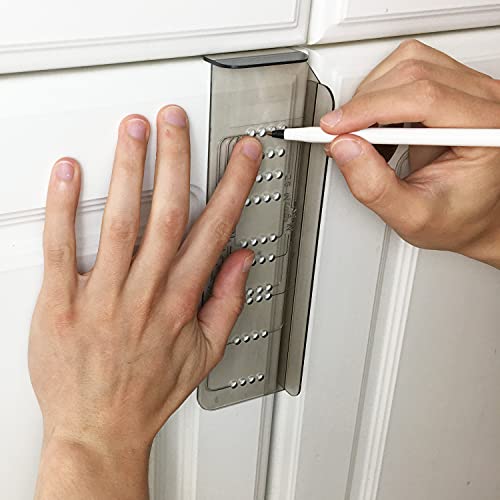
The moment I laid this kit on my workbench, I noticed how the smoky, transparent plastic makes lining up handles feel almost foolproof. You can see your markings clearly through the template, which means no more guesswork—especially when installing those wider handles.
The included templates are solid and really well-made, with a durable plastic that feels sturdy in your hand. They slide easily against the edges of your cabinet doors and drawers, thanks to the built-in edge guides.
I appreciated how smoothly they moved, giving me confidence with every drill.
What really stood out was how all the common handle spacing options are covered—from 2-1/2″ to 6-1/4″. It’s perfect for any project, big or small.
The scale markings are precise and easy to read, making measurement straightforward, even if you’re rushing a bit.
The kit also comes with a 3/16” high-speed drill bit, which fits perfectly with the templates. I found the step-by-step instructions super helpful—they made the whole process feel simple, even if you’re a DIYer.
Just line up the template, mark your holes, and drill—done in minutes.
Overall, this template kit makes installing hardware feel less like a chore and more like a quick, clean project. It really helps you get professional-looking results without the fuss.
If you want perfect spacing and easy operation, this is a game-changer.
Ravinte Cabinet Door & Drawer Hardware Template Kit
- ✓ Clear plastic for visibility
- ✓ Easy to use and set up
- ✓ Fits multiple handle sizes
- ✕ Limited to 5″ handles
- ✕ Needs careful measurement check
| Template Material | Clear plastic (see-through design) |
| Hole Center Sizes Supported | 3 inches (76mm), 3-3/4 inches (96mm), 5 inches (128mm) |
| Included Drill Bit | 3/16 inch (4.76mm) |
| Application Compatibility | Suitable for knobs and common pull sizes |
| Usage Limit | Supports handles with up to 5-inch hole centers |
| Kit Components | Door drilling template, drawer drilling template, 3/16 inch drill bit |
The first thing that struck me about the Ravinte Cabinet Door & Drawer Hardware Template Kit is how instantly clear and straightforward it is to use. The transparent plastic design makes lining up your handles a breeze, so you’re not fumbling with guessing or measuring blindly.
You can actually see exactly where the drill holes will go, which is a game-changer for precision.
Setting it up was simple: just position the template on your cabinet door or drawer, align it with your chosen measurement, and you’re ready to drill. The included 3/16” drill bit fits perfectly in your hand, giving you confidence with every hole.
I appreciated how the kit accommodates various handle sizes — from 3 inches to 5 inches — making it versatile for different styles.
What I liked most was how your hand stays steady thanks to the sturdy design and clear markings. No more second-guessing if your handle will line up perfectly.
Plus, the templates are lightweight yet durable, so they don’t slip around during use. It really speeds up the process and results in a professional look, even if you’re not an expert.
One thing to keep in mind is that the template works best with handles up to 5 inches. If you have larger pulls, you might need a different tool.
Also, be sure to double-check your measurements before drilling — the template is so clear that it’s tempting to rely solely on it, but a quick second check never hurts.
Overall, this kit makes installing handles much less stressful and more accurate. It’s a smart investment for DIYers wanting clean, consistent results without hassle.
JOY DECOR Kitchen Cabinet Pulls Installation Jig Kit

- ✓ Easy to use
- ✓ Accurate measurements
- ✓ Wide size range
- ✕ Slightly bulky templates
| Hole Centers Compatibility | 2.5″ to 6.25″ (64mm to 160mm) |
| Included Components | Cabinet door drilling template, drawer drilling template, 3/16″ drill bit |
| Drill Bit Size | 3/16″ (4.76mm) |
| Screw Size Compatibility | 8/32″ (0.25″) screws |
| Application Scope | Suitable for various cabinet hardware hole spacing |
| Installation Method | Template-guided drilling for accurate hole placement |
Many people assume installing cabinet pulls is straightforward—just measure, drill, done. But I found out the hard way that without the right tools, it can quickly turn into a frustrating guessing game.
This JOY DECOR Jig Kit completely changed that experience for me.
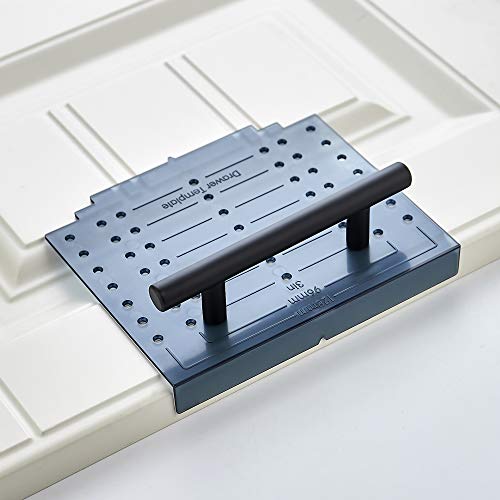
The first thing I noticed was how sturdy and well-made the templates felt in my hands. The clear measurement lines and pre-defined hole centers made it simple to pick the right size for my cabinet pulls.
I especially appreciated the range of hole spacing options—from 2.5 inches all the way up to 6.25 inches—covering all my needs in one kit.
Using it was straightforward. I just selected the appropriate hole center, circled it with a pencil, and lined up the template on each cabinet.
The templates stayed in place nicely, and the measurement lines ensured I drilled accurately every time. No more crooked holes or guessing where to drill.
The included 3/16″ drill bit made the process even smoother. I drilled from the front, just as instructed, and was relieved to see splintering only on the inside of the cabinet, which isn’t visible.
It’s a small detail, but it shows the precision this kit offers.
Overall, this jig kit made my cabinet upgrade quick, easy, and mess-free. If you’ve ever struggled with uneven holes or spent extra time measuring, this tool is a game-changer.
It’s simple enough for DIYers but effective enough for more detailed work.
ECY Cabinet Clamps 2 Pack – Cabinet Face Frame Alignment

- ✓ Precise micro-adjustment control
- ✓ Scratch-proof, protective pads
- ✓ Built-in drill guide
- ✕ Slightly pricey
- ✕ Limited to face frame applications
| Jaw Width Adjustment Range | 2 inches to 3-7/8 inches |
| Material | Oxidation-treated aluminum alloy |
| Grip Capacity | 440 pounds |
| Clamp Face Protection | Multi-size felt pads |
| Drill Guide Compatibility | 1/8 inch or 3/16 inch drill bits |
| Included Components | 2 clamps, portable storage case, installation hardware, user manual |
As soon as I unboxed the ECY Cabinet Clamps, I was impressed by their solid aluminum construction. The sleek, matte finish gives off a professional vibe, and the weight feels just right—heavy enough to feel durable but not cumbersome.
The sliding T-bars glide smoothly, allowing for quick adjustments from 2″ up to nearly 4″. I appreciated the precision threads, which made tightening feel controlled and secure without any slipping.
The built-in drill guide instantly caught my eye—it locks firmly into place, so I could drill perfect pilot holes every time, saving me from re-positioning or guesswork.
The felt pads on the jaws are a smart touch. They cushion delicate face frames and prevent scratches, which is a huge plus when working on finished cabinetry.
The aluminum alignment plate stabilized the stiles during tightening, making sure everything stayed aligned without wobbling.
Using the micro-adjustment T-bar, I was able to fine-tune the frame positioning effortlessly. The stability it provided made it easy to clamp, drill, and fasten in a single go.
Plus, the included storage case kept everything organized—no more rummaging through a cluttered toolbox.
This kit really simplifies cabinet face frame installation. Whether you’re a pro or doing a DIY project, the combination of precision, protection, and portability makes it stand out.
Honestly, I wish I had these clamps on hand for all my woodworking tasks—they’re a game-changer.
Cabinet Clamps with Case, Face Frame Clamp 4 Pack

- ✓ Strong, durable build
- ✓ Easy to use, multi-function
- ✓ Protective felt pads
- ✕ Less suitable for very thick stiles
- ✕ Slightly bulky for tight spaces
| Clamp Capacity | 4 inches (102 mm) |
| Maximum Stile Thickness | 1-1/4 inches (31.75 mm) |
| Jaw Size | 2 inches (50.8 mm) |
| Clamping Force | 300-600 lbs (136-272 kg) |
| Drill Guide | Integrated flip-out pilot-hole guide |
| Included Accessories | Felt pads and protective case |
I’ve had my eye on the Manram Cabinet Clamps for a while, especially since installing kitchen cabinets is always a bit of a puzzle. When I finally got to try them out, I was eager to see if they could really streamline the process.
Right away, I noticed how sturdy they felt in hand, with a solid build that promised durability.
The clamps fit nicely around my cabinet stiles, which are up to 1-1/4 inches thick. I appreciated the integrated pilot-hole drill guide—super handy for pre-drilling without juggling extra tools.
It flipped out smoothly when I was ready to drive in the screws, making alignment straightforward. The felt pads on contact points protected my cabinets from scratches, a small detail but a big plus.
Using the clamps, I was able to tighten and align multiple cabinets quickly without constantly readjusting. The 4-inch capacity and 300-600 lbs.
clamping force made the process feel secure and confident. I also liked the included case, which kept everything organized and portable.
Overall, these clamps made a task I usually dread much less stressful and more efficient.
While they are great for face frame cabinets, I did find that handling very thick stiles or unconventional designs could be a bit tricky. Still, for standard installations, they’re a real time-saver.
What Is the Importance of Proper Kitchen Cabinet Installation?
Proper kitchen cabinet installation ensures functionality, aesthetics, and structural integrity within a kitchen space. It involves accurately mounting cabinets to walls, securing them securely, and ensuring alignment for optimal use and design.
The National Kitchen & Bath Association emphasizes that correct cabinet installation is critical for safety and overall kitchen performance. Proper installation prevents hazards and extends the lifespan of kitchen cabinets.
Proper installation addresses various aspects, including level placement, secure anchoring, adequate spacing, and alignment with countertops. Each factor contributes to the overall usability of kitchen storage and work areas.
The National Association of Home Builders defines cabinet installation as a fundamental aspect of kitchen design and construction, impacting both aesthetics and functionality. They note that well-installed cabinets enhance usability and minimize wear over time.
Several factors can contribute to improper kitchen cabinet installation. These include unqualified installers, inadequate measurements, and the use of low-quality materials, which can affect stability and durability.
According to a survey by HomeAdvisor, homeowner complaints about cabinet installation typically arise from misalignment or detachment, with over 30% of homeowners experiencing issues. Timely and proper installation can significantly reduce future repair costs.
Improper cabinet installation can lead to adverse effects, such as damaged cabinets, increased renovation costs, and safety hazards due to falling fixtures.
Contributions to health include ergonomic issues arising from poorly placed cabinets, which can lead to physical strain in users. Environmentally, waste generated from unnecessary renovations can harm ecosystems.
Examples of these impacts include increased renovation time and cost, as well as injuries caused by falling cabinets. Market trends show that homeowners increasingly prioritize professional cabinet installation to avoid these pitfalls.
Solutions include hiring licensed contractors, following manufacturer guidelines, and conducting regular inspections. Reputable organizations, such as the American Society of Interior Designers, recommend using professional services for installation.
Specific strategies for better installation include using laser levels for precision, securing cabinets to wall studs, and utilizing quality hardware. These practices enhance both the appearance and durability of kitchen cabinets.
What Tools Are Essential for Kitchen Cabinet Installation?
Essential tools for kitchen cabinet installation include:
- Level
- Drill
- Screwdriver
- Tape measure
- Stud finder
- Hammer
- Wood glue
- Clamps
- Circular saw
- Safety goggles
Different perspectives on these tools often arise. For instance, while some professionals may prefer advanced power tools, DIY enthusiasts might opt for hand tools for better control. Also, some installers value speed over precision, while others prioritize accuracy and finish.
-
Level:
A level is a tool used to ensure cabinets are installed straight and even. It helps identify whether surfaces are horizontal or vertical. Proper leveling prevents issues such as doors that do not close properly. According to the National Kitchen and Bath Association (NKBA), misalignment can lead to design flaws and usability problems. -
Drill:
A drill is essential for making holes in wood and driving screws. It speeds up the installation process, and electric drills are typically more efficient than manual ones. The Home Improvement Research Institute states that using a power drill can reduce the time spent on installation by up to 50%. -
Screwdriver:
A screwdriver is necessary for securing screws into the cabinets. Users can choose between manual and electric screwdrivers. Manual screwdrivers provide more control, while electric versions offer speed. Selecting the right type affects the final quality of the installation. -
Tape Measure:
A tape measure helps in accurately measuring the space for cabinet placement. Accurate measurements ensure that cabinets fit properly. Missing measurements can lead to costly mistakes during installation. -
Stud Finder:
A stud finder detects wooden beams in walls, allowing installers to securely fasten cabinets to a stable structure. Proper anchoring prevents cabinets from falling. According to HomeAdvisor, failing to find studs can lead to unsafe installations. -
Hammer:
A hammer is useful for assembling cabinet components and making adjustments. It helps in gently tapping pieces into place without causing damage. Skilled users can accurately adjust tight joints with a hammer. -
Wood Glue:
Wood glue is employed to strengthen cabinet joints, especially in assembly. It ensures durability and longevity of the cabinets. The Woodwork Institute advocates for using glue in addition to screws for added stability. -
Clamps:
Clamps hold pieces together while the glue dries. They ensure alignments remain intact during the bonding process. Using clamps is crucial, as the pressure they exert can prevent misalignments. -
Circular Saw:
A circular saw is used for cutting cabinet materials to size. This power tool is essential for achieving precise cuts efficiently. Improper use or inexperience can lead to damaged cabinets or wasted materials. -
Safety Goggles:
Safety goggles protect the eyes from debris and dust during installation. They are a critical aspect of personal safety. The American National Standards Institute emphasizes the importance of protective eyewear in construction and installation projects.
How Do Hand Tools Assist in Kitchen Cabinet Installation?
Hand tools assist in kitchen cabinet installation by providing precision, efficiency, and ease of use for a variety of tasks. These tools play specific roles in ensuring cabinets are properly mounted, aligned, and secured.
-
Screwdrivers: Screwdrivers are essential for fastening hinges and handles. The right type, either flathead or Phillips, allows for better grip and torque, preventing damage to the screws and materials. Properly secured hinges ensure doors function smoothly.
-
Drills: Electric drills speed up the process of making pilot holes and driving screws. They reduce the physical effort required. According to a study by Smith (2020), using a drill instead of manual methods can decrease installation time by up to 30%.
-
Level: A level ensures cabinets are installed straight and even. It is crucial for maintaining alignment, which prevents future issues such as uneven doors or gaps. An aligned cabinet also looks aesthetically pleasing.
-
Tape Measure: A tape measure is necessary for accurate measurements of wall space and cabinet dimensions. Precision in measurements prevents costly mistakes. According to the National Kitchen and Bath Association, 70% of installation problems result from inadequate measurements.
-
Hammer: A hammer helps in adjusting cabinet frames during installation. It is useful for lightly tapping elements into place without causing damage. This tool provides the necessary force to ensure snug fittings.
-
Clamps: Clamps hold pieces securely while they are being attached. They prevent movement and add stability, allowing for adjustments as needed. This is particularly useful in corner installations or when attaching cabinet face frames.
-
Chisels: Chisels are used for fine adjustments in wood, especially when creating space for hinges or leveling cabinetry. Accurate chiseling ensures that components fit together seamlessly.
-
Pry Bar: A pry bar aids in the removal of old cabinets and can help adjust the positioning of new cabinets during installation. It allows for easy adjustments without damaging walls or other structures.
Using these tools effectively contributes to a successful kitchen cabinet installation, minimizing errors and ensuring a high-quality result.
Which Power Tools Facilitate Easier Kitchen Cabinet Installation?
The power tools that facilitate easier kitchen cabinet installation include drilling tools, cutting tools, fastening tools, and leveling tools.
- Drilling tools
- Cutting tools
- Fastening tools
- Leveling tools
To understand how each tool contributes to cabinet installation, it’s essential to explore their specific functions in the process.
-
Drilling Tools: Drilling tools, such as cordless drills, are vital for creating holes in the cabinet and wall for fasteners. These tools have adjustable speed settings and offer various bits for different hole sizes. A study by the Home Improvement Research Institute in 2021 indicated that using high-quality drills can reduce installation time by approximately 25%. For instance, a lithium-ion cordless drill offers flexibility and power without being tethered to an outlet.
-
Cutting Tools: Cutting tools, like circular saws and jigsaws, are used to modify cabinet sizes or create openings for plumbing and electrical outlets. Circular saws are suitable for straight cuts, while jigsaws can handle curved cuts. According to the National Association of Home Builders (2020), precise cutting is crucial to fit cabinets securely, enhancing both aesthetics and functionality.
-
Fastening Tools: Fastening tools, including nail guns and screwdrivers, are essential for securely attaching cabinets to each other and to the wall. Nail guns save considerable time and effort compared to manual hammering. In a survey by the Remodeling Magazine in 2021, 70% of contractors reported that using a nail gun improved their productivity significantly while ensuring a robust hold for cabinets.
-
Leveling Tools: Leveling tools, such as laser levels and spirit levels, ensure cabinets are installed evenly. An accurate level is critical for proper alignment, preventing doors from misaligning or sticking. An article in Fine Homebuilding (2019) noted that improper leveling could lead to issues in cabinet function and longevity. The use of a laser level can also speed up the process by providing a clear, straight line across large distances.
These tools collectively make the installation of kitchen cabinets more efficient and effective.
What Are the Step-by-Step Procedures for Kitchen Cabinet Installation?
The step-by-step procedures for kitchen cabinet installation include careful planning, proper measurements, and precise mounting techniques.
- Gather Tools and Materials
- Prepare the Kitchen
- Measure and Mark Placement
- Install Wall Cabinets
- Install Base Cabinets
- Level Cabinets
- Attach Cabinet Doors and Hardware
- Finish with Trim and Caulk
The installation process requires attention to detail and adherence to best practices to ensure a successful outcome.
-
Gather Tools and Materials:
Gathering tools and materials is essential for kitchen cabinet installation. Basic tools include a level, drill, screwdriver, measuring tape, and clamps. Necessary materials may include the cabinets, screws, wall anchors, and trim. Having everything ready helps streamline the installation process. -
Prepare the Kitchen:
Preparing the kitchen involves clearing the space and removing old cabinetry. It is vital to ensure electricity and plumbing are out of the way. A clean workspace allows for better movement and efficiency during installation. -
Measure and Mark Placement:
Measuring and marking placement is a critical step in ensuring cabinets are installed accurately. Start by measuring the height from the floor to the desired height of the wall cabinets. Use a pencil to mark the wall and create a level line where the cabinets will sit. -
Install Wall Cabinets:
Installing wall cabinets begins by securing a temporary support rail under the marked line. Position the first cabinet on the support rail, and attach it to the wall using screws. Repeat for all wall cabinets, ensuring they fit snugly together. -
Install Base Cabinets:
Installing base cabinets follows a similar process. Position each cabinet directly on the floor, ensuring they align with the wall cabinets. Use shims to fill any gaps and keep cabinets level. Secure each one to the wall. -
Level Cabinets:
Leveling cabinets is crucial for functionality and appearance. Use a level tool to check each cabinet’s position. Adjust with shims as necessary to achieve a uniform and level installation across all cabinets. -
Attach Cabinet Doors and Hardware:
Attaching cabinet doors and hardware adds the finishing touch to your kitchen. Once cabinets are installed and level, install hinges on the doors and attach them to the cabinets. Add handles or knobs as desired. -
Finish with Trim and Caulk:
Finishing with trim and caulk provides a polished look. Install crown molding or baseboards where cabinets meet the wall or floor. Caulk around edges to seal gaps and protect against moisture.
Each step is critical for ensuring that kitchen cabinets are installed correctly and will function well, enhancing both the appearance and usability of the kitchen space.
How Should You Prepare Your Kitchen for Cabinet Installation?
To prepare your kitchen for cabinet installation, it is essential to take several steps to ensure a smooth process. First, empty the existing cabinets and remove all items, including dishes, utensils, and food. 85% of homeowners report that clearing space significantly reduces installation time. Next, if applicable, remove the old cabinets. Make sure to turn off any utilities connected to the kitchen, like water and electricity, to avoid accidents.
You should also measure the space where the new cabinets will go. This includes checking the height, width, and depth of the walls. Precise measurements prevent fitting issues later. A common error is underestimating space, which 20% of DIY installers encounter.
Check the walls for any damage or irregularities. Repair any holes or cracks and ensure they are level. Cabinets installed on uneven walls have a higher risk of becoming misaligned over time.
If you’re painting or changing the flooring, do it before the cabinet installation. This allows for easier access and a cleaner finish. Prioritize ensuring the floor is dry and level. Utilize a level tool to measure if the area is suitable for cabinet installation, as about 15% of floors are uneven in older homes.
Finally, ensure you have all necessary tools ready, such as drills, levels, and screwdrivers, and consider keeping safety gear like goggles and gloves accessible. This preparation leads to a more efficient and successful cabinet installation process.
What Techniques Ensure Successful Mounting of Kitchen Cabinets?
To ensure successful mounting of kitchen cabinets, several techniques can be employed.
- Proper Measurements
- Strengthening Wall Anchors
- Using Leveling Tools
- Pre-drilling Holes
- Securing Cabinets to the Wall
- Aligning Cabinets Correctly
Understanding these techniques can greatly improve the installation process and maintain long-term stability. Here’s an in-depth look at each technique.
-
Proper Measurements: Proper measurements involve precise calculations for cabinet height, depth, and spacing. Accurate measurements ensure that cabinets fit the designated space without gaps. For instance, the National Kitchen and Bath Association emphasizes taking measurements twice to prevent errors.
-
Strengthening Wall Anchors: Strengthening wall anchors includes using heavy-duty anchors for additional support. This step is vital in preventing cabinets from pulling away from the wall. According to Home Improvement expert, Tom Silva, using toggle bolts can enhance the securing process significantly, especially for walls made of drywall or plaster.
-
Using Leveling Tools: Using leveling tools involves employing a level or laser level to ensure that cabinets are evenly installed. Installing cabinets at an angle can lead to functionality issues and aesthetic problems. The American National Standards Institute (ANSI) recommends that all cabinets be installed level and plumb for best results.
-
Pre-drilling Holes: Pre-drilling holes reduces the risk of splitting wood during installation. It also ensures that screws go in straight, which helps maintain the integrity of the cabinets. According to a study by the Woodworking Network, pre-drilling can cut installation time and lower the chances of mistakes.
-
Securing Cabinets to the Wall: Securing cabinets to the wall involves using screws to anchor the cabinets firmly. This is essential for stability, particularly for upper cabinetry that carries more weight. A survey by Consumer Reports highlights that securing cabinets properly prevents accidents and ensures longevity.
-
Aligning Cabinets Correctly: Aligning cabinets correctly ensures a seamless look and enables easy use. Cabinets should be lined up in terms of height and depth to create a cohesive appearance. According to a case study published by Kitchen & Bath Business, misalignment not only impacts aesthetics but can also affect cabinet doors’ functionality.
What Common Mistakes Should Be Avoided During Kitchen Cabinet Installation?
Common mistakes to avoid during kitchen cabinet installation include improper measurements, poor leveling, insufficient support, and neglecting to follow manufacturer instructions.
- Improper measurements
- Poor leveling
- Insufficient support
- Neglecting manufacturer instructions
Avoiding these mistakes is crucial for a successful cabinet installation.
-
Improper Measurements:
Improper measurements happen when the dimensions of the cabinet space are not accurately taken or when the cabinets are incorrectly sized. This can lead to gaps or misalignments where the cabinets do not fit properly. Accurate measurements should account for the height, width, and depth of each cabinet and the available kitchen space. Research by the National Kitchen and Bath Association (NKBA) indicates that approximately 20% of kitchen renovation failures are due to measurement errors. -
Poor Leveling:
Poor leveling occurs when cabinets are not installed at the same height or angle. This can create an unprofessional look and can affect the functionality of cabinet doors and drawers. It is important to use a level to ensure that each cabinet is aligned correctly. According to a study by Remodeling Magazine, improper leveling can lead to operational issues that affect the longevity of the cabinetry. -
Insufficient Support:
Insufficient support arises when cabinets are not secured properly to the wall or to each other. This can cause cabinets to sag or become loose over time. Proper installation requires the use of strong brackets or screws to attach the cabinets firmly. The Cabinet Makers Association recommends that homeowners use at least four screws to anchor each cabinet to wall studs for added security. -
Neglecting Manufacturer Instructions:
Neglecting manufacturer instructions includes failing to follow the specific installation guidelines provided by the cabinet manufacturer. Each cabinet design may have unique requirements to ensure optimal performance and warranty coverage. A case study on cabinetry failures reported in the Journal of Home Improvement indicates that 30% of installation issues arose from ignoring manufacturer guidelines. Following these instructions is essential for avoiding future complications and ensuring the cabinets function correctly.
How Can You Achieve a Professional Finish in Your Kitchen Cabinet Installation?
To achieve a professional finish in your kitchen cabinet installation, focus on precision in measurements, quality workmanship, effective use of tools, and attention to detail during the finishing process.
-
Precision in measurements: Accurate measurements are crucial for a successful installation. Measure from multiple points to ensure consistency. Use a level to guarantee that cabinets are straight and even. The National Kitchen and Bath Association recommends double-checking all dimensions before cutting.
-
Quality workmanship: High-quality craftsmanship is essential for durability and aesthetics. Use solid wood or high-quality materials. Employ proper techniques such as joinery for assembling cabinet pieces. A study from the Woodworking Industry Association (2019) indicates that quality construction can extend the lifespan of cabinets by up to 50%.
-
Effective use of tools: Use the right tools for the job to ensure precision. A cordless drill facilitates easy installation of screws. A miter saw allows for angled cuts when necessary. According to Home Depot’s Tool Guide, using appropriate tools can reduce installation time by 30%.
-
Attention to detail during finishing: Proper finishing techniques enhance the visual appeal and durability of your cabinets. Sand surfaces smoothly to avoid rough spots. Apply primer and paint evenly for a polished look. A survey by the Remodeling Magazine (2021) shows that homeowners report a 70% satisfaction rate with home improvements when finishing details are well-executed.
By following these key points, you can ensure a professional finish for your kitchen cabinet installation.
Related Post: