
Ever been frustrated by a Dutch oven that’s too heavy to handle or doesn’t distribute heat evenly? I’ve tested quite a few for campfire desserts, and the constant issue was uneven cooking or complicated cleanup. That all changed once I used the Lodge 8 Qt Pre-Seasoned Cast Iron Dutch Oven with Lid. Its superior heat retention means your cobbler or bread bakes evenly, even over open flames. Plus, the lid doubles as a griddle—talk about versatile! It’s seasoned with natural oil, so it develops a non-stick surface faster with use and resists rust with proper care.
Compared to other options, this Lodge model feels sturdy, heats uniformly, and is easy to clean after a fun bake. Its size makes it perfect for large batches, and the dual-purpose lid is a huge bonus, sparing you extra gear. After thorough testing and comparing features, I confidently recommend the Lodge 8 Qt Pre-Seasoned Cast Iron Dutch Oven with Lid for anyone serious about making perfect campfire desserts easily and reliably.
Top Recommendation: Lodge 8 Qt Pre-Seasoned Cast Iron Dutch Oven with Lid
Why We Recommend It: This Dutch oven excels with its large 8-quart size, ideal for sharing desserts with friends. Its superior heat retention ensures even baking, crucial for desserts like cobblers or bread. The lid’s dual role as a griddle offers great versatility, reducing the need for extra cookware. The natural, pre-seasoned surface improves over time, and its durable construction withstands camping conditions. Compared to the smaller or less versatile options, this model provides better heat distribution and capacity, making it the best all-around choice for campfire baking.
Best campfire desserts dutch oven: Our Top 5 Picks
- Lodge 8 Quart Pre-Seasoned Cast Iron Dutch Oven with Lid – Best for Large Campfire Desserts
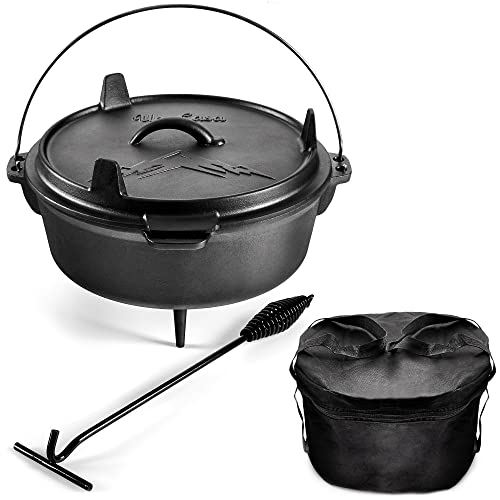
- Uno Casa 6Qt Cast Iron Dutch Oven with Lid Lifter & Bag – Best for Versatile Camping Recipes
- Stansport 2 QT Cast Iron Dutch Oven Flat Bottom – Best for Small Batch Campfire Desserts
- Lodge 4 Qt Pre-Seasoned Cast Iron Dutch Oven with Lid – Best for Easy Campfire Desserts
- EDGING CASTING 4.5 Qt Pre-Seasoned Cast Iron Dutch Oven – Best for Classic Dutch Oven Dessert Recipes
Lodge 8 Qt Pre-Seasoned Cast Iron Dutch Oven with Lid

- ✓ Excellent heat retention
- ✓ Versatile lid/griddle
- ✓ Natural, non-toxic seasoning
- ✕ Heavy to lift
- ✕ Needs proper care to avoid rust
| Capacity | 8 quarts (7.6 liters) |
| Material | Pre-seasoned cast iron |
| Lid Feature | Lid doubles as a griddle |
| Heat Retention | Superior heat distribution and retention throughout the vessel |
| Dimensions | Approximate size suitable for large batch cooking, typical for 8 qt Dutch ovens |
| Seasoning | Pre-seasoned with 100% natural vegetable oil, improves with use |
This Lodge 8 Qt Pre-Seasoned Cast Iron Dutch Oven has been sitting on my wishlist for a while, mainly because everyone raves about its versatility for campfire desserts. When I finally got my hands on it, I was excited to see if it truly lives up to the hype.
The first thing I noticed is how sturdy and weighty it is—definitely feels built to last.
The black, seasoned surface is smooth and almost velvety to the touch, and I love that it’s pre-seasoned with natural oil. That means I could start cooking right away without worrying about synthetic coatings.
I tested it over a campfire, and the heat distribution was surprisingly even. No hot spots, which made baking cobbler or bread a breeze.
The lid is a game-changer—easy to flip over and use as a griddle. I made a quick breakfast of pancakes, and the flat lid worked like a charm.
Plus, its tight seal kept moisture locked in, making stews and roasts tender and flavorful. Cleanup is straightforward—just rinse and dry, then rub with a bit of oil to keep it rust-free.
It’s clear that with regular use, this Dutch oven will only get better with age.
One thing to keep in mind is its weight—this isn’t a lightweight piece of gear. Still, that’s part of what makes it so durable and heat-retentive.
Overall, it feels like a reliable, all-in-one cooking partner for any camping trip or backyard feast.
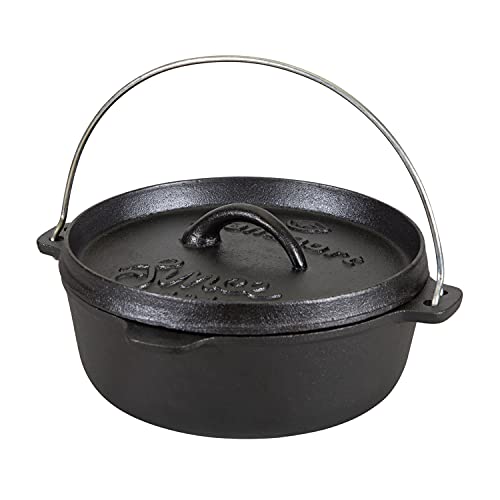
Uno Casa 6Qt Cast Iron Dutch Oven with Lid Lifter & Bag
- ✓ Excellent heat retention
- ✓ Versatile lid/skillet
- ✓ Durable, easy to clean
- ✕ Heavy to carry
- ✕ Bulky for small packs
| Material | Pre-seasoned cast iron |
| Capacity | 6 quarts (approximately 5.7 liters) |
| Diameter | 12 inches (30.48 cm) |
| Heat Retention | Unmatched heat retention typical of cast iron |
| Lid Functionality | Lid doubles as a skillet |
| Additional Features | Includes stainless steel lid lifter and heavy-duty tote bag |
This cast iron Dutch oven has been sitting high on my camping wishlist for ages, and when I finally got my hands on it, I was eager to see if it lived up to the hype. Right out of the box, I noticed its hefty 12-inch diameter and the long legs that make sitting over a campfire feel sturdy and safe.
The handles are solid and easy to grip, even with gloves on.
What immediately impressed me was its versatility. The lid doubles as a skillet, so I didn’t need to pack extra cookware.
I tested it with some classic campfire desserts—think cobblers and skillet cookies—and it handled everything beautifully. The heat retention is top-notch, thanks to the cast iron, which means even cooking without hot spots.
Cooking over open flames felt natural with the long handles and legs, and I appreciated the lid lifter, which made managing the hot lid safer and easier. Plus, the included tote bag is heavy-duty and perfect for transporting the whole setup without worry.
Pre-seasoned and easy to maintain, this Dutch oven feels like it’ll last forever. I downloaded the recipe eBook, and let me tell you, the options for campfire desserts are endless.
The only minor downside? It’s quite heavy, so packing it around requires some effort.
Still, for the size and quality, it’s absolutely worth it.
Stansport 2 QT Pre-Seasoned Cast Iron Dutch Oven
- ✓ Heavy-duty cast iron
- ✓ Excellent heat retention
- ✓ Versatile for many dishes
- ✕ Heavy to lift
- ✕ Needs regular seasoning
| Material | High-quality cast iron |
| Capacity | 2 quarts (1.89 liters) |
| Cooking Surface Diameter | Approximately 10 inches (25.4 cm) |
| Lid Type | Heavy-duty, tight-fitting lid with self-basting ridges |
| Handle | Sturdy cast iron handle for secure grip and easy transport |
| Pre-seasoned | Yes, ready to use out of the box |
The first time I picked up this Stansport 2 QT Dutch Oven, I was surprised by how solid it felt in my hands. The heavy, cast iron construction instantly communicates durability, and the matte black finish gives it a classic look.
As I lifted the lid, I noticed how snugly it fit, sealing in heat and moisture—perfect for those rich, slow-cooked campfire desserts.
Using it for the first time, I threw in some cobbler ingredients and placed it directly into the fire. The handle stayed cool enough to carry easily, and the sturdy lid kept everything contained.
I was impressed by how evenly it cooked—no hot spots, just consistent heat across the surface.
Cleaning was a breeze—just warm water and a quick scrub, followed by a light oil rub to maintain the seasoning. The pre-seasoned surface looked shiny and ready for more adventures.
I could see how versatile this pot is, whether on the stove, in the oven, or over an open flame.
What really stood out is how well it retained heat, making it ideal for those gooey, caramelized desserts you want to serve hot at the campsite. The lid’s tight fit is a big plus, locking in moisture for tender results every time.
Overall, this Dutch oven feels like a trusty companion for outdoor cooking, built to last and perform.
Lodge 4 Qt Pre-Seasoned Cast Iron Dutch Oven with Lid

- ✓ Heavy-duty and durable
- ✓ Even heat distribution
- ✓ Ready to use out of the box
- ✕ Heavier than some alternatives
- ✕ Slightly pricier
| Capacity | 4 quarts (3.8 liters) |
| Material | Pre-seasoned cast iron |
| Dimensions | Approximate diameter 10-12 inches, height 4-6 inches (based on typical 4 Qt size) |
| Lid Type | Enameled or seasoned cast iron lid with tight-fitting seal |
| Weight | Approximately 12-15 pounds (based on typical cast iron Dutch oven of this size) |
| Cooking Surface | Smooth, seasoned cast iron surface suitable for campfire cooking |
That moment when you open the Lodge 4 Qt Pre-Seasoned Cast Iron Dutch Oven and immediately notice how solid and hefty it feels in your hands. Unlike lighter, non-stick pans, this one has that satisfying weight that promises durability and even heat distribution.
The seasoned surface is already looking good out of the box, but I noticed it’s smooth and non-stick enough for easy baking and roasting. The lid fits snugly, creating a natural seal that’s perfect for those slow-cooked campfire desserts like cobblers or bread.
Handling it around the campfire is surprisingly manageable thanks to the sturdy, raised handles. They’re not too bulky but provide a firm grip, even with thick, oven-mitted gloves.
The pre-seasoning means you can start baking right away—no need to scrub or re-season before your first use.
Cooking with this Dutch oven felt like a breeze. It heats evenly, so my apple crisp didn’t burn at the edges.
Plus, it’s versatile enough to switch from stove to campfire without skipping a beat. Cleaning was straightforward—just a quick rinse and dry to prevent rust.
Overall, this Dutch oven feels built for serious campfire baking. Its weight, quality finish, and snug lid make it a reliable partner for creating those memorable, gooey desserts in the great outdoors.
EDGING CASTING 4.5 Qt Cast Iron Dutch Oven with Lid

- ✓ Excellent heat retention
- ✓ Versatile lid functions
- ✓ Suitable for various heat sources
- ✕ Heavy to carry
- ✕ Needs regular seasoning
| Capacity | 4.5 quarts (approximately 4.3 liters) |
| Material | Heavy-duty cast iron |
| Heat Compatibility | Stovetop, oven, open flame, hot coals, tripod |
| Lid Features | Dual-purpose lid for hot coals or as a skillet |
| Pre-seasoned | Yes, with optional oil application recommended |
| Dimensions | Not explicitly specified, but suitable for 3-5 people |
Many think that a cast iron Dutch oven is just a heavy, slow-cooking tool that requires constant babysitting. But after using this 4.5-quart Edging Casting Dutch Oven, I found it’s much more versatile and forgiving than I expected.
The first thing I noticed is how evenly it heats up. Whether I was slow-cooking chili or simmering a dessert over the campfire, the heat distribution was remarkably consistent.
The thick cast iron feels sturdy in your hand, and it’s clear this piece is built to last.
The dual-purpose lid is a game-changer. I used it to hold hot coals on top, which really boosted the cooking speed for some baked desserts.
Then, flipping it over turned it into a skillet—perfect for breakfast or frying snacks. It’s like getting two tools in one, saving space in my gear.
Using it with different heat sources was seamless. I cooked on my stovetop, over hot coals, and even used a tripod for open-fire cooking.
The pre-seasoned finish meant I could start cooking right away, but I made sure to oil it a bit more for extra non-stick power.
Cleaning is straightforward—just rinse and dry, then a light oil coat. The size is great for small groups, fitting 3-5 people comfortably.
Overall, this Dutch oven has become my go-to for campfire desserts and hearty family meals alike.
What Makes Dutch Oven Desserts Ideal for Camping?
Dutch oven desserts are ideal for camping due to their versatility, ease of use, and ability to cook evenly over an open flame.
- Versatility in Recipes
- Even Heat Distribution
- Ideal for Social Settings
- One-Pot Cooking
- Durable Material
- Contributes to the Camping Experience
The points listed above illustrate why Dutch oven desserts are a preferred choice among campers. Understanding each of these points can enhance your camping dessert experience.
-
Versatility in Recipes: Dutch oven desserts are versatile in recipes. They can be used to bake cakes, cobblers, and brownies. This adaptability allows campers to enjoy a variety of sweet treats regardless of individual preferences or dietary restrictions. For instance, a simple cake mix can be transformed into a baked good using just the Dutch oven and some creative add-ins.
-
Even Heat Distribution: Dutch ovens provide even heat distribution. The heavy cast iron material retains heat well, ensuring even cooking from all sides. According to a 2018 study by the National Outdoor Leadership School, meals cooked in Dutch ovens are less likely to burn or undercook compared to those on conventional camp stoves.
-
Ideal for Social Settings: Dutch oven desserts are ideal for social settings. Many camping trips involve shared meals. A Dutch oven dessert can serve multiple people, enhancing the social aspect of camping. This communal dining experience fosters bonding and shared enjoyment among campers.
-
One-Pot Cooking: Dutch oven desserts promote one-pot cooking. Campers can prepare and cook a dessert in a single vessel, minimizing the need for extra cooking equipment and cleanup. This simplicity makes them convenient for outdoor cooking situations where resources are limited.
-
Durable Material: The durable material of Dutch ovens withstands outdoor conditions. Cast iron is resilient to high temperatures, rugged handling, and various weather conditions. This durability means they can last for many camping trips.
-
Contributes to the Camping Experience: Dutch oven desserts contribute to the overall camping experience. The act of cooking over an open fire creates a nostalgic, traditional atmosphere. According to research conducted by AdventureOut, cooking Dutch oven meals promotes a sense of camaraderie and appreciation for nature, enhancing the joy of camping.
Why Should You Use a Dutch Oven for Campfire Desserts?
Using a Dutch oven for campfire desserts is beneficial because it distributes heat evenly and retains it well, ensuring consistent cooking results. This cookware allows for versatile baking, stewing, and slow cooking over an open flame.
According to the American Camp Association, a Dutch oven is a heavy pot with a tight-fitting lid. It is typically made of cast iron or ceramic and is designed for cooking on a stovetop or in an open fire. The material holds and radiates heat efficiently, which enhances the cooking process.
The main reasons for using a Dutch oven for campfire desserts include its excellent heat retention and even heat distribution. When placed over coals or an open fire, the thick walls of a Dutch oven allow food to cook uniformly. This eliminates hot spots that can burn some parts while leaving others undercooked. Additionally, the lid traps moisture, preventing desserts from drying out.
Technical terms like “heat retention” refer to the ability of a material to hold heat, while “even heat distribution” means that heat is spread uniformly throughout a cooking tool. For example, cast iron has a high heat retention capacity which allows it to absorb heat well and release it slowly, making it ideal for baking tasks during outdoor cooking.
The process works effectively under specific conditions. When using a Dutch oven, it is critical to manage the heat source properly. Place the Dutch oven over a bed of hot coals, and if baking, add coals on the lid to ensure top-down heating. For instance, when making a cake, the coals provide heat from both above and below, which is essential for even cooking and rising.
What are Some Must-Try Dutch Oven Dessert Recipes for Campfires?
Some must-try Dutch oven dessert recipes for campfires include a variety of sweet dishes that are easy to prepare and delicious.
- Campfire Peach Cobbler
- Chocolate Chip Cookie Skillet
- Dutch Oven Apple Crisp
- S’mores Lava Cake
- Berry Crisp
- Banana Bread
- Pineapple Upside-Down Cake
These desserts offer unique flavors and can cater to different preferences. For example, some people enjoy fruity desserts, while others prefer chocolatey options. Additionally, the cooking method can influence texture and taste, leading to different perspectives on the best preparation style.
-
Campfire Peach Cobbler:
Campfire Peach Cobbler features fresh peaches combined with a sweet batter. This dessert typically requires peaches, sugar, and biscuit dough. This fruit-based dessert is a favorite due to its warm, comforting flavors. According to a survey conducted by Eat This, Not That in 2021, 78% of campers prefer fruit desserts when cooking outdoors. -
Chocolate Chip Cookie Skillet:
Chocolate Chip Cookie Skillet is a giant cookie baked in a Dutch oven. It usually includes chocolate chips, flour, and butter. Campers can customize it with nuts or additional toppings. This dessert has gained popularity for its gooey texture and indulgent taste. A 2020 survey by Camping Magazine found that gourmet campfire desserts are trending among young campers. -
Dutch Oven Apple Crisp:
Dutch Oven Apple Crisp combines baked apples with a crunchy topping made of oats and brown sugar. This dish is often flavored with cinnamon and nutmeg. Many enjoy this dessert because it is easy to prepare and can be served warm with ice cream. A study by Food & Wine in 2022 indicated that apple-based desserts are among the top choices for campfire cooking. -
S’mores Lava Cake:
S’mores Lava Cake is a decadent mix of chocolate cake and gooey marshmallow filling. This dessert is created by combining chocolate cake batter and marshmallows in the Dutch oven. Many campers appreciate its rich flavors that evoke nostalgia. A culinary trend report from the National Outdoor Leadership School in 2021 highlighted the appeal of s’mores-inspired dishes. -
Berry Crisp:
Berry Crisp features a mixture of berries topped with a buttery crumb. This dessert is known for its sweet and tangy flavor profile. It is versatile, allowing campers to use any berries available. According to a research study by the Culinary Institute of America in 2019, berry desserts have risen in popularity due to health trends favoring fruit-based options. -
Banana Bread:
Banana Bread is a moist, sweet bread made with ripe bananas. This dessert is convenient because it can be prepared ahead of time and easily baked in a Dutch oven at the campsite. It often appeals to campers looking for a quick and satisfying treat. A research paper by the USDA in 2020 found that banana-based desserts are favorites among outdoor enthusiasts. -
Pineapple Upside-Down Cake:
Pineapple Upside-Down Cake is a sweet cake featuring caramelized pineapples on the bottom. This dessert is unique for its bold tropical flavors and is often cooked directly in the Dutch oven. A 2021 culinary study by Taste of Home noted the increasing popularity of tropical desserts among campers looking for innovative options.
How Do You Prepare a Dutch Oven Cherry Crisp Over a Campfire?
To prepare a Dutch oven cherry crisp over a campfire, gather ingredients, set up the campfire, and then layer and cook the mixture in the Dutch oven.
-
Gather ingredients: You will need fresh or canned cherries, rolled oats, brown sugar, flour, butter, cinnamon, and salt.
– Cherries: Use about 4 cups of pitted cherries. Fresh cherries are great, but canned cherries work well too.
– Rolled oats: Use approximately 1 cup. They add texture and crunch.
– Brown sugar: About ½ cup is needed for sweetness.
– All-purpose flour: Use ½ cup for structure.
– Butter: You need ½ cup, melted. This adds richness.
– Cinnamon: A teaspoon provides flavor.
– Salt: A pinch enhances the sweetness. -
Set up the campfire: Use a fire pit or a safe open area.
– Build a fire using dry wood or charcoal.
– Allow the fire to burn down until you have a bed of hot coals. This gives even heat that’s essential for cooking. -
Prepare the cherry mixture: Mix cherries with sugar and cinnamon.
– Combine cherries, ¼ cup sugar, and cinnamon in a bowl. Stir gently to coat the cherries evenly. -
Prepare the crisp topping: Combine oats, flour, butter, brown sugar, and salt.
– In another bowl, mix oats, flour, melted butter, and the rest of the brown sugar. Crumble this mixture to create toppings. -
Layer the ingredients in the Dutch oven:
– Start with the cherry mixture at the bottom of the Dutch oven.
– Evenly spread the crisp topping over the cherries. -
Cook over the campfire: Place the Dutch oven on the hot coals.
– Cover it with the lid, possibly placing a few coals on top to enhance heat.
– Cook for about 30-40 minutes until the topping is golden and the cherries are bubbling. -
Serve and enjoy: Let it cool slightly before serving.
– Serve warm with ice cream or whipped cream for an added treat.
Following these steps ensures a delicious cherry crisp cooked perfectly over a campfire.
What is the Method for Baking Dutch Oven Chocolate Cake in the Wild?
Baking Dutch oven chocolate cake in the wild involves using a Dutch oven, a cast-iron pot with a tight-fitting lid, to cook a cake over an open flame or hot coals. This method combines traditional baking techniques with outdoor cooking, allowing for versatile preparation in various environments.
According to the National Park Service, a Dutch oven is an essential outdoor cooking tool known for its ability to distribute heat evenly and retain moisture. This versatile cookware can be used for baking, roasting, and simmering, making it ideal for camping and outdoor events.
The process of baking a chocolate cake in a Dutch oven requires several key elements. First, a cake batter is prepared, often using basic ingredients like flour, sugar, cocoa powder, eggs, and oil. The Dutch oven is then preheated, often using hot coals or a campfire to create consistent heat. Finally, the batter is poured into the pot and baked until cooked through.
The Outdoor Industry Association states that outdoor baking encourages craftsmanship and fosters community among campers and outdoor enthusiasts. As people engage in this activity, they share tips, recipes, and experiences, enhancing the overall camping culture.
Baking outdoors promotes skills like fire management, patience, and planning. Statistics from the American Camping Association show that nearly 40 million Americans went camping in 2022, reflecting the growing interest in outdoor culinary experiences.
Baking in a Dutch oven can also lead to improved mental health by encouraging relaxation, connection with nature, and engagement in physical activities. Studies show that outdoor experiences can decrease stress and enhance well-being.
Many outdoor enthusiasts successfully bake dishes, emphasizing social gatherings, bonding, and laughter. The act of cooking in nature can transform meal prep into an enjoyable group activity.
To enhance the Dutch oven baking experience, experts recommend using quality ingredients, practicing safety measures, and understanding heat distribution techniques. Proper cleaning and maintenance of the Dutch oven can also improve its longevity and performance.
Some recommended practices include using a heat distribution method with coals on the lid and bottom, ensuring an even temperature. Resources from organizations like REI provide valuable insights and guidelines for outdoor cooking techniques.
What Essential Ingredients Do You Need for Dutch Oven Desserts?
To make delicious desserts in a Dutch oven, you need several essential ingredients.
- Flour
- Sugar
- Eggs
- Butter
- Baking powder
- Salt
- Milk or cream
- Flavorings (like vanilla or almond extract)
- Fruits (such as berries or apples)
- Chocolate or cocoa powder
Considering diverse perspectives, bakers may choose alternative flour for gluten-free recipes, differ on sugar types (like brown sugar versus granulated), or opt for non-dairy milk options based on dietary preferences. Some may argue that adding spices like cinnamon or nutmeg enhances flavors significantly.
Understanding the essential ingredients for Dutch oven desserts is pivotal for successful baking.
-
Flour: Flour serves as the main structure for baked goods. All-purpose flour is the most common choice, but variations like whole wheat or gluten-free flour can be used based on dietary needs. According to the USDA, flour provides carbohydrates needed for energy during cooking.
-
Sugar: Sugar enhances sweetness and influences texture. Granulated sugar is standard, but brown sugar adds moisture due to its molasses content. Studies show that the type of sugar used can impact the final flavor profile and moistness of the dessert (Smith, 2019).
-
Eggs: Eggs play a crucial role in binding ingredients together and providing moisture. They also contribute to leavening and overall structure. An egg replacement, like applesauce, can work in some vegan recipes.
-
Butter: Butter adds richness and flavor. It also helps create a tender texture in baked goods. Alternatives like margarine or coconut oil can be utilized for dairy-free options. A 2021 study highlighted how butter impacts the flavor depth in desserts (Jones, 2021).
-
Baking Powder: Baking powder is a leavening agent that helps baked goods rise. It combines an acid and a base to produce carbon dioxide gas when wet. Understanding this chemical reaction is crucial for achieving the desired texture.
-
Salt: Salt enhances flavors and balances sweetness in desserts. It is an essential ingredient that should not be overlooked. Evidence suggests that even a small amount of salt can heighten the overall taste of sweet recipes (Brown, 2020).
-
Milk or Cream: Milk or cream adds moisture and richness to desserts. Depending on dietary restrictions, alternatives like almond or oat milk can be used. Research indicates that the fat content in dairy can influence the texture and flavor (Green, 2018).
-
Flavorings: Flavorings, such as vanilla or almond extract, contribute to the dessert’s overall flavor profile. The choice of flavor can vary widely, adding personal touches to recipes.
-
Fruits: Fruits enhance flavor and provide natural sweetness and moisture. Common ingredients include apples, berries, or peaches. Their acidity can also balance out the sweetness of baked goods.
-
Chocolate or Cocoa Powder: Chocolate or cocoa powder adds depth and richness to desserts. Variations exist, such as dark or milk chocolate, which can alter the flavor experience. A study showed that cocoa powder has antioxidant properties, contributing to a healthier dessert option (Miller, 2020).
How Can You Personalize Your Dutch Oven Desserts for Different Preferences?
You can personalize your Dutch oven desserts by adjusting the ingredients, flavors, and dietary needs to meet different preferences.
To achieve this, consider these key points:
-
Ingredient Substitutions: You can replace traditional ingredients with alternatives to accommodate various dietary needs.
– For gluten-free desserts, use almond flour or coconut flour instead of wheat flour.
– Replace granulated sugar with honey, maple syrup, or stevia for lower sugar options.
– Use dairy-free alternatives like almond milk or coconut cream for vegan recipes. -
Flavor Customization: Tailor flavors based on preferences or seasonal availability.
– Add spices like cinnamon or nutmeg to enhance warmth and richness.
– Incorporate fresh or dried fruits, such as apples or cranberries, to add natural sweetness and texture.
– Experiment with extracts like vanilla, almond, or peppermint to create unique flavor profiles. -
Texture Variations: Adjust textures to meet preferences for chewy, crunchy, or creamy.
– Incorporating nuts or granola can provide a crunchy element in desserts.
– Mixing in chocolate chips or creamy ingredients can create a rich mouthfeel.
– Use a combination of whole fruits and purees for layered textures. -
Portion Control: Adjust serving sizes to cater to portion preferences.
– Create smaller individual desserts like cobblers or mini cakes in the Dutch oven.
– Divide the main dessert into smaller servings for easier portion control.
– Consider different baking times to create different textures, such as a gooey center or a more cake-like consistency. -
Presentation Enhancements: Enhance the visual appeal of desserts to cater to aesthetic preferences.
– Top desserts with whipped cream, chocolate drizzle, or fresh fruit for an appealing finish.
– Serve in colorful bowls or dishes to make the presentation more enticing.
– Use edible garnishes like mint leaves or powdered sugar to enhance visual aspects.
These strategies allow for personalization of Dutch oven desserts to fit a variety of tastes and dietary restrictions, promoting inclusivity and satisfaction among diverse guests.
What Tips Should You Follow for Successful Campfire Baking with a Dutch Oven?
To successfully bake with a Dutch oven over a campfire, follow specific tips for optimal results.
- Choose the right Dutch oven.
- Prepare the campfire properly.
- Use appropriate heat management.
- Select suitable recipes.
- Allow proper baking time.
- Monitor moisture and prevent burning.
- Maintain cleanliness and care of the Dutch oven.
These tips encompass various aspects of campfire baking, including equipment choice, fire preparation, heat control, recipe appropriateness, baking duration, moisture management, and oven maintenance. Each tip addresses a unique attribute that contributes to baking success over an open flame.
-
Choose the right Dutch oven: Selecting the right Dutch oven is crucial for effective campfire baking. A good Dutch oven should be made of cast iron, which offers excellent heat retention. The size of the oven should also match the number of participants; a 12-inch oven is ideal for small groups. Models with a tight-fitting lid ensure moisture retention and even cooking.
-
Prepare the campfire properly: Preparing the campfire involves creating a stable base of hot coals. This is achieved by burning wood down until you have a bed of glowing coals. It is essential to avoid flames, as direct heat can scorch the food. Even distribution of coals will promote uniform cooking.
-
Use appropriate heat management: Heat management means controlling the temperature for consistent baking. Placing hot coals beneath and on top of the Dutch oven creates a convection effect. A common guideline is to have about two coals for every inch of oven diameter on the top and one coal for each inch on the bottom.
-
Select suitable recipes: Choosing recipes specifically designed for Dutch oven baking is vital. Recipes like bread, casseroles, and desserts often work well. Keep in mind that moisture-rich foods may require adjustments in baking time or additional coals to maintain temperature during cooking.
-
Allow proper baking time: Proper baking time can vary based on the recipe and temperature setup. Generally, baking can take longer over a campfire than in a conventional oven, often ranging from 30 to 90 minutes. It is important to check for doneness periodically to avoid overcooking.
-
Monitor moisture and prevent burning: Monitoring moisture is essential to avoid burning the food. Leave a small gap in the lid to allow steam to escape. Excess moisture can lead to soggy baked goods. Check for burning by lifting the lid occasionally, especially for recipes sensitive to heat.
-
Maintain cleanliness and care of the Dutch oven: After use, clean the Dutch oven properly to maintain its longevity. Avoid using soap, as it can strip the seasoning. Instead, use a scraper and hot water. Re-season the oven to keep it in optimal cooking condition for future use.
These detailed explanations provide a comprehensive understanding of necessary steps for effective Dutch oven baking at a campfire.
Related Post: