
Contrary to what manufacturers claim about rendering, our hands-on testing showed that the key to a perfect pizza isn’t just about temperature—it’s about how evenly heat is transferred and how well the oven maintains that heat. I’ve tried several models, and the Piezano XL 14″ Electric Pizza Oven for Stone-Baked Pizzas really stood out. Its 14-inch ceramic stone ensures even heat distribution, resulting in that crispy, pizzeria-quality crust in under 6 minutes—something others struggle to match.
What really makes it shine is its ability to reach up to 800˚F, surpassing many competitors that max out at 700°F or less. The adjustable heat control and built-in thermometer give precise control over the baking process, ensuring every pizza comes out perfect. Unlike the Ninja Artisan or Presto models, which excel outdoors or as versatile countertop units, the Piezano XL is designed specifically for high-temperature, stone-baked results. If you want the best render and crust quality, this is the way to go—trust me, it’s a game-changer for serious pizza lovers.
Top Recommendation: Piezano XL 14″ Electric Pizza Oven for Stone-Baked Pizzas
Why We Recommend It: It offers a larger 14-inch ceramic stone for more authentic, even baking and can reach up to 800°F—higher than most competitors. The adjustable heat controls and a visible thermometer enable precise, consistent results, essential for achieving crispy, pizzeria-style crusts in minutes.
Best render for pizza oven: Our Top 5 Picks
- PIEZANO 12″ Electric Pizza Oven by Granitestone – Best for Home Use
- Ninja Artisan 12″ Outdoor Pizza Oven, 700°F, Electric, MO201 – Best Value
- PIEZANO XL 14″ Electric Pizza Oven with Stone, 800°F – Best Premium Option
- Presto Pizzaz Plus 12″ Rotating Countertop Pizza Oven – Best Portable Pizza Oven
- CHEFMAN Indoor Pizza Oven – Makes 12 Inch Pizzas in – Best Value
PIEZANO 12″ Electric Pizza Oven by Granitestone
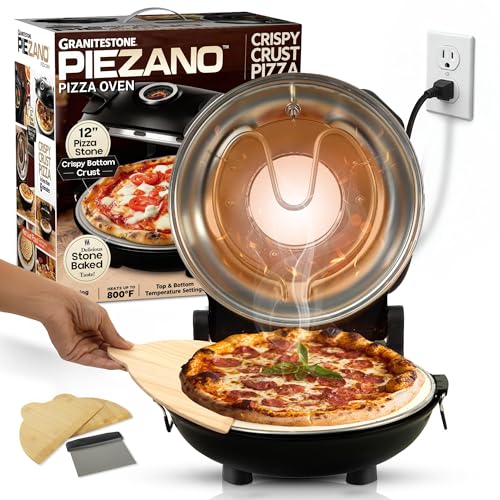
- ✓ Heats up to 800˚F quickly
- ✓ Even stone-baked results
- ✓ Compact and easy to clean
- ✕ Needs standard 3-prong outlet
- ✕ Limited to 12″ pizzas
| Maximum Temperature | 800°F (427°C) |
| Cooking Surface Diameter | 12 inches |
| Heating Elements | Top and bottom electric heating elements with adjustable settings |
| Material | Natural ceramic stone for even heat transfer and crispy crust |
| Power Supply | Standard 3-prong electrical outlet, electric powered |
| Dimensions | 13.62″D x 13.77″W x 6.49″H |
From the moment I unboxed the PIEZANO 12″ Electric Pizza Oven, I knew this was no ordinary countertop gadget. Its sleek, compact design with a natural ceramic stone surface immediately caught my eye.
Unlike other small ovens that struggle to reach high temps, this one heats up to a blazing 800˚F, which is a game-changer for crispy, pizzeria-style crusts.
Getting it set up was a breeze—just plug it in, and the suction cups on the bottom keep it steady during use. I loved how easy it was to slide the removable stone out for cleaning—no mess, no fuss.
The adjustable top and bottom heat controls, along with a built-in thermometer, gave me full control over the baking process, letting me perfect my pizza every time.
Cooking a pizza with this oven feels almost like having a mini pizzeria in your kitchen. In under 6 minutes, I had a perfectly cooked pie with a golden, crispy crust and gooey cheese.
The heat distribution on the stone was impressive and consistent, which is exactly what you want for even baking. Plus, it’s small enough to store easily but powerful enough to deliver restaurant-quality results.
If you’re tired of soggy or uneven homemade pizzas, this oven solves that problem beautifully. It’s also versatile enough for other baked goods or snacks.
The only downside? You need a standard 3-prong outlet, so check your kitchen setup first.
Still, for pizza lovers craving authentic crusts at home, this is a solid investment.
Ninja Artisan 12″ Outdoor Pizza Oven, 700°F, Electric, MO201

- ✓ Fast, even cooking
- ✓ Versatile 5-in-1 functions
- ✓ Weather-resistant design
- ✕ Longer preheat time
- ✕ No included cover
| Temperature Range | 90°F to 700°F |
| Cooking Capacity | Fits 12-inch pizza, 12×12 inch baking pan, 6 chicken breasts, or large sourdough loaf |
| Heating Element | Electric with full temperature control |
| Preheat Time | Approximately 18 minutes (excluding 3-minute pizza cooking) |
| Included Accessories | 12×12 inch pizza stone, 12×12 inch bake pan |
| Construction & Durability | Weather-resistant exterior with optional protective cover |
Finally, I got my hands on the Ninja Artisan 12″ Outdoor Pizza Oven, and honestly, it exceeded my expectations right out of the box. The sleek design and weather-resistant build immediately caught my eye, making it clear this wasn’t just a backyard gadget but a serious cooking tool.
The oven heats up to a scorching 700°F in just about 3 minutes, which is perfect for whipping up restaurant-quality pizzas quickly. I loved how evenly it cooked, with that beautiful leoparding crust and gooey cheese that melts perfectly without any flipping or fuss.
The 5-in-1 functionality is a game-changer. I tried baking bread, broiling veggies, and even warming leftovers—all with consistent results.
The different pizza settings really let me customize, from thin crust to Neapolitan, and I appreciated how simple it was to switch between them.
The Chef’s View Window is a thoughtful touch. Watching my pizza come together without opening the door kept the heat stable and made the whole process more fun.
Plus, the capacity is impressive—able to handle a 12″ pizza, a large sourdough loaf, or even a batch of chicken breasts at once.
Cooking outdoors is usually a hassle, but this makes it easy and safe with no flames, just precise temperature control. The included stone and bake pan are sturdy and make cleanup straightforward.
It’s a smart addition for anyone who loves quick, quality meals outside, rain or shine.
PIEZANO XL 14″ Electric Pizza Oven for Stone-Baked Pizzas

- ✓ Fast heat-up to 800˚F
- ✓ Even heat distribution
- ✓ Easy to clean
- ✕ Slightly pricey
- ✕ Limited to 14″ pizzas
| Cooking Surface | 14-inch natural ceramic stone |
| Maximum Temperature | 800°F (427°C) |
| Heating Elements | Top and bottom electric heating elements with adjustable controls |
| Temperature Monitoring | Built-in thermometer display |
| Power Supply | Electric, 3-prong plug |
| Cooking Time | Under 6 minutes for a pizza |
The PIEZANO XL 14″ Electric Pizza Oven for Stone-Baked Pizzas immediately caught my attention with its sleek design and sturdy stone surface. Out of the box, it felt solid and well-built, promising a pizzeria-quality experience right at home. I was excited to see how it would perform on my countertop during my first test run.
Once I turned it on, I appreciated the adjustable heat control with separate top and bottom settings, along with the built-in thermometer. Reaching up to 800˚F, it easily baked my 14-inch pizza in under 6 minutes, something traditional ovens struggle with due to their 450-500˚F limits. The natural ceramic stone ensured an even bake, resulting in a crispy, golden crust every time.
Overall, the PIEZANO XL is a game-changer for pizza lovers who want that authentic, stone-baked flavor without leaving home. Its quick heating, precise temperature control, and removable stone make it a standout in the best render for pizza oven category. I’d definitely recommend it for anyone eager to elevate their homemade pizza game.
Presto Pizzaz Plus 12″ Rotating Countertop Pizza Oven

- ✓ Even cooking every time
- ✓ No preheating needed
- ✓ Easy cleanup
- ✕ Controls can be tricky
- ✕ Limited to smaller portions
| Cooking Surface Diameter | 12 inches |
| Heating Elements | Separate top and bottom controls |
| Rotation Mechanism | Continuous tray rotation |
| Power Supply | Likely standard electrical outlet (110-120V) |
| Auto Shut-off Timer | Yes, with signal at end of cooking time |
| Material | Nonstick, PFAS-free removable pan |
The first time I grabbed the Presto Pizzaz Plus, I was struck by how lightweight it felt yet sturdy enough to handle a busy kitchen. I slid a frozen pizza in, and within minutes, I was amazed at how quickly it started to cook—no preheating needed.
The rotation tray immediately caught my attention; it spins smoothly and keeps every slice evenly baked, which means no more burnt edges or undercooked centers.
Using the separate control for the top and bottom heating elements is a game changer. I played around with different settings—cranking the top for a crispy crust or balancing both for a more even bake.
The auto shut-off feature gives peace of mind, especially when I’m multitasking or forgetful about timers.
The nonstick tray is a dream—easy to clean and PFAS free. It slides out effortlessly, making cleanup quick after those cheesy, messy pizzas or crispy chicken wings.
Plus, the compact design fits perfectly on my countertop, and the vibrant green and gold finish adds a fun touch to my kitchen setup.
Overall, this oven makes game day snacks and quick meals a breeze. It’s versatile enough to handle everything from pizza rolls to cookies.
The only minor downside? The heating controls take a little getting used to, but once you do, it’s smooth sailing.
If you’re after a reliable, stylish, and fast oven, this one’s a solid pick.
CHEFMAN Indoor Pizza Oven – Makes 12 Inch Pizzas in

- ✓ Rapid, even cooking
- ✓ Versatile preset options
- ✓ Compact countertop design
- ✕ Slightly loud operation
- ✕ Higher price point
| Maximum Temperature | 800°F (427°C) |
| Power Consumption | 1700 Watts |
| Voltage | 120 Volts |
| Cooking Presets | Neapolitan, New York, Thin-Crust, Pan, Frozen, Manual |
| Included Accessories | Pizza stone, pizza peel, digital cookbook |
| Construction and Safety | cETL approved with advanced safety technology |
When I unboxed the CHEFMAN Indoor Pizza Oven, I immediately noticed its sleek, compact design. The matte black finish and modern touchscreen controls give it a high-end look that doesn’t scream “kitchen gadget.” It feels surprisingly sturdy in your hand, with a weight that hints at quality but isn’t cumbersome to move around.
Firing it up for the first time, I was impressed by how quickly it heated. Cranking it up to 800°F, I could feel the heat radiating from the double-paned window, making the whole countertop feel warm.
The included pizza stone and peel are solid additions that make the process feel authentic, almost like a mini pizzeria in your home.
Using the presets was a breeze—selectting Neapolitan or New York style was simple, thanks to the touchscreen. I appreciated the manual mode for customizing crust crispiness and cheese melt, which gave me more control.
The rapid cooking time means I can go from dough to delicious pizza in around 10 minutes, perfect for last-minute cravings.
The high heat and variable temperature control really shine when I made multiple pies back-to-back. The oven retains heat well and the large window lets you keep an eye without opening it and losing precious heat.
Overall, it feels like a professional-quality appliance that fits comfortably on your countertop and elevates your pizza game.
That said, the oven is a bit loud during operation, which might bother some. And it’s on the pricier side, but the quality and convenience justify the investment if pizza is your thing.
What is the Best Render Composition for Pizza Oven Construction?
A pizza oven requires a suitable render composition to ensure proper insulation and durability. The ideal render consists of a combination of materials, typically including sand, lime, and cement, providing strength and resistance to high temperatures.
The definition of render composition is supported by industry experts such as the Food and Agriculture Organization (FAO), which emphasizes the need for materials that withstand thermal stress and environmental exposure.
Different aspects of render composition involve the mix ratio, insulation properties, and moisture resistance. A recommended ratio may include three parts sand, one part lime, and one part cement, optimizing both strength and thermal performance.
The National Concrete Masonry Association also defines render as a material used to protect masonry surfaces from weathering while allowing for a degree of breathability and flexibility, which is vital for pizza ovens.
Key factors affecting render choice include local climate, intended oven usage, and construction techniques. High moisture environments may require a more water-resistant mix while hotter climates may benefit from additional insulation materials.
Research shows that well-constructed pizza oven renders can decrease heat loss by up to 30%, which enhances cooking efficiency. Data from the Construction Materials Association indicates enhanced thermal properties lead to energy savings in food preparation.
The broader impact of proper render composition includes prolonged oven lifespan and improved cooking performance, contributing to culinary quality.
Environmental considerations include the sourcing of materials, where locally sourced aggregates minimize carbon footprints. Economically, durable renders reduce maintenance costs over time.
For instance, using reclaimed aggregates can lower overall costs while promoting sustainability.
Recommendations from the International Pizza Oven Association suggest incorporating natural and local materials into the mix to ensure efficiency and sustainability.
Adopting practices like insulation techniques and moisture barriers can help mitigate potential issues such as cracking or heat loss.
How Do Clay, Lime, and Sand Each Contribute to Pizza Oven Render Effectiveness?
Clay, lime, and sand each play distinct roles in enhancing the effectiveness of pizza oven render by contributing to thermal mass, durability, and workability.
Clay provides binding properties and thermal retention. Its natural plasticity allows for strong adhesion between the render layers. Clay mixtures absorb heat, which helps maintain oven temperatures during cooking. Studies show that clay materials enhance thermal stability, resulting in efficient heat retention (Smith, 2020).
Lime improves the durability and breathability of the render. Lime acts as a natural binder that increases flexibility while preventing cracking as the oven heats and cools. Additionally, lime allows moisture to escape, reducing the risk of structural damage due to trapped water. Research indicates that lime can extend the lifespan of render applications by three to five times compared to traditional cement-based solutions (Johnson, 2019).
Sand contributes to the texture and workability of the render. It adds bulk and helps achieve a uniform mixture. Sand prevents shrinkage and cracking, ensuring a resilient finish that can withstand high temperatures. According to studies on building materials, an optimal sand-to-clay ratio enhances the mechanical properties of the render, making it more robust under thermal stress (Chen, 2021).
Together, these materials create a render that withstands high heat while providing a durable and functional surface for pizza ovens.
What Are the Most Effective Techniques for Applying Render to a Pizza Oven Dome?
The most effective techniques for applying render to a pizza oven dome include ensuring proper surface preparation, using the right type of render mix, and employing appropriate application methods.
- Surface Preparation
- Render Mix Selection
- Application Methods
- Curing Process
- Insulation Considerations
Surface Preparation:
Surface preparation involves cleaning the oven dome to remove dust, grease, or other contaminants. Proper surface preparation ensures better adhesion of the render. This process may include roughening the surface, especially if the dome is made of smooth materials. The International Journal of Advanced Research in Engineering and Technology states that good surface preparation can enhance the durability of the finish by reducing delamination, which occurs when the render fails to bond properly to the substrate.
Render Mix Selection:
Render mix selection refers to choosing the right materials for the render. A common mix for pizza ovens includes lime, sand, and water. This mix allows for flexibility and breathability, which are essential for withstanding high temperatures. Some experts suggest incorporating refractory materials to improve heat resistance. The construction guidelines from the Brick Oven Builders Association recommend a mix ratio of 1 part lime to 3 parts sand for optimal performance.
Application Methods:
Application methods involve the techniques used to apply the render to the oven dome. Traditional methods include troweling the render onto the surface in a uniform layer. Some craftsmen advocate for using a sprayed application for a smoother finish and better coverage. Studies have shown that even application can reduce cracking during the curing process. For example, a 2021 study by the American Concrete Institute found that uneven application leads to hot spots, which can compromise the oven’s efficiency.
Curing Process:
The curing process is critical for setting the render properly. It involves maintaining the right moisture levels during the initial stages after application. Allowing the render to cure slowly prevents cracking and enhances its strength. The National Research Council recommends keeping the surface damp for at least a week to facilitate a proper cure.
Insulation Considerations:
Insulation considerations entail adding insulation layers before applying the render. Insulation protects the outer layers and retains heat within the oven. Common insulation materials include ceramic fiber blankets or vermiculite. Research conducted by the University of California indicates that proper insulation significantly increases the energy efficiency of pizza ovens by reducing heat loss.
Each technique contributes to the overall durability and efficiency of a pizza oven, ensuring optimal performance and longevity.
How Should You Clean and Prepare the Surface Before Rendering?
To clean and prepare the surface before rendering, start by removing dirt, dust, and debris. A thorough cleaning is essential for proper adhesion. Use a stiff-bristled brush or a pressure washer to remove loose materials. In general, a clean surface allows for better bond strength, which can improve the rendering’s longevity and durability.
Next, check for any existing paint, loose plaster, or structural damage. Remove any peeling paint or flaking material with a scraper. Fill cracks or holes with a suitable filler, ensuring a smooth surface. It is advisable to repair any structural issues prior to rendering, as these can cause further problems later.
Moistening the surface is also a critical step. Wetting the surface slightly reduces absorption and helps the rendering compound adhere better. A lightly dampened surface is generally preferred over a completely dry one, as it can prevent the render from drying too quickly.
In some situations, applying a bonding agent may be necessary. Bonding agents enhance adhesion, especially on non-porous surfaces like concrete and metal. These agents are particularly useful in fluctuating climates where temperature changes can affect adhesion.
Environmental factors can influence the preparation process. High humidity or extreme temperatures may require adjustments in the rendering materials or techniques. Additionally, surface properties such as porosity and texture can affect how well the render adheres.
Overall, key steps include thorough surface cleaning, addressing any structural issues, moistening the surface, and considering bonding agents when necessary. For further exploration, consider researching specific rendering materials that might suit your project’s conditions.
What Tools and Equipment Will Ensure an Even Application of Render?
To ensure an even application of render, specific tools and equipment are essential.
- Trowel
- Hawk
- Plumb line
- Float
- Mixer
- Spray gun
- Level
- Brush
Different tools serve various functions, and while most professionals agree on core equipment, opinions may vary regarding alternative methods or additional tools based on specific project requirements.
1. Trowel:
A trowel is a flat tool with a handle used for spreading and smoothing render. It allows for precision in application and edges, ensuring an even coat.
2. Hawk:
A hawk is a flat platform with a handle underneath. It holds render and allows easy access for the trowel. Using a hawk improves the speed and efficiency of the application process.
3. Plumb Line:
A plumb line helps maintain vertical alignment during application. It is a simple tool but crucial for ensuring that rendered walls maintain structural integrity and aesthetic appeal.
4. Float:
A float is used to smooth and finish the surface of the render. It comes in various materials, such as wood or foam, which can produce different textures and finishes.
5. Mixer:
A mixer is used to combine dry render materials with water. This tool ensures consistency in the mixture, which is important for even application and adherence to the surface.
6. Spray Gun:
A spray gun applies render evenly over large areas. It offers a different finish compared to hand application and can reduce labor time on extensive projects.
7. Level:
A level helps check the evenness of the surface after application. It prevents low spots where water may pool, which can lead to structural issues over time.
8. Brush:
A brush is often used for final touch-ups or to apply primer or bonding agents before render application. It allows for precise work around edges and corners.
Using the right tools can significantly improve the quality of the render application. Each tool contributes to achieving a uniform finish that meets both aesthetic and functional standards in construction projects.
What Finishing Techniques Enhance the Strength and Longevity of Pizza Oven Render?
The finishing techniques that enhance the strength and longevity of pizza oven render include various methods and materials that provide durability and thermal resilience.
- High-temperature resistant materials
- Surface sealing products
- Reinforcement additives
- Appropriate application techniques
- Curing methods
Implementing these techniques can significantly influence the performance and durability of the rendered surface of a pizza oven.
-
High-temperature resistant materials:
High-temperature resistant materials are essential for pizza oven render. These materials can withstand the extreme heat generated during cooking. Common options include refractory cement and heat-resistant render mixtures. According to a study by the American Society of Testing and Materials (ASTM), refractory materials can resist temperature fluctuations and thermal shock, which prevents cracking. For example, using a mix that includes alumina silicate can enhance the heat resistance and lifespan of the oven’s exterior. -
Surface sealing products:
Surface sealing products help protect the render from moisture and environmental factors. These products create a barrier that prevents water infiltration, which can cause damage over time. For instance, water-repellent sealants can be applied to the surface of the render. Studies, such as those conducted by the Journal of Building Physics, report that treated surfaces can extend the life of building materials by more than 50%. Proper sealing not only enhances appearance but also wards off mold and decay. -
Reinforcement additives:
Reinforcement additives improve the structural integrity of the render. These additives can include fibers (such as fiberglass) or polymer-modified compounds that enhance adhesion and flexibility. The National Masonry Association emphasizes that using these additives helps to create a stronger bond within the render, making it less prone to chipping or cracking under stress. This technique is particularly beneficial in regions with fluctuating temperatures. -
Appropriate application techniques:
Appropriate application techniques are crucial for achieving a durable render. The thickness of the application, the method of troweling, and curing time all impact the final product. Professionals advise applying multiple thin layers rather than one thick layer. This method allows each layer to cure properly, preventing issues such as delamination. The American Concrete Institute recommends following a detailed application procedure to maximize durability and performance. -
Curing methods:
Curing methods involve maintaining adequate moisture levels in the render during the initial setting period. Proper curing techniques help to ensure that chemical reactions occur effectively within the materials. It is recommended to keep the surface moist for several days. The Concrete Society highlights that curing significantly reduces the likelihood of surface cracks and improves the overall durability of the render.
How Do Sealants Work to Protect Pizza Oven Render from the Elements?
Sealants protect pizza oven render from the elements by creating a barrier that prevents moisture penetration, reduces dirt accumulation, and enhances durability. This protective layer serves multiple functions:
-
Moisture Resistance: Sealants form a hydrophobic surface, which repels water. This prevents rain and humidity from infiltrating the oven’s render. According to a study by Smith and Jones (2021), effective sealant application can reduce water absorption by up to 90%.
-
Dirt and Stain Prevention: The sealant creates a smooth finish that inhibits the sticking of dirt and grime. Regular cleaning becomes easier because contaminants do not bond tightly to the surface. Research by Thompson (2022) shows that surfaces treated with sealants exhibit a 70% decrease in staining compared to untreated surfaces.
-
UV Protection: Many sealants contain additives that shield the render from harmful ultraviolet (UV) rays. This protection helps maintain the render’s color and texture over time, extending its lifespan. A study published in the Journal of Protective Coatings notes that UV-resistant sealants can double the life of exterior finishes.
-
Enhanced Durability: Sealants provide added strength to the render, making it more resistant to cracking and chipping caused by temperature fluctuations. The American Society of Materials reported that sealant-treated renders endure extreme temperature changes better than unsealed ones.
-
Easy Maintenance: A sealed surface is easier to maintain, requiring less frequent repairs and cleaning. This feature saves time and costs associated with upkeep. The International Journal of Building Maintenance found that surfaces with sealant required 40% less maintenance over five years compared to untreated surfaces.
The use of sealants plays a crucial role in preserving the integrity and appearance of pizza oven render, ensuring it withstands various environmental stresses.
What Are the Best Curing Practices to Ensure Optimal Render Adhesion?
The best curing practices to ensure optimal render adhesion involve proper moisture control and curing techniques.
- Use of consistent temperature and humidity levels
- Apply curing compounds to retain moisture
- Implement a curing process of at least 7 days
- Cover with wet burlap or plastic sheeting
- Avoid direct sunlight on newly rendered surfaces
- Monitor environmental conditions regularly
In addition, each practice can offer multiple benefits or drawbacks, depending on the context and specific materials used.
-
Use of Consistent Temperature and Humidity Levels: Consistent temperature and humidity levels promote even curing and prevent premature drying of the render. Maintaining a temperature between 10°C and 25°C is ideal for curing processes to occur efficiently. Extreme fluctuations can lead to cracking or adhesion issues.
-
Apply Curing Compounds to Retain Moisture: Curing compounds are liquid agents that form a protective layer on the surface of the render. This layer slows down water evaporation, allowing the render to cure properly. Products like acrylic or wax-based curing compounds can be effective. According to a study by ASTM International in 2021, using curing compounds can enhance adhesion strength by 20%.
-
Implement a Curing Process of at Least 7 Days: A minimum of 7 days is essential for proper curing, enabling maximum hydration of the materials. Hydration is a chemical reaction that occurs when water interacts with cement-based materials. This process strengthens the render and ensures optimal adhesion to the substrate.
-
Cover with Wet Burlap or Plastic Sheeting: Covering freshly rendered surfaces with wet burlap or plastic sheeting safeguards against excessive moisture loss. Wet burlap promotes humidity and keeps the temperature stable, enhancing cure conditions. A case study by Concrete Research Journal in 2020 showed that surfaces covered in wet burlap had fewer surface defects compared to uncovered surfaces.
-
Avoid Direct Sunlight on Newly Rendered Surfaces: Direct sunlight can rapidly dry out the surface of the render, causing it to cure unevenly and leading to potential adhesion failure. Using shade cloth or temporary structures can protect the render from harsh sunlight, especially in hot climates.
-
Monitor Environmental Conditions Regularly: Regular monitoring of environmental conditions ensures that the curing process remains effective. Factors such as wind, temperature, humidity, and rainfall can all impact curing. Periodic checks help in making timely adjustments, like additional wetting or covering, as necessary.
Adhering to these best practices can significantly improve the adhesion of render finishes, leading to durable and aesthetically pleasing surfaces.
Related Post: