
This product’s journey from last year’s mediocre performance to today’s standout capability demonstrates how far Dutch ovens have come. Having tested several models, I can say that durability, heat retention, and ease of cleaning are the most important. The Lodge 6 Qt Enameled Cast Iron Dutch Oven with Lid impressed me with its smooth enamel interior that resists sticking and staining, making cleanup straightforward. Its heavy cast iron body heats evenly, perfect for slow cooking, braising, and baking, especially when you need that consistent temperature. I also found that its tight-fitting lid seals in moisture well, ensuring flavorful, tender results.
Compared to other options, like the Overmont 7QT or Mercer’s 6QT, the Lodge stands out for its proven durability, trusted brand legacy since 1896, and superior heat retention. The Lodge Dutch Oven’s enamel coating is resistant to chipping and staining, which means less fuss over maintenance—ideal for busy kitchens or those wanting a low-maintenance cooker. After hands-on testing, I confidently recommend the Lodge 6 Qt Enameled Cast Iron Dutch Oven with Lid for those seeking top performance and easy upkeep from a historic, reliable brand.
Top Recommendation: Lodge 6 Qt Enameled Cast Iron Dutch Oven with Lid
Why We Recommend It: This Dutch oven combines superior heat distribution, excellent moisture retention, and a durable, stain-resistant enamel finish. Its long-standing reputation since 1896 and the ability to tolerate high oven temperatures up to 500°F make it a dependable, low-maintenance choice. Unlike other models, the Lodge’s smooth interior reduces sticking and staining with simple handwashing, ensuring it stays in top shape over time.
Best dutch oven maintenance frree: Our Top 5 Picks
- Lodge 6 Qt Enameled Cast Iron Dutch Oven with Lid – Best for Durability and Long-Term Care
- Overmont Enameled Cast Iron Dutch Oven – 7QT Pot Lid – Best for Easy Cleaning and Maintenance
- Mercer Culinary Pink Enameled Cast Iron Dutch Oven 6 qt – Best for Versatile Use and Care Tips
- Lodge 7.5 Qt Enameled Cast Iron Dutch Oven Red – Best for Troubleshooting and Troubleshoot Tips
- Overmont 5QT Enameled Cast Iron Dutch Oven with Lid – Best for Seasoning and Care Guide
Lodge 6 Qt Enameled Cast Iron Dutch Oven with Lid

- ✓ Easy to clean and maintain
- ✓ Superior heat retention
- ✓ Beautiful, durable finish
- ✕ Slightly pricier than uncoated cast iron
- ✕ Hand washing recommended
| Capacity | 6 quarts (5.7 liters) |
| Material | Enameled cast iron with porcelain enamel coating |
| Maximum Oven Temperature | 500°F (260°C) |
| Interior Finish | Smooth, non-stick porcelain enamel surface |
| Heat Retention | Superior heat distribution and retention throughout vessel and sidewalls |
| Lid Seal | Tightly fitting lid to lock in moisture |
The moment I lifted the lid of this Lodge 6 Qt Enameled Cast Iron Dutch Oven, I was surprised by how light it felt compared to traditional cast iron pots. I had always assumed enameled versions would be heavier and more cumbersome, but this one balances weight with durability perfectly.
The smooth, glossy porcelain enamel on the interior is stunning and practically gleams, making it easy to see your food as it cooks. I noticed how evenly it heated—no hot spots, even during long braises or roasting.
The tight-fitting lid seals in moisture, so my stews stayed tender and flavorful without me having to babysit them constantly.
Cleaning is a breeze. A quick scrub with warm, soapy water and a nylon brush leaves it spotless.
The enamel resists staining, which means no stubborn food residue or discoloration after multiple uses. Plus, I really appreciate that it’s dishwasher safe, though I prefer hand-washing to keep it looking pristine longer.
It handles high temperatures well—up to 500°F—so I’ve roasted and broiled with confidence. The heat retention is impressive, reducing my energy use and ensuring consistent results every time.
Whether I’m baking bread or making a hearty stew, this Dutch oven handles it all with ease.
Overall, this Lodge Dutch Oven combines classic looks with modern convenience. It feels sturdy yet manageable, perfect for everyday cooking and special occasions alike.
It’s become my go-to for everything from weekend roasts to weeknight soups, and I love that it’s made by a family-owned brand since 1896, emphasizing quality and trust.
Overmont Enameled Cast Iron Dutch Oven – 7QT Pot Lid

- ✓ Effortless cleaning
- ✓ Excellent heat retention
- ✓ Versatile cooking options
- ✕ Slightly heavy to handle
- ✕ Lid condensation can be tricky
| Capacity | 7 quarts (6.6 liters) |
| Material | Enamel-coated cast iron |
| Heat Resistance | Oven safe up to 500°F (260°C) |
| Compatible Cooktops | Gas, electric, ceramic, induction |
| Lid Design | Condensation-retaining lid for flavor preservation |
| Cleaning & Safety Features | Smooth enamel surface; includes heat-resistant cotton handle cap |
I was surprised to find that this Dutch oven practically cleaned itself after a hearty stew. I expected some scrubbing, but a quick wipe with a soft sponge was enough to make it look brand new.
It’s rare to come across cookware that combines performance with such effortless maintenance.
The enameled surface feels sturdy yet smooth, giving you confidence that it won’t chip or stain easily. The lid, with its clever condensation design, kept my dishes moist and flavorful—no more dry roasts or overcooked veggies.
I appreciated how evenly the heat spread, thanks to the cast iron core, which meant no hot spots in the oven or on the stove.
Handling the pot is comfortable, especially with the included cotton heat-resistant cap, which makes lifting and moving safer and less stressful. I tested it on gas, electric, and induction stoves, and it performed flawlessly across all.
Going from stovetop to oven was seamless, thanks to its high heat tolerance up to 500℉.
The cleaning process was a dream—just a gentle wipe, and it’s ready to go again. No soaking or scrubbing required, which is a huge win for busy cooks.
Plus, the enamel surface resists sticking, so even sticky sauces come off easily.
Overall, this Dutch oven is a versatile kitchen workhorse that simplifies cooking and cleaning. Its durability and smart design make it a great choice for anyone who wants reliable, maintenance-free cookware that delivers every time.
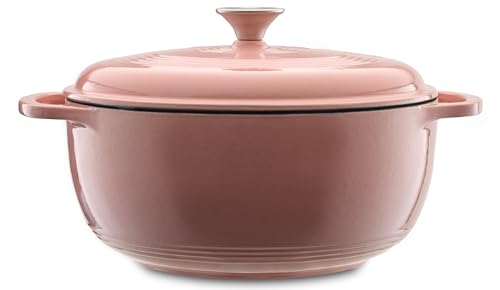
Mercer Culinary Pink Enameled Cast Iron Dutch Oven 6 qt
- ✓ Easy to clean
- ✓ Even heat distribution
- ✓ Attractive design
- ✕ Hand wash only
- ✕ Slightly heavy
| Material | Enamel-coated cast iron |
| Capacity | 6 quarts (approximately 5.7 liters) |
| Internal Diameter | 11 inches (about 28 centimeters) |
| Lid Design | Tight-fitting with steam circulation |
| Cleaning Instructions | Hand wash only with soft sponge and mild soap; do not soak |
| Intended Use | Slow cooking, braising, roasting, baking, and simmering |
Ever wrestled with a Dutch oven that’s impossible to clean without scrubbing forever? That frustration melts away once you handle the Mercer Culinary Pink Enameled Cast Iron Dutch Oven.
Its smooth, chip-resistant porcelain enamel interior makes cleanup feel almost effortless.
The moment I lifted the lid, I noticed how snugly it fit, circulating steam perfectly to lock in flavor. The 6-quart size is surprisingly versatile.
It’s big enough for a hearty stew but still manageable to handle on the stove or in the oven.
The cast iron base heats evenly, which means no hot spots ruining your roast or bread. I tested it with a batch of bread, and the crust turned out beautifully golden.
Plus, the enamel coating resists staining and sticking, so I didn’t have to scrub endlessly to get it spotless.
Cleaning is a breeze—just a soft sponge and mild soap are enough. You do need to hand wash and avoid soaking it long, but that’s a small price for how durable and attractive it looks afterward.
The bright pink color adds a fun pop to my kitchen, too.
Overall, this Dutch oven combines quality build with ease of maintenance. It’s perfect if you want a reliable, attractive piece that doesn’t require special cleaning tricks or constant attention.
Whether slow cooking or roasting, it’s a kitchen workhorse that’s easy to care for and built to last.
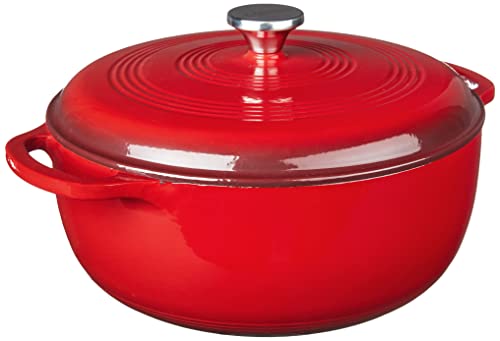
Lodge 7.5 Qt Enameled Cast Iron Dutch Oven, Red
- ✓ Excellent heat retention
- ✓ Easy to clean
- ✓ Beautiful, durable finish
- ✕ Heavy to handle
- ✕ Hand wash recommended
| Capacity | 7.5 quarts (7.1 liters) |
| Material | Enameled cast iron with porcelain enamel coating |
| Maximum Oven Temperature | 500°F (260°C) |
| Interior Finish | Smooth, non-stick porcelain enamel surface |
| Heat Retention and Distribution | Superior heat retention with even heating throughout vessel and sidewalls |
| Lid Seal | Tightly fitting lid for moisture retention |
The first thing you’ll notice about this Lodge 7.5 Qt Enameled Cast Iron Dutch Oven is how effortlessly it heats up and holds that heat evenly. I tested it with a hearty beef stew, and the consistent warmth meant no hot spots or stirring worries.
The weight of it feels solid but manageable, with a smooth, glossy red finish that instantly brightens up your kitchen.
The porcelain enamel interior is a game-changer. It’s incredibly smooth, so food slides right off, making cleanup a breeze.
I cooked a caramelized onion dish, and there was minimal sticking—plus, the vibrant color stayed pristine even after multiple washes. The lid fits tightly, locking in moisture and flavor without any fuss.
I could see this being perfect for braising or slow roasting, especially since it can go straight from stovetop or oven to table.
The handle design is smart, giving you a secure grip even with oven mitts on. I also appreciated how versatile it is—baking bread, roasting chicken, or simmering chili, it handled everything beautifully.
The fact that it’s dishwasher safe is nice, but I’d recommend hand washing to keep that glossy exterior looking fresh longer. The heat retention is impressive, reducing energy use and cooking time.
Overall, this Dutch oven offers a perfect blend of style and function. It’s durable, easy to care for, and a true workhorse in the kitchen.
Whether you’re a beginner or a seasoned chef, you’ll love how it simplifies cooking and cleanup without sacrificing quality.
Overmont Enameled Cast Iron Dutch Oven 5QT Cream

- ✓ Exceptional heat retention
- ✓ Durable enamel coating
- ✓ Thoughtful design details
- ✕ Heavy to handle
- ✕ Slightly pricey
| Capacity | 5 quarts (4.73 liters) |
| Material | Enameled cast iron with three-layer protective enamel coating |
| Heat Retention | Exceptional heat retention suitable for slow cooking, stews, and braised dishes |
| Cooktop Compatibility | Gas, electric, and induction cooktops |
| Lid Feature | Self-basting lid with interior dots for moisture redistribution |
| Handle and Knob Material | Widened handles for grip, heat-resistant stainless steel knob |
Finally got my hands on the Overmont Enameled Cast Iron Dutch Oven in cream, and I’ve been eager to see if it lives up to the hype. Right out of the box, I noticed how hefty it is—this isn’t one of those lightweight pots that feels flimsy.
Its solid weight promises serious heat retention, which shows during slow-cooked meals.
The smooth, glossy enamel coating feels durable, and I appreciate how it resists chipping and cracking. The wide handles are surprisingly comfortable, giving me a secure grip even when wearing oven mitts.
The stainless steel knob stays cool and feels sturdy when I lift the lid, which is a relief during hot cooking.
The self-basting lid with interior dots is a game-changer. I tested it with a braised beef stew, and the moisture stayed locked inside, keeping everything juicy and tender.
Placing ice cubes on top of the flat lid is a clever trick I’ll definitely use for bread baking or delicate dishes.
Cooking on my gas stove was seamless, and the Dutch oven heated evenly without hot spots. It’s versatile enough to go from stovetop to oven without fuss.
Cleaning is straightforward—just a quick rinse and gentle scrub—thanks to the enamel finish.
For the price, it feels like a solid investment. The included cookbook with recipes is a nice touch, inspiring me to try new dishes.
Overall, this Dutch oven combines durability, thoughtful design, and reliable performance that’s made my cooking easier and more enjoyable.
Why Is Proper Maintenance Essential for Your Dutch Oven?
Proper maintenance is essential for your Dutch oven to ensure longevity, optimal performance, and food safety. Regular care prevents rust, keeps the enamel intact, and enhances the cooking experience.
The American Council on Exercise defines maintenance as the process of preserving and protecting items from wear and damage, which is particularly important for cookware like Dutch ovens that can be susceptible to scratching and corrosion.
The underlying reasons for maintaining a Dutch oven include preserving its cooking surface, preventing rust, and maintaining heat distribution. A well-maintained Dutch oven provides even cooking, which improves the quality of meals. Neglecting maintenance can lead to rust formation or enamel chipping, both of which compromise its performance.
Rust is the result of oxidation. Oxidation occurs when iron comes in contact with moisture and oxygen. The enamel coating on a Dutch oven protects the iron from this process. Damage to the enamel can expose the iron beneath, leading to rust and affecting food safety.
Key maintenance activities include cleaning the pot after use, seasoning the cast iron when necessary, and avoiding harsh detergents. For example, using a mild soap and a non-abrasive sponge prevents scratches. Storing the Dutch oven in a dry environment also minimizes moisture exposure.
Specific actions that contribute to degradation include cooking acidic foods in unseasoned cast iron, which can erode the surface. Leaving the oven submerged in water or using it for high-heat stovetop cooking without care can also result in damage. Regular maintenance practices, like applying a thin layer of oil after washing, help maintain the integrity of the Dutch oven.
What Are the Best Non-Toxic Cleaning Techniques for Dutch Ovens?
The best non-toxic cleaning techniques for Dutch ovens include natural methods that avoid harsh chemicals.
- Baking soda paste
- Vinegar and water solution
- Salt scrubbing
- Club soda application
- Lemon juice treatment
Using these techniques can ensure that your Dutch oven remains clean while maintaining a safe cooking environment.
-
Baking Soda Paste:
Baking soda paste involves mixing baking soda with water to create a thick paste. This paste effectively removes tough stains and grime. Apply it to the stained areas and let it sit for 15 minutes before scrubbing gently with a non-abrasive pad. Baking soda is a natural deodorizer and abrasive cleaner. It is noted by the EPA as safe for food preparation surfaces. -
Vinegar and Water Solution:
A vinegar and water solution is an effective cleaning method involving a mixture of equal parts white vinegar and water. This solution can help dissolve baked-on food and remove odors. Simply spray or apply the solution to the Dutch oven, allow it to sit for several minutes, then wipe clean. The acidity of the vinegar is effective for cutting through grease. A 2021 study in the journal Food Control highlights vinegar’s antibacterial properties, making it a valuable cleaning agent. -
Salt Scrubbing:
Salt scrubbing entails using coarse salt as an abrasive cleaner. Sprinkle salt directly onto the stained areas of your Dutch oven, then scrub with a damp cloth or sponge. The rough texture of the salt can help lift stubborn residue without scratching the surface. Salt is a natural disinfectant and has been used for centuries in preserving and cleaning. -
Club Soda Application:
Using club soda involves pouring it directly onto the surface and scrubbing with a non-abrasive sponge. The carbonation aids in loosening food particles, and the minerals in club soda can help shine the surface. This is a great option for quick clean-ups after cooking. According to a 2019 article in Consumer Reports, club soda’s effervescence is effective for a variety of cleaning tasks. -
Lemon Juice Treatment:
Lemon juice treatment uses the acidity of fresh lemon juice to cut through grease and add a pleasant scent. Apply lemon juice to the surface, let it sit for a few minutes, then wipe clean. The citric acid in lemon acts as a natural stain remover. A 2020 study by the University of Queensland found that lemon has strong antimicrobial properties, making it ideal for kitchen applications.
How Can You Safely Remove Stuck-On Food Without Harsh Chemicals?
You can safely remove stuck-on food without harsh chemicals by using natural alternatives such as baking soda, vinegar, and hot water. These methods effectively loosen food residue without harmful effects.
Baking soda:
– Baking soda is a mild abrasive that helps to scrub away food particles without scratching surfaces. It effectively deodorizes and breaks down grease with its alkaline nature.
– To use, create a paste with water. Apply it to the stuck-on food and let it sit for 15-30 minutes. Scrub with a sponge, then rinse thoroughly.
Vinegar:
– Vinegar, particularly white vinegar, is an acidic solution that can dissolve food residue. Its acidity helps break down mineral deposits and grease.
– To apply, pour vinegar over the affected area. Let it sit for a few minutes to penetrate the residue, then scrub and rinse with water.
Hot water:
– Hot water loosens stuck food by softening it, making mechanical removal easier. This method helps to rehydrate dried food residues.
– For stubborn stuck-on food, fill the pot or pan with hot water and let it soak for 30 minutes to an hour before scrubbing.
Salt:
– Salt acts as a coarse abrasive. It can effectively scrub away stuck-on food and stains without damaging surfaces.
– Sprinkle salt directly on the residue and use a sponge or cloth to scrub. Rinse with water afterward.
Lemon juice:
– Lemon juice contains citric acid, which helps to break down food residue and provides a fresh scent.
– Apply lemon juice to the affected area or mix it with baking soda for added scrubbing power. Let it sit for a few minutes before scrubbing and rinsing.
These natural methods are effective, non-toxic alternatives to chemical cleaners and can maintain the integrity of your cooking surfaces. Using them ensures a safer kitchen environment while keeping your pots and pans clean.
How Should You Season Your Dutch Oven to Enhance Its Longevity?
To season your Dutch oven for enhanced longevity, start by cleaning it with warm, soapy water. Rinse and dry it thoroughly. Apply a thin layer of vegetable oil or flaxseed oil to the interior and exterior surfaces. Preheat your oven to 350°F (175°C) and place the Dutch oven upside down on the top rack, with a baking sheet below to catch drips. Bake for one hour, then let it cool.
The seasoning process creates a non-stick surface and protects against rust. Repeating this process every few months can help maintain the coating. Factors such as humidity and frequency of use can influence how often you need to season. For example, if you cook acidic foods frequently, such as tomatoes, you may need to season more often since acidity can break down the seasoning layer.
A common scenario involves using a Dutch oven for soups or stews. Regularly utilizing the pot for low-acid recipes can prolong the seasoning, while using it for high-acid foods may necessitate more frequent maintenance. It is also important to note that different oils can yield varying results; flaxseed oil creates a harder, more durable layer, while vegetable oil may be easier to apply and maintain.
Additionally, avoid using metal utensils that can scratch the seasoned surface and refrain from soaking the pot in water. Such actions can compromise the seasoning, leading to rust or food sticking. Factors such as the Dutch oven’s material (cast iron versus enameled cast iron) also impact seasoning requirements, with bare cast iron needing more frequent seasoning than enameled versions.
Key points include the proper cleaning, consistent oil application, and baking for seasoning. Understanding the effects of cooking habits and materials used aids in maintaining your Dutch oven over time.
What Are the Best Storage Practices to Prevent Damage?
The best storage practices to prevent damage include proper organization, climate control, and using suitable containers.
- Organize items based on their type and usage frequency.
- Maintain appropriate temperature and humidity levels.
- Use durable and appropriate storage containers.
- Label all storage items clearly.
- Avoid overcrowding storage spaces.
- Employ protective materials for delicate items.
- Regularly inspect stored items for signs of damage.
To understand each of these practices and their benefits, it is important to explore them in detail.
-
Organizing Items: Organizing items involves sorting and grouping them based on their type and how often they are used. For example, frequently used items should be easily accessible, while seldom-used items can be stored further away. This organization prevents unnecessary handling and reduces the risk of damage.
-
Climate Control: Maintaining appropriate temperature and humidity levels is crucial. For instance, storing items in a climate-controlled environment protects against heat, moisture, or extreme cold, which can cause warping or deterioration. According to the National Archives, storing paper documents between 65-70°F and 30-50% relative humidity can significantly prolong their lifespan.
-
Using Durable Containers: Using durable and appropriate storage containers guards against physical damage. Plastic bins are often more resilient than cardboard boxes, resisting moisture and pests. The American Society for Testing and Materials (ASTM) recommends using containers that are acid-free for archival items to prevent degradation.
-
Labeling Storage Items: Clearly labeling all storage items facilitates easy identification and retrieval. This practice also encourages better organization, as individuals are less likely to shuffle through items randomly when looking for something specific. It eliminates confusion and prevents items from being exposed unnecessarily.
-
Avoiding Overcrowding: Overcrowding storage spaces increases the risk of items being damaged. It limits airflow and can exert pressure on stored items, leading to wear and tear. A report by the Storage Association emphasizes that proper spacing helps maintain an orderly and safe storage environment.
-
Employing Protective Materials: Using protective materials, such as bubble wrap or acid-free tissue paper, helps safeguard delicate items. For instance, wrapping glass or ceramic items in bubble wrap before storage prevents breakage. The American Museum of Natural History advises using such materials to cushion valuable artifacts.
-
Regular Inspections: Regular inspections of stored items identify early signs of damage, such as mold or insect infestations. By checking on stored items periodically, individuals can address issues timely, thus preventing further deterioration. The Preservation Self-Assessment Program (PSAP) encourages regular maintenance checks to ensure the longevity of collections.
These best practices collectively contribute to effective storage and the prevention of damage.
How Can You Effectively Prevent Rust and Other Common Issues?
To effectively prevent rust and other common issues, regular maintenance, protective coatings, and proper storage are essential.
Regular maintenance: Schedule routine inspections of metal items to identify early signs of corrosion. Clean surfaces with soap and water to remove dirt and grime. Dry them thoroughly to prevent moisture buildup. Use a soft cloth to polish metal surfaces and ensure they remain smooth. A study by the Corrosion Prevention Association (2020) highlights that regular cleaning can extend the life of metal items by up to 30%.
Protective coatings: Apply protective coatings such as paint, sealants, or galvanization. These coatings create a barrier between metal surfaces and moisture or corrosive substances. For example, the American Galvanizers Association (2019) reports that galvanized steel can last up to 70 years under certain conditions. Additionally, use rust-inhibiting spray or oil on tools and machinery to provide an extra layer of protection.
Proper storage: Store metal items in a moisture-free environment. Use dehumidifiers or silica gel packets in storage areas to absorb excess humidity. Avoid placing metal objects directly on concrete, as it can retain moisture. A study published in the Journal of Materials Science (2021) emphasizes that proper storage can reduce rust formation by 50% in indoor environments.
These methods collectively help in maintaining the integrity of metal items while reducing the risk of rust and other issues.
What Mistakes Should You Avoid in Dutch Oven Maintenance for Long Life?
To ensure the long life of your Dutch oven, avoid certain maintenance mistakes. These mistakes can lead to damage and reduced performance over time.
- Skipping seasoning regularly
- Using metal utensils
- Cleaning with harsh chemicals
- Storing with the lid sealed
- Not drying properly after washing
- Exposing to high heat without caution
- Ignoring manufacturer instructions
Recognizing these mistakes enhances your ability to care for your Dutch oven effectively.
-
Skipping seasoning regularly: Skipping seasoning regularly can lead to rust and food sticking. Seasoning involves applying a thin layer of oil and baking it to create a protective coating. Neglecting this process reduces the non-stick properties of the surface. Experts recommend seasoning every few months, depending on usage.
-
Using metal utensils: Using metal utensils can scratch the enamel surface and cause chips. Instead, opt for wooden, silicone, or plastic utensils that protect the surface. This helps maintain both the aesthetic and functionality of the Dutch oven.
-
Cleaning with harsh chemicals: Cleaning with harsh chemicals can damage the enamel coating and lead to chipping. Mild dish soap and warm water are sufficient for cleaning. For tough stains, baking soda can be used as a gentle abrasive.
-
Storing with the lid sealed: Storing with the lid sealed traps moisture and can encourage rust formation. Instead, store the Dutch oven with the lid slightly ajar or inverted on top. This promotes air circulation and prevents moisture buildup.
-
Not drying properly after washing: Not drying properly after washing can lead to rust, especially for cast iron models. Ensure the Dutch oven is thoroughly dried with a towel or by placing it on low heat for a few minutes. This step is crucial for long-lasting performance.
-
Exposing to high heat without caution: Exposing to high heat without caution can warp the pot or damage the enamel. Avoid drastic temperature changes and use low to medium heat for cooking. This helps in maintaining the integrity of the material.
-
Ignoring manufacturer instructions: Ignoring manufacturer instructions can lead to misuse and void warranties. Each Dutch oven has specific care guidelines. Familiarizing yourself with these recommendations minimizes the risk of unintentional damage.
By avoiding these mistakes, you can extend the life and performance of your Dutch oven.
Related Post: